background image

8. Maintenance

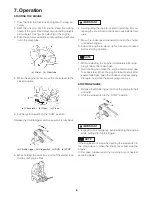
ADJUSTING CARBURETOR

The carburetor has been adjusted at the factory. 

Should

your unit need readjustment due to the 

changes in alti-

tude or operating conditions, please let your skillful dealer

make the adjustment. A wrong adjustment may cause

damage to your unit.

(1) Idle adjusting screw

(2) Up

(3) Down

(4) Fuel adjusting screw

     (Opening 1 ± 1/4)

(5) Decrease

(6) Increase

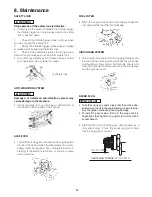
GEAR CASE

•  Apply multi-purpose grease at every 50 hours of use.

1.   Use a grease pump.

2.   Feed grease until it comes out of the base of blades.

(a) Grease nipple: A type

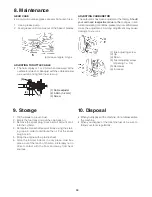
ADJUSTING THROTTLE CABLE

• The normal play is 1 or 2 mm when measured at the

carburetor side end. Readjust with the cable adjuster

as required and tighten the screw up.

(1)

(3)

(2)

(1) Cable adjuster

(2) 0.04in (1~2mm)

(3) Screw

12

9. Storage

1. Oil the blade to prevent rust.

2. Empty the fuel tank and put the cap back on.

3. Remove the spark plug, pour a small amount of oil

into the cylinder.

4. Rotate the crankshaft several times using the start-

ing rope in order to distribute the oil. Put the spark

plug back in.

5. Wrap the engine with a plastic sheet.

6. Store the trimmer indoors in a dry place, dust free

place, out of the reach of children, preferably not in

direct contact with the floor and away from heat

sources.

10. Disposal

• When you dispose of the machine, do not disassemble

the machine.

• When you dispose of the machine fuel oil, be sure to

follow your local regulations.

Summary of Contents for Sherwood H60

Page 1: ...Hedge Trimmer Instructions Manual Read instructions manual before use Equipmart Ltd Kiam House Birchill Road Knowsley Ind Park North Merseyside L33 7TD United Kingdom T 0044 151 548 5500 F 0044 151 5...

Page 2: ...icates instructions which must be followed in order to prevent accidents that could lead to serious bodily injury or death This mark indicates instructions which must be followed to prevent any mechan...

Page 3: ...action type Engine Displacement 22 5 cm3 Carburetor Diaphragm type Ignition system I C controlled ywheel magneto Fuel Mixture Petrol 40 Oil 1 Fuel tank capacity 0 6 L Starter Recoil starter Clutch Cen...

Page 4: ...ar protection 3 Handling this machine improperly could result in accidents causing se rious injury or death Read this manual carefully and practice using the hedge trimmer until you are fully acquaint...

Page 5: ...t of your body see a doc tor before getting worse 2 To avoid noise complaints in gen eral operate product between 8 a m and 5 p m on weekdays and 9 a m to 5 p m on weekends 1 THIS MACHINE CAN CAUSE SE...

Page 6: ...urther apart than the width of your shoulders so that your weight is distributed evenly across both legs and always be sure to maintain a steady even posture while working 2 Maintain the speed of the...

Page 7: ...here are no sparks or open ames any where nearby before refueling 4 Wipe spilled fuel completely us ing a dry rag if any fuel spillage occurs during refueling 5 After refueling screw the fuel cap back...

Page 8: ...r for the sake of your health and the environment Poor quality petrol or oils may damage sealing rings fuel lines or fuel tank of the engine Measure out the quantities of petrol and oil to be mixed Pu...

Page 9: ...fail ures 7 Move the choke lever downward to open the choke and restart engine 8 Allow the engine to warm up for a several minutes before starting opertion NOTE 1 When restarting the engine immediatel...

Page 10: ...is equipped with a blade brake that maintains the blades at a standstill HEDGE TRIMMING TECHNIQUES Trim sides of a hedge rst and then the top Vertical cut Horizontal cut In order to get the best cutti...

Page 11: ...Con tact with moving cutting head or hot muffler may result in a personal injury BLADE Clean any resin and plant reside from the blade be fore and after using the machine Check the cutting edges and r...

Page 12: ...lock 11 Safety lock is the switch to disable the throttle trigger the throttle trigger can only be used when the safety lock is pushed down Damaged or deformed anti vibration system may cause damage...

Page 13: ...easured at the carburetor side end Readjust with the cable adjuster as required and tighten the screw up 1 3 2 1 Cable adjuster 2 0 04in 1 2mm 3 Screw 12 9 Storage 1 Oil the blade to prevent rust 2 Em...

Page 14: ...etighten Case 2 Engine starts but does not keep running hard re starting R P K C E H C OBABLE CAUSES ACTION fuel tank incorrect fuel or staled fuel drain it and use correct fuel carburetor adjustment...

Page 15: ...luded when returning to Kiam Power Products Kiam House Birchill Road Knowsley Ind Park North Merseyside L33 7TD United Kingdom Kiam Power Products Return Sheet Name ___________________________________...

Reviews: