background image

SUPERVISION GUIDELINES

Even playgrounds that are designed, installed, and maintained in accordance with safety guidelines
and standards can still present hazards to children in the absence of adequate supervision.
The goal of playground safety is to remove hazards and minimize injury while playing, but these risks
cannot be eliminated entirely. Because all playgrounds present some challenge, and children can be
expected to use equipment in unintended ways, injuries can occur.
It is the responsibility of a playground supervisor to understand the basics of playground safety.
Supervisors should be aware that the playground equipment is designed based on the most current
CPSC guidelines. For more information on playground guidelines, go the Consumer Product Safety
Commission’s website at www.cpsc.gov.

The following are some general guidelines to follow:

Direct children to age-appropriate activities, keeping in mind that not all playground equipment is
appropriate for all children who may use the playground. The range of users encompassed by this
CPSC specification is the 5th percentile 2-year-old through the 95th percentile 12-year-old. It is
important to recognize that preschool-age children require more attentive supervision on
playground equipment than older children.

Children should not wear loose clothing, hoods, drawstrings, or jewelry while on the playground
equipment. These items could pose a strangulation/entanglement hazard.

Make sure children are wearing proper footwear.

Check for and remove unsafe modifications that are not part of the design, especially ropes tied to
equipment, before letting children play.

Look out for dangerous horseplay, such as children throwing protective surface materials, jumping
from heights, etc.

Watch for and stop children from wandering away from the play area.

Check for properly maintained protective surfacing.

Prohibit use of playground while wet. Wet equipment will not provide the necessary traction and
gripping capability. Slips or falls may occur.

Observe play patterns to note possible hazardous play and overcrowding on playground equipment.

Loose-filled Surfacing:

Surfacing should be checked regularly to ensure it has not displaced significantly, particularly in areas
of the playground most subject to displacement (heavy traffic areas such as stair entry and slide exits).
Displaced loose-fill surfacing should be raked back into proper place so that a constant depth is
maintained throughout the playground area.

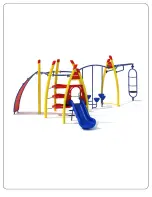
Summary of Contents for NX-1402

Page 1: ...mer Name Sales Order Unit NX 1402 Distributor Name Distributor Phone COMMERCIAL PLAYGROUND SAFETY GUIDELINES MAINTENANCE PROCEDURES LIMITED WARRANTY INFORMATION GENERAL USE INSTALLATION GUIDE CUSTOMER...

Page 2: ...ce schedule safety guidelines warranty information installation instructions and the site plan Please read this information carefully and apply these guidelines to your specific situation We also reco...

Page 3: ...The critical height for surfacing is to be rated as specified by the CPSC ASTM standard F 1487 and Canadian Standard CAN CSA Z 614 Information on surfacing options and corresponding required depth thi...

Page 4: ...e panels slide hoods etc need to be stored flat to prevent warping Look below ground Always arrange for your state s 811 underground utility services to locate any buried utilities which could include...

Page 5: ...ing base If soil conditions are loose or unstable a larger diameter footing may be required After marking your footing locations playground perimeter and use zone perimeter locate and set center deck...

Page 6: ...ating the playground is installed correctly and meets the guidelines set forth by the Consumer Product Safety Commission Tools required With the tamper resistant hardware the manufacturer provides a T...

Page 7: ...anty on rails rungs rigid climbers loops and decks against structural failure due to deterioration corrosion or workmanship Fifteen Year 15 Limited Warranty on all HDPE and rotational molded plastic c...

Page 8: ...ear old It is important to recognize that preschool age children require more attentive supervision on playground equipment than older children Children should not wear loose clothing hoods drawstring...

Page 9: ...inches are loose the base layer may be frozen and the impact attenuation of the surfacing may be significantly reduced Contact your playground installer for more information about loose fill safety s...

Page 10: ...ent weather Maintaining your playground equipment as well as its surrounding area is essential to minimizing the risk of injury to users as well as maximizing your playground s useful lifespan We reco...

Page 11: ...d recommendations made Other important information to keep on file includes information about the manufacturer sales representative contact information sales brochures date of purchase sales purchase...

Page 12: ...MAINTENANCE CHECKLIST...

Page 13: ...made to the part EXAMPLE If a component is made for a 72 deck height but is being used on a 68 deck height posts or legs will need to be cut down 4 plus any additional adjustments for surfacing as des...

Page 14: ...Thank you for the opportunity to serve you...

Page 15: ......

Page 16: ...nd CPSC guidelines All playground equipment should be installed over ADA accessible safety surfacing Use Zone Structure Size Critical Fall Height Post Diameter Age Range Child Capacity Posts Decks Met...

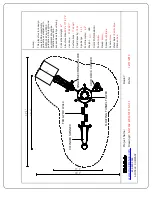
Page 17: ...6 5 6 7 8 1 2 3 4 NX 1402 25 4 37 4 17 1 29 1...

Page 18: ...83 3 45 9 73 5 R29 6 2 3 3 38 8 15 1 7 3 5 3 6 8 103 4 4 5 9 52 24 4 54 2 NX 1402 25 4 37 4 17 1 29 1 167 6 179 8 146 4 112 6...

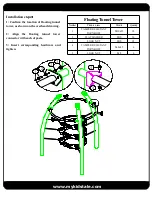
Page 19: ...36 3 LOCK NUT M10 18 4 TAMPER RESISTANT TORX BOLT M8x45 6 5 LOCK NUT M8 6 www mykidstale com Installation steps 1 Confirm the location of floating tunnel tower as shown on the overhead drawing 2 Align...

Page 20: ...WASHER M10 6 3 LOCK NUT M10 3 4 TAMPER RESISTANT TORX BOLT M8x45 1 5 LOCK NUT M8 1 www mykidstale com 1 2 2 3 5 4 Installation steps 1 Confirm the location of floating tunnel tower as shown on the ove...

Page 21: ...ASHER M10 12 3 LOCK NUT M10 6 4 TAMPER RESISTANT TORX BOLT M8x45 2 5 LOCK NUT M8 2 www mykidstale com 1 2 2 3 5 4 Installation steps 1 Confirm the location of floating tunnel tower as shown on the ove...

Page 22: ...SHER M10 12 3 LOCK NUT M10 6 4 TAMPER RESISTANT TORX BOLT M8x45 2 5 LOCK NUT M8 2 www mykidstale com Installation Steps 1 Confirm the location of frog pod walk beam as shown on the overhead drawing 2...

Page 23: ...T WASHER M10 18 3 LOCK NUT M10 9 4 TAMPER RESISTANT TORX BOLT M8x45 3 5 LOCK NUT M8 3 www mykidstale com Installation Steps 1 Confirm the location of frog pods as shown on the overhead drawing 2 Align...

Page 24: ...WASHER M10 24 3 LOCK NUT M10 12 4 TAMPER RESISTANT TORX BOLT M8x45 4 5 LOCK NUT M8 4 www mykidstale com Installation Steps 1 Confirm the location of cylinder spinner as shown on the overhead drawing...

Page 25: ...ORX BOLT M10x25 3 2 FLAT WASHER M10 6 3 LOCK NUT M10 3 www mykidstale com Installation Steps 1 Confirm the location of cylinder spinner as shown on the overhead drawing 2 Align the cylinder spinner wi...

Page 26: ...NT TORX BOLT M10x45 3 2 LOCK NUT M10 3 www mykidstale com Installation steps 1 Confirm the location of cylinder spinner as shown on the overhead drawing 2 Align the cylinder spinner triangle supporter...

Page 27: ...ASHER M10 6 3 LOCK NUT M10 3 4 TAMPER RESISTANT TORX BOLT M8x45 1 5 LOCK NUT M8 1 www mykidstale com 1 2 2 3 5 4 Installation steps 1 Confirm the location of arch rock climber as shown on the overhead...

Page 28: ...T TORX BOLT M10x30 8 2 FLAT WASHER M10 8 www mykidstale com Installation Steps 1 Confirm the location of slide deck as shown on the overhead drawing 2 Align the deck with the corresponding holes on th...

Page 29: ...M10 3 3 TAMPER RESISTANT TORX BOLT M10x25 2 4 LOCK NUT M10 2 www mykidstale com 4 2 2 3 A B B A 1 2 Installation steps 1 Confirm the location of slide hood rail as shown on the overhead drawing 2 Alig...

Page 30: ...BOLT M10x65 2 2 FLAT WASHER M10 4 3 LOCK NUT M10 2 www mykidstale com Installation Steps 1 Confirm the location of steps climber as shown on the overhead drawing 2 Align the climber with correspondin...

Page 31: ...LOCK NUT M10 4 4 TAMPER RESISTANT TORX BOLT M10x80 2 www mykidstale com Installation Steps 1 Confirm the location of sectional straight slide as shown on the overhead drawing 2 Align the sectional str...

Page 32: ...2 FLAT WASHER M10 3 3 LOCK WASHER M10 3 www mykidstale com Installation Steps 1 Confirm the location of sectional straight slide footer as shown on the overhead drawing 2 Align the sectional straight...

Reviews: