background image

Assembly Instruction

Assemble the rear wheel to the rear axle and secure the wheel in place with a washer and cotter pin, then 

snap on the wheel cover. Repeat the same on the other side.

Assemble a washer to the front axle, follow by the front wheel and secure in place with a washer and cotter 

pin. Snap on the wheel cover. Repeat the same on the other side.

Connect the steering wheel wiring to the vehicle and assemble the steering wheel to the steering colume.

Washer

Washer

Cotter Pin

(         

Please take down the rubber band,it only for immobilization.) 

!

Summary of Contents for 060-ROT-01L

Page 1: ...Licensed Lamborghini SIAN Ride On 12V item number 060 ROT 01L This product is packed with the battery disconnected Connect the battery before use ATTENTION...

Page 2: ...n slippery surface Always keep hands hair and clothing away from moving parts Maximum users weight for this product is 55 12 lb Do not change modify or add any electrical wiring on this product Avoid...

Page 3: ...arts and Feature E Steering Wheel 1x 1x 6x 4x J Remote Control K Washer L Cotter Pin I Charger A Car Body G Seat B Front Wheel C Rear Wheel F Wind Shield H Rear View Mirror D Wheel Cover N MP3 Cable 1...

Page 4: ...e other side Assemble a washer to the front axle follow by the front wheel and secure in place with a washer and cotter pin Snap on the wheel cover Repeat the same on the other side Connect the steeri...

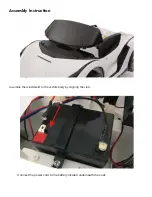
Page 5: ...Assembly Instruction Assemble the windshield to the vechile body by aligning the slots Connect the power cord to the battery located underneath the seat...

Page 6: ...on Remove the screws on the vehicle body Assemble the seat to the vehicle and secure with the removed screws Insert the left rear view mirror to the left side of the vehicle body then repeat the same...

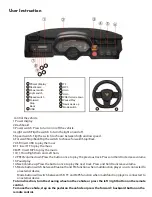
Page 7: ...e 15 Mode button switch between Bluetooth and FM function when multifunction player is not connected to an external device Mode button will switch between USB TF and MP3 function when multifunction pl...

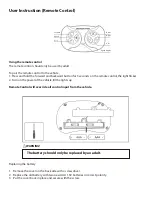
Page 8: ...3 Put the cover back in place and secure with the screw Forward Speed Brake Right Back Left Speed display Remote Control will over ride all control input from the vehicle Using the remote control The...

Page 9: ...harging port located below the vehicle seat 2 Insert the charger plug into a wall outlet The vehicle must be OFF when charging Recharge the battery if the vehicle operates slowly The vehicle cannot be...

Page 10: ...not wash the product with a hose or immerse any parts in water or other liquid Occasionally use lightweight oil to lubricate moving parts Problem Possible Reason Solution Vehicle does not move Low Bat...

Page 11: ...er service Loud grinding sound or clicking sound from the motor or gear box Damaged motor or gear box Contact customer service Battery does not charge Disconnected Badly connected battery Reconnect th...

Page 12: ...e for particular purpose No representative employee agent or any other person is authorized to assume for KIDZONE any additional liability or responsibility in connection with KIDZONEs merchandise exc...

Reviews: