A
B
C
8
9
IMPORTANT
1.
Pay attention to the rating voltage.
2.
Only use the clipper to cut the hair.
3.
Do not use the clipper in case it has
fallen into water.
4.
Only use the clipper in a dry place.
5.
Never use the clipper if it is damaged.
6.
If the supply cord is damaged, it must be
replaced by the manufacture or its service
agent or a qualified person in order to
avoid a hazard.
7.
Oil the blades before using the clipper
for the first time
8.
Always store the clipper with the blade
guard covering the blades.
9.
This appliance is not intended for use by
persons (including children) with reduced
physical, sensory or mental capabilities, or
lack of experience and knowledge, unless
they have been given supervision or ins-
truction concerning use of the appliance by
a person responsible for their safety.
10.
Children should be supervised to ensu-
re that they do not play with the appliance.
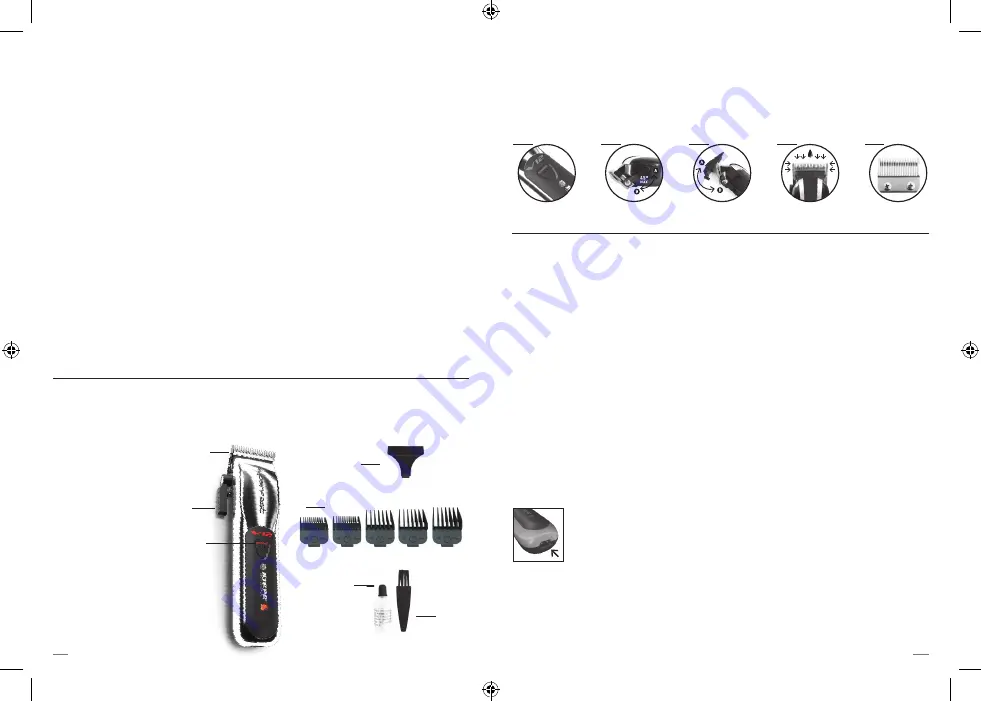
A
Blades
B
Blade lever
C
ON/OFF switch
D
Blade guard
E
Attachment combs
(4pcs: 1,5mm, 3mm,
6mm,10mm, 13mm)
F
Lubrication oil
G
Cleaning brush
DESCRIPTION OF PARTS
1.
ON-OFF switch
2.
Adjust the cutting length A to B
3.
Clip-on comb
4.
Oil the blades
5.
Change and fix the blades
HOW TO USE
1.
Oil the cutting blades before using the
clipper for the first time.
2.
Turn on the clipper by ON/OFF switch.
3.
Please only use the correct oil, apply the
oil to the blades after each time use.
HOW TO CHARGE THE CLIPPER
Before the equipment is used for the first
time, it should be charged 3-5 hours.
Plug the power cord directly into the unit.
Make sure that the clipper is switched
OFF when charging. During charging, the
charge indicator is illuminated. The charge
indicator will begin to blink when almost
fully charged and may shut off when fully
charged.
USING RECHARGEABLE
CORD/CORDLESS CLIPPERS
This unit may be used without
a cord when fully charged. If
the battery power is low, a power cord can
be attached directly to the unit to continue
using the device as a corded unit. • Plug
the power cord into a power outlet at the
correct voltage. • Plug the power cord
directly into the unit. Be sure the clipper is
switched OFF when charging.
•
For corded operation
, connect the cord
to the receptacle located at the bottom
of the unit. If the battery is completely
down, allow the unit to charge for 1 minute
(switched OFF) before using as a corded
unit. • If the cord is left attached to the unit
when not in use, the cord will automati-
cally charge the unit when left in the OFF
position.
HOW TO CHANGE THE BLADES
Switch off the clipper and disconnect it
from the power outlet.
Undo both screws on the cutting set, re-
move the bottom blade and the top blade.
When assembling, the bottom blade and
top blade should be aligned as follows:
1.
Raise and adjust the cutting-length
adjustment lever to the shortest cutting
length.
2.
The distance between the front edge of
the bottom blade and the front edge of the
top blade should be between 0.8mm and
1.5mm.
3.
The bottom blade and the top blade
F
G
D
E
1
2
3
4
5
Summary of Contents for KPE00067
Page 1: ...PROFESSIONAL RECHARGEABLE HAIR CLIPPER...
Page 15: ...28...


