БЪЛГАРСКИ
ENGLISH
IMPORTANT! PLEASE REMOVE ALL PARTS FROM THE PACKAGE AND IDENTIFY THEM BEFORE ASSEMBLY.
SOME PARTS MAY BE PACKED IN THE PADS.
PARTS: 1- Seat Back; 2- Pad; 3- Toy Bar; 4- Rear Cross Brace; 5-Front Cross Brace; 6- Bases( Left and Right)
ASSEMBLY:
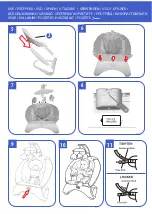
1. Snap the rear cross brace onto the bases, as shown (Figure1). Hint: The cross brace is designed to fit
onto each base one way. If it does not seem to fit, try the other base.
2. Snap the base assembly into the front cross brace ( Figure 2).
3. Make sure the socket in each retainer is upright. Fit the seat back tube onto the base, as shown.(Figure 3)
Hint: The seat back tube is designed to fit one way. If it does not seem to fit, tum it around and try again.
4. Insert a screw in each hole in the seat back tube. Tighten each screw. Pull the seat back tube up to be sure
it is secure (Figure 4).
5. Position the pad above the frame. Fit the upper pocket on the back of the pad onto the seat back tube
(Figure 5).
6. Insert and "snap" the pegs on the pad into the holes in the footrest(Figure 6).
7. Insert and "snap" the toy bar into the toy bar socket.The toy bar is designed to fit one way. If it does not
seem to fit, turn it around and try again(Figure 7). Hint: The toy bar is removable. Press the ends of the
latches and lift the toy bar.
BATTERY INSTALLATION:
Hint: We recommend using an alkaline battery for longer battery life.
1. Loosen the screw in the battery compartment door and remove
the door. 2. Insert four AA (LR6) alkaline battery into the battery compartment. 3. Replace the battery
compartment door and tighten the screw. 4. If this product begins to operate erratically, you may need
to reser the electronics. Slide the power switch off and then back on.
BATTERY SAFETY INFORMATION:
In exceptional circumstances, batteries may leak fluids that can cause a chemical burn injury or ruin
your product. To avoid battery leakage:
1. Do not mix old and new batteries or batteries of different types: alkaline, standard (carbon-zinc) or
rechargeable (nickel-cadmium).
2. Insert batteries as indicated inside the battery compartment.
3. Remove batteries during long periods of non-use. Always remove exhausted batteries from the product.
Dispose of batteries safely. Do not dispose of this product in a fire. The batteries inside may explode or leak.
4. Never short-circuit the battery terminals.
5. Use only batteries of the same or equivalent type, as recommended.
6. DO not charge non-rechargeable batteries.
7. Remove rechargeable batteries from the product before charging.
8. If removable, rechargeable batteries are used, they are only to be charged under adult supervision.
SETUP AND USE:
Soothing Unit: Make sure your child is properly secured in the seat.
IMPORTANT! LOW BATTERY POWER CAUSES THIS PRODUCT TO OPERATE ERRATICALLY: NO VIBRATIONS
AND THE PRODUCT MAY NOT TURN OFF. REMOVE AND DISCARD THE BATTERY AND REPLACE WITH FOUR
NEW AA (LR6) ALKALINE BATTERY.
Tighten each waist belt so that the restraint system is snug against your child. Please refer to the next
section for instructions to tighten the waist belts.
To tighten the restraint belts: Feed the anchored end of the restraint belt up through the buckle to form a
loop O. Pull the free end of the restraint belt.
To loosen the restraint belts: Feed the free end of the restraint belt up through the buckle to form a loop Q.
Enlarge the loop by pulling on the end of the loop toward the buckle. Pull the anchored end of the restraint
belt to shorten the free end of the restraint belt.
Summary of Contents for COCONUT
Page 5: ...1 2 3 4 5 6 1 1 2 2 3 3 4 4 5 5 6 6 7 7 1 2 4 AA LR6 3 4 1 2 3 4 5 6 7 8 10 11...
Page 12: ...I 1 2 3 4 5 6 1 1 2 2 3 3 4 4 5 5 6 6 7 7 1 2 4 LR6 3 4 1 2 3 4 5 6 7 8 9 AA LR6 Q...
Page 15: ...SRPSKI 1 2 3 4 5 6 1 1 2 2 3 3 4 4 5 5 6 6 7 7 1 2 4 6 3 4 1 2 3 4 5 6 7 8 9 6...
Page 16: ...1 2 3 4 5 6 1 1 2 2 3 3 4 4 5 5 6 6 7 7 1 2 4 AA LR6 3 4 1 2 3 4 5 6 7 8 9 LR6 Q...
Page 17: ...1 2 3 4 5 6 1 1 2 2 3 3 4 4 5 5 6 6 7 7 1 2 4 AA LR6 3 4 1 2 3 4 5 6 7 8 9 LR6 O Pull Q UA...
Page 23: ...AR...
Page 24: ......
Page 25: ......
Page 26: ......
Page 28: ......

