background image

HLX+ batteries must be placed flat on their bottoms. Any other orientation will void the warranty. 

Also, do not stack them one directly on top of another.
Batteries warm up while in use. Please consider your local average and seasonal temperature 

when positioning your battery bank. If they will be in a warmer environment, you may want to leave 

a minimum of one inch spacing between each of the batteries.
If they will be subjected to cold temperatures, you may want to place them as closely as possible 

to each other. Consider adding insulation or an insulated enclosure around the batteries if they will 

be exposed to temperatures that approach 32°F (0°C). The BMS will not allow charging when the 

internal temperature is below freezing, and they will try to warm themselves using the charging 

current Using insulation when it is cold will maintain more of the heat generated during normal 

charging and reduce the chance of the BMS shutting the battery down to protect the battery cells.
Please note battery capacity is reduced by 20% as its internal temperature falls between room 

temperature (approximately 77°F (25°C) and just above 32°F (0°C).
Please remember to remove the insulation in warmer months. Overheating the batteries will short-

en their life and the BMS will shut down the battery in temperatures above 149°F (65°C).

3.3 Cabling

All wire must be the appropriate gauge and construction to handle the loads that will be placed 

upon it. Heavy gauge, fine stranded copper wire is the industry standard. A minimum of 2/0 or 4/0 

AWG copper cable is recommended for battery interconnect cables.
The cables connecting batteries in series into rows must be the same length. The cables connect-

ing the rows in parallel must be the same length. The home run cables to the inverter must be the 

same length. Cables of different lengths will cause voltage differences in your battery bank. The 

rows in your battery bank must be kept within 0.2 V of each other to ensure that they work correctly 

and that large currents between rows aren’t generated.
If your battery bank suddenly shuts down as one or more rows approaches fully charged or fully 

discharged, it is likely either the batteries are not all at the same state of charge or, if they are mea-

sured with a multimeter to be all the same voltage, the voltage drop across the cables connecting 

the rows is not equal. Also use the voltmeter to make sure that the voltage drops across each 

battery interconnect is very close.
Torque all bolts and battery terminals to between 7.38 and 8.11 ft-lbs (88.51 to 97.36 in-lbs OR 10 

to 11 nm). Terminals left insufficiently tightened will lead to overheating, melting the battery termi-

nals and potentially causing a fire. Be careful when using thin washers. You may think you're ap-

plying sufficient torque, but if the washers are too thin, the cable lugs can still move. Add additional 

washers until you can tighten, and the cable lugs cannot move.

3.4 Configurations

The KiloVault® HLX+ series of batteries can be used in 12 V, 24 V, 36 V, and 48 V configurations 

where one, two, three or four batteries are connected in series, plus to minus, in a row. The maxi-

mum number of batteries in a bank is sixteen, 4 in parallel strings of 4 batteries in series. Each row 

of batteries must be kept within 0.2 V of each other or the battery bank may prematurely shut down 

during charging and discharging. There are configuration limitations depending on the temperature 

range of the installation location and whether or not you are using the HLX+ Bridge. The HLX+ 

Bridge helps the HLX+ batteries coordinate their heaters.

2022

5

Summary of Contents for 1200 HLX+

Page 1: ...INSTALLATION USER MANUAL KiloVault HLX Lithium Iron Phosphate Deep Cycle Solar Batteries 2022 1 ...

Page 2: ... included in this manual is accurate at the time of publication However this manual is subject to change without prior notice as we continu ously improve our products Additionally the illustrations in this manual are for demonstration only and are intended to help explain the KiloVault HLX system concepts and installa tion instructions Details may vary slightly depending upon the market region and...

Page 3: ...3 4 4 Connecting the KiloVault PlusNet communication 8 3 4 5 Storage Mode 9 4 Operation 10 4 1 Inverter Charger Settings 10 4 2 Solar Charge Controller Settings 11 4 3 Battery Monitor Settings 12 4 4 Generator Automatic Generator Control Settings 13 4 5 HLX iT Bluetooth Mobile Application 14 4 5 1 Introduction 14 4 5 2 Screens Operation 14 5 Troubleshooting Q A 18 6 Storage and Recommissioning 22 ...

Page 4: ...re Use the full battery capacity if necessary HLX withstands occasional 100 discharges Please Note frequent 100 discharges will decrease battery life Long life Even after 2000 full discharges 80 of the total battery capacity remains Maintenance Free No watering or cleaning of hazardous chemicals required High Efficiency 94 5 providing up to 12 more usable stored energy Smart Investment Lower cost ...

Page 5: ...LX Bridge Sold Separately The features the HLX Bridge are 1 Viewing information about your entire battery bank and individual batteries 2 Enable 4x4 bank configurations in cold climates 3 Update the HLX firmware 1 1 4 Heating System The 1200 HLX heater is 64 W The 2400 HLX heater is 96 W and the 3600 HLX heater is 192 W The heater is powered by charging current not by the battery The battery does ...

Page 6: ...f metal personal items and insulated gloves A small risk of spark exists while making electrical connections Ensure the installation area is free of explosive gases and liquids Ensure the batteries are not installed in confined areas containing explosive substances This includes flammable fuel powered machinery holding tanks pipe fittings and connectors In the unlikely event of a fire when possibl...

Page 7: ...rify all equipment to be connected to the batteries is turned off before making any electrical connections Do not submerge the batteries This can cause personal injury and will void your warranty Do not attempt to disassemble the batteries This can cause personal injury and will void your warranty KiloVault batteries can be used in RV applications for electrical appliances ONLY They can NOT be use...

Page 8: ...ing When charging is finished and the charger shuts off or the battery is disconnected the voltage will slump to 13 3 13 6 V This is normal The battery is still fully charged B Due to transportation regulations lithium batteries cannot be shipped fully charged As a result if you have purchased more than one battery for your system all batteries must be fully charged to exactly 14 1 V before using ...

Page 9: ...e rows in parallel must be the same length The home run cables to the inverter must be the same length Cables of different lengths will cause voltage differences in your battery bank The rows in your battery bank must be kept within 0 2 V of each other to ensure that they work correctly and that large currents between rows aren t generated If your battery bank suddenly shuts down as one or more ro...

Page 10: ... will stay above freezing 32 F 0 C then the HLX batteries can be wired together up to 4 parallel strings of 4 batteries each The KiloVault HLX BRIDGE is used with HLX series batteries The KiloVault HLX BRIDGE is integrated with smart touch screen management control board interface ports and Blue tooth Through CAN RS485 communication it can monitor manage and control The KiloVault HLX series batter...

Page 11: ...wer panel All wire lengths from each HLX Battery to common busbars or plates should be identical in length and gauge in order to balance the load across all HLX Batteries in the installa tion Warning All wire lengths from each HLX Battery to common busbars or plates should be identical in length and gauge in order to balance the load across all HLX Batteries in the installation 2022 7 ...

Page 12: ...erminator plug and an RJ45 dust cover for networking communication set up For battery with self distribution feature when 4pcs are in series or 4pcs are in parallel there is no need for the Bridge the first battery can act as the Leader Battery See connection diagram as below 1 Connect the COM port to the COM port between the batteries 2 Insert the resistor plug into the COM port of the last batte...

Page 13: ... not both because without the Bridge the HLX cannot coordinate their heaters beyond these configurations 3 4 5 Storage Mode The battery can be switch between Active Mode and Storage Mode using the KiloVault iT app The battery is shipped in Storage Mode to switch from Storage Mode to Active Mode long press the power button for 5 seconds Prior to long periods of storage disconnect the battery from t...

Page 14: ...batteries and use the KiloVault iT app s Storage Mode to switch each battery to Storage Mode Storage Mode will turn of the Bluetooth function on each battery reducing the self discharge rate and can hold a charge for a longer period of time The battery will not be visible using the KiloVault iT app and will require a reset by a 5 second long press of the power Button PlusNET will disconnect commun...

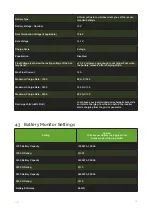
Page 15: ...ings for guidance Also please don t hesitate to contact KiloVault technical support for help 4 1 Inverter Charger Settings 2022 11 Setting Values Volts are per HLX in a single string Amps are per parallel string 1200 Battery Capacity 1200 Wh 100 Ah 2400 Battery Capacity 2400 Wh 150 Ah 3600 Battery Capacity 3600 Wh 300 Ah 1200 Max Charge Current 80 A 2400 Max Charge Current 150 A 3600 Max Charge Cu...

Page 16: ...re Compensation 0 00 mV deg C Equalization Disabled Float Voltage 13 4 Normally the inverter charger is set to 2 Stage No Float but if it has to be set then used this value HBCO High Battery Cut Out 14 4 V LBCO Low Battery Cut Out 12 25 V or as close as it can be set LBCO Delay 5 seconds LBCO Hysteresis 0 5 V Max Bulk Current Set the inverter max bulk current so that when it is add ed to the charg...

Page 17: ...ging stops Max Float Current 10 A Maximum Charge Rate 1200 80 A C 1 25 Maximum Charge Rate 2400 150 A C 1 3 Maximum Charge Rate 3600 200 A C 1 5 Recharge Volts 80 DoD Just above your inverter charger recharge rebulk volts so it starts charging from the sun before the inverter starts charging from the grid or generator Setting Values Volts are per battery in a single string Amps are per string in p...

Page 18: ...n these settings 2 minutes Set just above the inverter charger Low Voltage Disconnect 12 25 V so the gen erator starts before the inverter stops inverting Start at approx 12 3 V and adjust as necessary 2 hours Set above the 2 minutes volts Start at approx 12 4V 24 hours Set just below the Recharge Re bulk voltage If the Recharge Re bulk setting hasn t already started the generator at this time the...

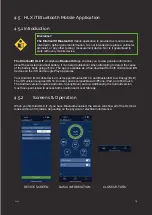
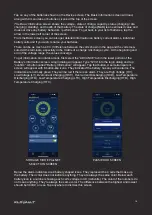
Page 19: ...is compatible with iPhone iPad and iPod touch The Android version requires Android 4 3 Jelly Bean and up Additionally the Android version must have permission to access both Location and Local Storage 4 5 2 Screens Operation When you first start HLX iT if you have Bluetooth enabled the screen will show all of the HLX bat teries within a 30m radius depending on the physical or electrical interferen...

Page 20: ... select the ADVANCE tab in the lower portion of the Battery s Information screen A login dialog will appear Type 1234 into the login dialog and tap confirm A button called Battery Information will appear Tap that button A semi transparent screen will appear with 8 button like icons They indicate if the battery has any active alarms The indicators are normally green They will be red if there is an ...

Page 21: ...A login dialog will appear Type 5678 into the login dialog and tap confirm A dialog box Edit Device will appear Type in the new name and tap Confirm The battery is now renamed Tap the light bulb shaped tab the third from the left at the bottom of the screen to get to the alerts screen Here you ll find any active Events on the HLX Events are not saved into any kind of history ADVANCED TAB PASSWORD ...

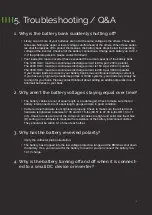
Page 22: ...HVAC systems your loads may simply be too high for your bank Please contact KiloVault about adding an additional parallel row of KiloVault batteries to your bank 2 Why aren t the battery voltages staying equal over time The battery cables are not of equal length or are damaged Check to make sure that all battery interconnects are of equal length gauge and are in good condition Cable terminal hardw...

Page 23: ... auto RV al ternator Yes as long as the alternator provides the appropriate charging current for your battery and does not exceed 14 1 V 6 What is the terminal mounting hardware size M8 1 25 x 16 mm bolts In all models the terminals extend 1 mm above the case 7 What are the recommended voltage settings for a gen erator We recommend a low voltage start of 12 3V and a cut off voltage of 13 9V multip...

Page 24: ...e Iota Engineering DLS series of 12 V AC Chargers that are capable of being configured for this slightly higher voltage Use a 12 V solar charge controller set to 14 1 V or sealed battery charging as long as it gets to 14 1 V with a solar panel to charge up the batteries individually This method will take longer than an AC charger unless you are using a high amperage charge controller with sufficie...

Page 25: ...nnect all devices from the battery even battery monitors first connect the inverter wait 45 seconds and then connect the remain ing devices 16 Do high temperatures affect how the batteries per form Yes the battery cycle life will be reduced if they are regularly charged and dis charged above ambient temperatures of 100 degrees F Please see the environmental specifications 17 Do low temperatures af...

Page 26: ...the battery is at 14 1 V please do not stop charging Keep charging all of the way to 14 1 V Then Discharge the HLX all of the way to 12V Then re charge the HLX normally once again up to 14 1V The SoC should now be re calibrated Remember the SoC reported in the app is an approximation for people to use but the battery be havior is actually driven by the Volts and Amps 20 My HLX is stuck in a protec...

Page 27: ... again As a result the constant cycling of this circuitry will shorten the life of the entire battery Recommended Storage Temperature and Humidity 15 C to 35 C 45 to 75 Relative Humidity They can be stored at 4 F to 113 F 20 C to 45 C 45 to 75 Relative Humidity for 1 month or less They can be stored at 14 F to 95 F 10 C to 35 C 45 to 75 Relative Humidity for 3 months or less Re commissioning your ...

Page 28: ...0 05 V cell Low Voltage Over discharge Shutoff Protection 10 2 0 2 V 2 50 0 05 V cell Low Voltage Shutoff Release Charge above 11 2V 0 4 V 2 80 0 10 V cell Maximum Configuration With Bridge Any Tempera ture Conditions Up to 4 parallel strings of 4 batteries in series Total of 16 Maximum Configuration Without Bridge Temperature falls below freezing Up to 4 batteries in series OR 4 batteries in para...

Page 29: ...from Load 0 25 A 250 mA Voltage Configurations 12 V 24 V 36 V 48 V High Temperature Protection Trigger 149 65 C High Temperature Protection Release 122 F 50 C Low Temperature Protection Trigger 32 F 0 C Low Temperature Protection Release 41 F 5 C Heater Behavior The heater starts at an internal temperature of 32 F 0 C and stops at an internal temperature of 41 F 5 C ...

Page 30: ...til high charge current triggers protection 110 5 A 25 Seconds Overcurrent Protection Time delay until high charge current triggers protection 150 5 A 3 Seconds Overcurrent Protection Time delay until high discharge current triggers protection 110 5 A 25 Seconds Overcurrent Protection Time delay until high discharge current triggers protection 300 20 A 3 5 Seconds Overcurrent Protection Charging R...

Page 31: ...0 0 05 V cell Overcurrent Protection Time delay until high charge current triggers protection 210 5 A 25 Seconds Overcurrent Protection Time delay until high discharge triggers protection 210 5 A 20 Seconds Overcurrent Protection Time delay until high discharge triggers protection 400 20 A 3 5 Seconds Overcurrent Protection Charging Release Method Discharge battery for immediate release Wait 1 min...

Page 32: ...05 V cell Overcurrent Protection Time delay until high charge current triggers protection 210 5 A 25 Seconds Overcurrent Protection Time delay until high discharge triggers protection 210 5 A 20 Seconds Overcurrent Protection Time delay until high discharge triggers protection 400 20 A 3 5 Seconds Overcurrent Protection Charging Release Method Discharge battery for immediate release Wait 1 minute ...

Page 33: ...ase at 122 F 50 C Low Internal Temperature Charge Protection 32 F 0 C with protection release at 39 F 4 C Low Internal Temperature Discharge Protection 4 F 20 C with protection release at 14 F 10 C Ingress Protection Water Please see section 8 Certifications Splashing Water Water splashing against the enclosure from any direction shall have no harmful effect Maximum Altitude 3000 meters Recommende...

Page 34: ...in 235 1mm 3600 HLX Width 11 02 in 280 mm 3600 HLX Length 20 5 in 520 mm 3600 HLX Weight 88 2 lb 40 kg Terminals Stainless Steel M8 1 25 x 16 mm Bolts In all models the terminals extend 1mm above the case Terminal torque Tighten the terminal bolts to between 7 38 and 8 11 ft lbs 88 51 to 97 36 in lbs OR 10 to 11 nm ...

Page 35: ...2022 31 2400 HLX Dimensions 3600 HLX Dimensions ...

Page 36: ... services 10 Limited Warranty 10 1 Registration Please register your HLX batteries at https kilovault com register 10 2 Non Transferable This Limited Warranty is to the original purchaser of the Product and is not transferable to any oth er person or entity Please contact the place of purchase regarding any warranty claim Model Free Replacement or Re pair Period months Prorated Credit Period month...

Page 37: ... for airflow Environmental damage inappropriate storage conditions as defined by the Manufacturer exposure to extreme hot or cold temperatures fire or freezing or water damage Damage caused during operation by collision over charging or over discharging the Product as defined by the Manufacturer Damage caused by lightning fire water or Acts of God Damage due to improper maintenance under or over c...

Page 38: ...INSTALLATION USER MANUAL KiloVault LLC 330 Codman Hill Road Boxborough MA 01719 1 888 218 5924 info kilovault com www kilovault com ...

Reviews: