Assembly Instructions
Perks
™
Proper product installation, in accordance with these instructions, is theresponsibility of the installing agent.
If you have any questions concerning these instructions, please call Kimball Office Customer Service.
Part No. 2066767
Revision B-08
Page 1 of 1
Name Plate Mounting
Tools Required
■
None
Xsite Traxx, Traxx, and Slat Tile Mount
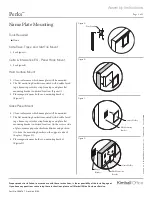
1. See Figure A.
Cetra & Interworks EQ - Panel Hook Mount
2. See Figure B.
Hard Surface Mount
3. Clean surface area which name plate will be mounted.
4. The flat mounting bracket is mounted with double faced
tape. Remove protective strip from tape and place flat
mounting bracket in desired location. (Figure C).
5. Place magnetic name holder on mounting bracket.
(Figure C).
Glass Panel Mount
6. Clean surface area which name plate will be mounted.
7. The flat mounting bracket is mounted with double faced
tape. Remove protective strip from tape and place flat
mounting bracket in desired location. On the reverse side
of glass, remove paper backer from blinder and position
it to hide the mounting bracket on the opposite side of
the glass. (Figure D).
8. Place magnetic name holder on mounting bracket.
(Figure D).
Figure A
Figure B
Paper
Blinder
Flat Mounting
Bracket
Name Holder
Figure C
P
ri
n
te
d
in
U
.S
.A
.
©
2
0
0
8
K
im
b
a
ll
In
te
rn
a
ti
o
n
a
l,
In
c
.
T
8
0
0
.4
8
2
.1
8
1
8
F
8
1
2
.4
8
2
.8
3
0
0
Figure D
Flat Mounting
Bracket
Name Holder
Xsite Traxx


