background image

Assembly Instructions

Perks

Page 1 of 1

Proper product installation, in accordance with these instructions, is the responsibility of the installing agent.

If you have any questions concerning these instructions, please call Kimball Office Customer Service.

Part No. 2066772

Revision A-08

Undersurface
Power/Data Center

Tools Required

Screwdriver

Package Contents

1 Electrical Module

2 Screws

1 Mounting Frame

Installation

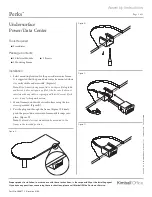
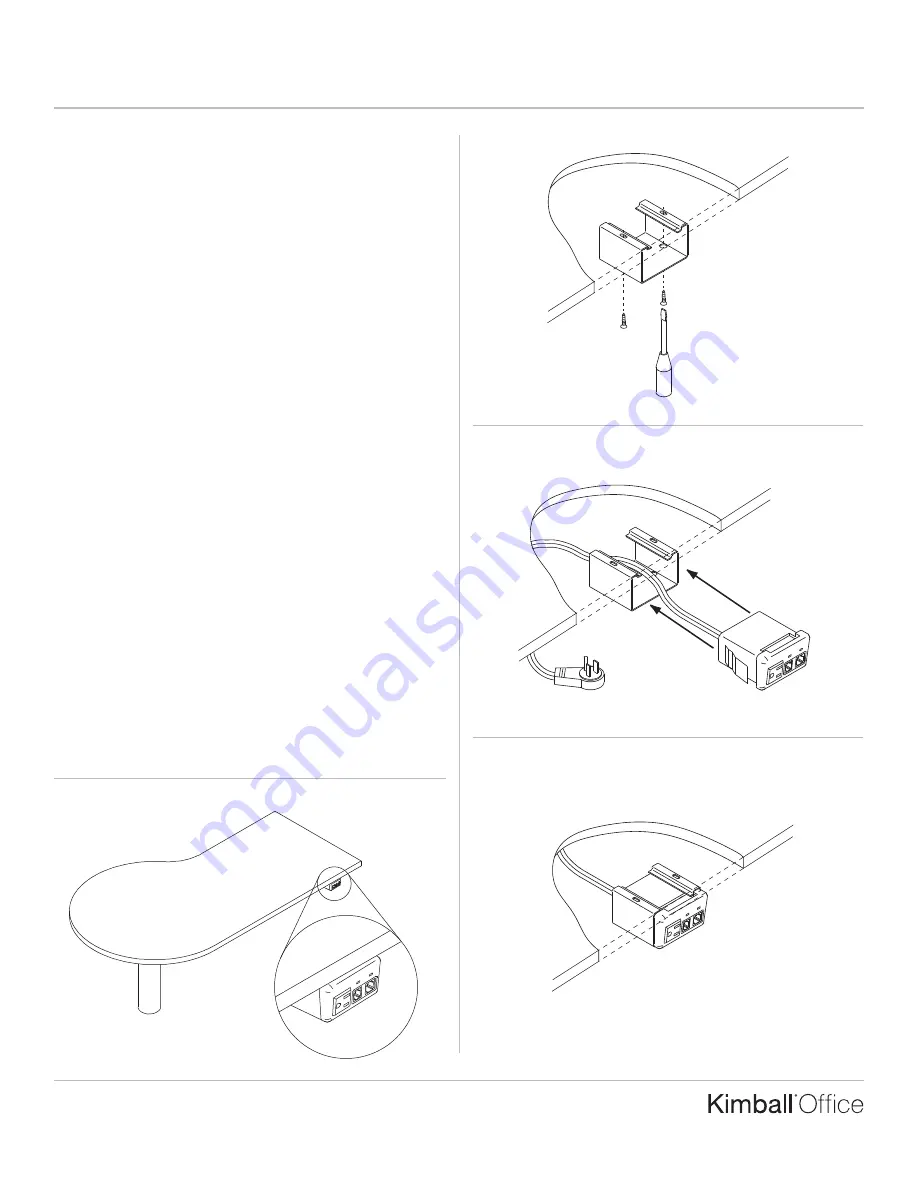
1. Select mounting location for the power/data center frame.

It is suggested that the power/data center be mounted where

it is easily visible and accessible. (Figure A).

Note:

If the frame is being mounted to an Aspire folding table,

make sure it does not span any folds. Also, be sure it does not

interfere with any cables or springs and that it does not block

access to any locking mechanisms.

2. Mount frame to underside of worksurface using the two

screws provided. (Figure B).

3. Pass the plug end through the frame. (Figure C). Firmly

push the power/data center into frame until it snaps into

place. (Figure D).

Note:

If desired, electrical module can be mounted in the

frame in the inverted position.

Figure B

Figure C

TM

Figure A

Figure D

P

ri

n

te

d

in

U

.S

.A

.

©

2

0

0

8

K

im

b

a

ll

In

te

rn

a

ti

o

n

a

l,

In

c

.

T

8

0

0

.4

8

2

.1

8

1

8

F

8

1

2

.4

8

2

.8

3

0

0

Summary of Contents for Perks Complete Series

Page 1: ...sponsibility of the installing agent If you have any questions concerning these instructions please call Kimball Office Customer Service 2008 Kimball International Inc T 800 482 1818 F 812 482 8300 Perks Assembly Instructions 2066779 Revision A 10 Complete Series Master Packet ...

Page 2: ... B Repeat procedure for lower connecting collars located above the casters Note Additional Add On Screens may be attached to the basic assembly by repeating Step 2 Note Over tightening of the handcuff screws may constrain the folding capability of the mobile screens 3 Insert casters into sockets in the bottom of the screen tubes Make sure caster fully seats in socket If necessary use a rubber mall...

Page 3: ...ront edge of worksurface in desired location Figure A 2 Secure bracket with four flathead screws provided 3 Align hole in tray over threaded stem on mounting plate 4 Assemble washer then lock nut and tighten with 1 2 socket Roller Catch Note Roller catch stabilizes carousel tray at rear preventing it from unintentional free rotation e g if accidentally bumped 1 Align Carousel Tray with front edge ...

Page 4: ...s I Center drawer with I 4 Screws two slides Installation 1 Locate center drawer by setting back 1 4 from front edge of worksurface at the desired location Figure A 2 Hold center drawer in place and mark the locations for the slide screws on the underside of the worksurface 3 Attach drawer in marked locations using screws provided Note Center drawer cannot be used under a 24 D worksurface when usi...

Page 5: ...n the back of the tile should be at the top Ensure face of marker tile is clean and dry Figure A 2 Peel off pre mounted adhesive tape backing Figure B 3 Ensure tray is in upright position curved edge of tray pointing up Align bottom and side edges of tray with edge of marker tile Do not attach any part of the tray to the tile frame Press tray firmly onto face of tile Figure C Figure A Figure B Cur...

Page 6: ...t Marker Tray Installation 1 Lay board face down on a smooth solid surface and remove shipping screw that is holding wall mount shorter portion of bracket to board Figure A Note Fasteners needed to attach wall mount bracket to wall are NOT included See chart at right for recommended fasteners Figure A Remove shipping screw Wood Studs Metal Studs Concrete or Block Wall For 2 x 4 wood studs For 20 g...

Page 7: ... wall mount it is recommended a fastener be placed 2 from each end and in the center Figure C 3 Attach the pencil tray to the front of the board using the four 11 2 screws provided Figure D 4 Hold the board securely and slip the lower edge of the mounting bracket over and behind the upward protruding lip of the wallmount bracket Then slide the board down to lock it into position Figure E Figure C ...

Page 8: ...rubber bumpers are intended for use on Work Tools when they are hung on Xsite TRAXX Traxx or slat tile 1 Peel the rubber bumpers from their adhesive backing and firmly affix them to the rear of the work tool If the work tool is to be placed on a worksurface affix a bumper near each corner of the bottom of the work tool Figure A 2 When the work tool is being hung on Xsite Traxx Traxx or slat tile t...

Page 9: ...le monitor up to 20 lbs For use only on the straight edge of a worksurface not applicable for Knife reverse Knife and slope edges 1 Remove Bottom Assembly from Base by loosening scews with hex key Figure A 2 Position Base at surface edge Figure B Note If Clamp is installed along wire manager edge of work surface the bottom edge of the wire manager will need to be notched Figure C 3 From under surf...

Page 10: ...ch VESA Bracket to monitor Bolt Through Mount Installation Important Cannot be used with 1 9 16 worksurface or placed over a pedestal modesty panel or support panel 6 Drill 1 2 hole through surface in desired location 7 Apply protective foam sheet to bottom of base if desired 8 Pass large bolt through hole in curved plate Make sure to note the direction of the curve Pass bolt through hole in surfa...

Page 11: ... back of monitor with cut out toward top of monitor and attach using screws provided For this you may also use screws that came with your monitor Figure H Important Monitor should not exceed 20 lbs Monitor to Mounting Arm Installation 14 Place cut out on VESA Bracket over Lip at end of Arm Secure monitor to arm using two 2 screws Figure I Cable Management 15 Route the monitor and power cables thro...

Page 12: ...ice Part No 2066764 Revision A 08 Page 4 of 4 Friction Adjustments 16 If desired friction on the Ball Joint may be increased This can be achieved by tightening the three 3 Ball Joint Friction Screws Figure K 17 Adjust the Tension Screw to increase or decrease the strength of the arm to balance the weight of the monitor Turn the Screw clockwise to decrease tension for smaller monitors or counter cl...

Page 13: ...e monitor up to 20 lbs For use only on the straight edge of a worksurface not applicable for Knife reverse Knife and slope edges 1 Remove Bottom Assembly from Base by loosening scews with hex key Figure A 2 Position Base at surface edge Figure B Note If Clamp is installed along wire manager edge of work surface the bottom edge of the wire manager will need to be notched Figure C 3 From under surfa...

Page 14: ... E Note Proceed to Step 11 Attach VESA Bracket to monitor Bolt Through Mount Installation Important Cannot be used with 1 9 16 worksurface or placed over a pedestal modesty panel or support panel 6 Drill 1 2 hole through surface in desired location 7 Apply protective foam sheet to bottom of base if desired 8 Pass large bolt through hole in curved plate Make sure to note the direction of the curve ...

Page 15: ...n back of monitor with cut out toward top of monitor and attach using screws provided For this you may also use screws that came with your monitor Figure H Important Monitor should not exceed 20 lbs Monitor to Mounting Arm Installation 13 Place cut out on VESA Bracket over Lip at end of Arm Secure monitor to arm using two 2 screws Figure I Cable Management 14 Route the monitor and power cables thr...

Page 16: ... responsibility of the installing agent If you have any questions concerning these instructions please call Kimball Office Customer Service Part No 2066765 Revision A 08 Page 4 of 4 Friction Adjustments 15 If desired friction on the Ball Joint may be increased This can be achieved by tightening the three 3 Ball Joint Friction Screws Figure K Figure K Ball Joint Friction Screws ...

Page 17: ...tive strip from tape and place flat mounting bracket in desired location Figure C 5 Place magnetic name holder on mounting bracket Figure C Glass Panel Mount 6 Clean surface area which name plate will be mounted 7 The flat mounting bracket is mounted with double faced tape Remove protective strip from tape and place flat mounting bracket in desired location On the reverse side of glass remove pape...

Page 18: ...ball Office Customer Service Part No 2066768 Revision A 08 Page 1 of 1 Voice Data and Power Modules Tools Required None Package Contents 1 Voice Data Module or Power Module Installation 1 For installation in wire manager feed all cabling from the module through the wire management channel Position the lower flange of the module into the rubber portion of the channel Figure A Figure A Feed cabling ...

Page 19: ...ge Contents 12 8 Panhead Screws Installation 1 Measure the area where the Undersurface Cable Manager is to be mounted Mark and cut the cable manager to the desired length 2 On W shaped cable mananger peel the protective coating from the tape strip provided Position the cable manager in its desired location and press firmly into place U shaped cable managers does not come with tape strip Figure A 3...

Page 20: ...is the responsibility of the installing agent If you have any questions concerning these instructions please call Kimball Office Customer Service Part No 2066771 Revision A 08 Page 1 of 1 Vertical Cable Manager Tools Required None Package Contents None Installation 1 See Figure A Figure B Figure A Figure B Vertical Cable Manager Peel Coat Left Right Tape Tape Peel Coat TM ...

Page 21: ...tomer Care 2460952 Revision Assembly Instructions Wire Manager Tools Required Hardware Required Cordless Drill 2 Philips Head Bit 1 Attach hanger with 8 X 1 flathead screw to underside of surface in desired location Figure A 2 Run wires thru base of manager before attaching to under surface hanger Figure B Installation 8 x 1 Flathead Flakeboard Screws Worksurface attachment hanger Figure A Figure ...

Page 22: ... data center be mounted where it is easily visible and accessible Figure A Note If the frame is being mounted to an Aspire folding table make sure it does not span any folds Also be sure it does not interfere with any cables or springs and that it does not block access to any locking mechanisms 2 Mount frame to underside of worksurface using the two screws provided Figure B 3 Pass the plug end thr...

Page 23: ...abling can be routed under the worksurface through an opening in the metal cap Check for clearance under worksurface BEFORE boring to avoid brackets panels or similar interferences Fits G7 grommet option on Evoke Definition Transcend Senator President Innsbruck and Osterley Park Installation 1 If worksurface has existing grommet remove the plastic trim ring that came with the metal grommet cap and...

Page 24: ...e by placing masking tape or similar material over area to be drilled to prevent tear out Measure and mark grommet location not ing minimum distances recommended from the edge of the core material or adjacent worksurface Using specified drill bit bore hole through worksurface as shown Figure B 3 Place grommet in hole As required use rubber mallet to secure grommet into place by tapping grommet alo...

Page 25: ...t Metal Screws Installation 1 Attach pencil tray to front of board using four 11 2 screws provided Figure A 2 Attach end panel brackets to top rear side of board and attach cabinet spacers to bottom rear side of board using 5 8 sheet metal screws provided as shown Make sure hooks on end panel brackets are pointing down Figure B 3 Hold the board securely in front of desired location in panel run Fi...

Page 26: ...66783 Revision A 08 Corner Sleeve Tools Required Screw Gun 2 Phillips Head Bit Hardware Required Included 2 8 x Panhead Screws Installation 1 See Figure A Optional Keyboard Kit to Corner Sleeve Attachment Hardware Required Included 2 8 32 x Long Machine Screws 2 8 32 K Locknuts Installation 1 See Figure B Figure A Figure B Printed in U S A 2008 Kimball International Inc Kimball Office T 800 482 18...

Page 27: ... Tools Required 11 16 Drill Bit Installation 1 The Equipment Lock consists of two locks tethered together by a stainless steel cable The rear of each lock has a T shaped prong which engages into the Kensington slot that is located in laptop computers docking stations printers CPU towers and other portable electronic equipment The two locks are equipped with removable lock cores which can be re key...

Page 28: ...ot in the portable equipment Figure B The round Scenario tables have a Kensington slot located in the mounting plate on the underside of the worksurface Figure C Hum The Hum cable managers have Kensington slots stamped into the lower floor of the tray One end of the security cable secures to the slot in the cable manager the other end can be secured into the Kensington slot in the portable equipme...

Reviews: