background image

10

Mounting the screen on wall

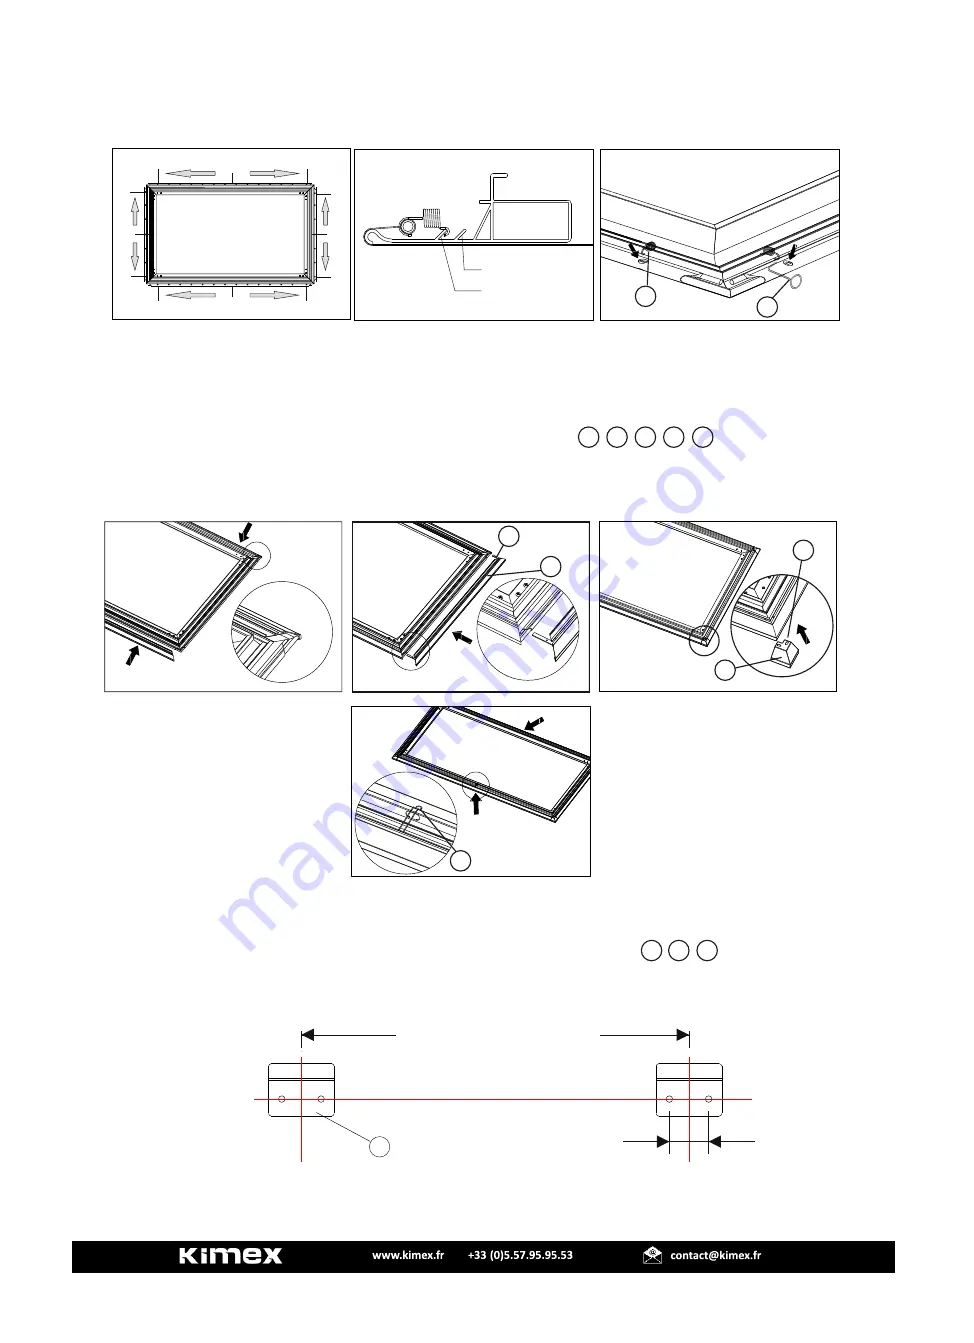
4.First, put on the spring on all 4 
corners as marked ①below

,

 then 

from the middle of frame towards
 to edge.

【Notice】


When wrinkle is observed on the screen fabric after installing all springs, DO NOT 

    remove the springs, slightly pull the end of spring along the frame slot until wrinkle 

    disappears.

S

Stte

ep t

p th

hrre

ee

e

B

Bo

orrd

de

er F

r Frraam

me I

e In

nssttaallllaattiio

on

n


[

[

M

Ma

atte

erriia

alls

s

                                ]

                                ]

1.

Put both long border frames 

along the long, DO NOT insert any 

corner bracket on long border

frame at this moment.

2.

Insert corner bracket into both 

end of short border frame, then 

assemble the border frame.

3.

Fasten the decoration corner 

cover onto border frame by 

screw.

Drill 4 holes on concrete wall by 8mm hammer drill bit according to the dimension 
indicated below, then insert the screw anchor into the hole by hammer.

Product length

2/3

30mm

11

2

2

6

6

7

7

9

9

S

Stte

ep o

p on

ne

e

M

Mo

ou

un

nt t

t th

he u

e up

pp

pe

er h

r haan

nggiin

ng b

g brraacckke

et [

t [

M

Ma

atte

erriia

allss

1

11

1 1

13

3

                  ]

                  ]

1

14

4

4.

Put both long border 

frames along the long, 

DO NOT insert any corner 

bracket on long border frame 

at this moment.

1

19

9

2

2

6

6

7

7

9

9

1

19

9

1

10

0

1

18

8

Outer slot

Inner slot

5.Recommend to hang the spring 
onto the outer slot. Move the 
spring to inner slot to enhance 
overall flatness when necessary.

6.Pull out the spring by spring hook, 
make sure the end of spring fully go 
through the hole on fabric.  

Summary of Contents for 044-6 Series

Page 1: ...ECRAN CADRE FIXE SERIE SLIM 044 6XXX ...

Page 2: ... la superficie di supporto supporti in modo sicuro il peso combinato dell apparecchiatura e tutti i materiali e componenti assocati Utilizzare le viti di montaggio fornite e non serrare eccessivamente le viti di montaggio Questo prodotto contiene piccole parti che possono causare il soffocamento in caso di ingestione Tenere questi pezzi lontano dai bambini Questo prodotto è inteso solo per uso inter...

Page 3: ...3 x4 x4 x4 x4 x4 x16 x2 x2 No ce x6 x2 x2 x2 x8 Contenu du colis ...

Page 4: ... toile 3 Pliez 4 bords de la toile sur la frange du cadre 1 D abord me re les ressorts aux 4 coins comme indiqué ci dessous puis du milieu du cadre vers le bord 2 Nous recommandons d accrocher le ressort sur la fente extérieure outlet slot Déplacez le ressort vers la fente interieure intern slot pour améliorer la planéité globale si nécessaire 3 Tirez le ressort grâce au crochet assurez vous que l...

Page 5: ...sième étape Installa on du cadre de bordure Pièces 4 Placez les deux montants longs sur les côtés longs Longueur écran 2 3 Première étape Montez les supports de suspension supérieurs pièces Percez 4 trous dans le mur de béton avec un foret de 8 mm selon la dimension indiquée ci dessous puis insérez la cheville dans les trous à l aide d un marteau Fixez l écran au mur Conseil 80 120 cm du sol Nous ...

Page 6: ...les supports inférieurs le long du cadre et placez les à environ 2 3 de la longueur du cadre 5 Marquez l emplacement des trous des supports au mur puis percez les trous à l aide d une perceuse de 8 mm et insérez les chevilles dans les trous à l aide d un marteau Longueur écran 2 3 L installa on est terminée Ne pas toucher la toile avec les mains Ne pas utiliser de produits chimiques ou détergents ...

Page 7: ...SLIM SERIES FIXED FRAME SCREEN 044 6XXX 7 ...

Page 8: ...e Important Note Please handle and install this product very carefully our company will not take any liability of injury or death or responsibility for product damage due to poor handling human mistakes natural disaster etc It is recommended that at least 2 persons assemble the product together After assembling two persons should lift up the screen simultaneously on both side of screen as shown be...

Page 9: ...M Ma at te er ri ia al ls s Main Frame Horizontal Long 2PCS Main Frame Vertical short 2PCS Border Frame Horizontal Long 2PCS Border Frame Vertical short 2PCS Fiberglass rod Long 2PCS Fiberglass rod short 2PCS Screen fabric 1PCS corner Bracket for main frame 4PCS Corner Bracket for birder frame 4PCS Plastc corner deciration cover 4PCS Screw M5 8mm 16PCS Tension Spring According to size Upper hangin...

Page 10: ...e the border frame 3 Fasten the decoration corner cover onto border frame by screw Drill 4 holes on concrete wall by 8mm hammer drill bit according to the dimension indicated below then insert the screw anchor into the hole by hammer Product length2 3 30mm 11 2 2 6 6 7 7 9 9 S St te ep o p on ne e M Mo ou un nt t t th he u e up pp pe er h r ha an ng gi in ng b g br ra ac ck ke et t M Ma at te er r...

Page 11: ...th brackets 3 Pull out the bottom of screen from the wall about 10cm hang both lower hanging bracket at the rear side of main frame as shown below Do not touch the screen surface by hand 5 Mark the location of holds on bracket then drill holes by 8mm hammer drill bit and insert screw anchor into the holes by hammer Do not clean the fabric with corrosive detergent Do not write on the screen surface...

Reviews: