background image

4.RF 

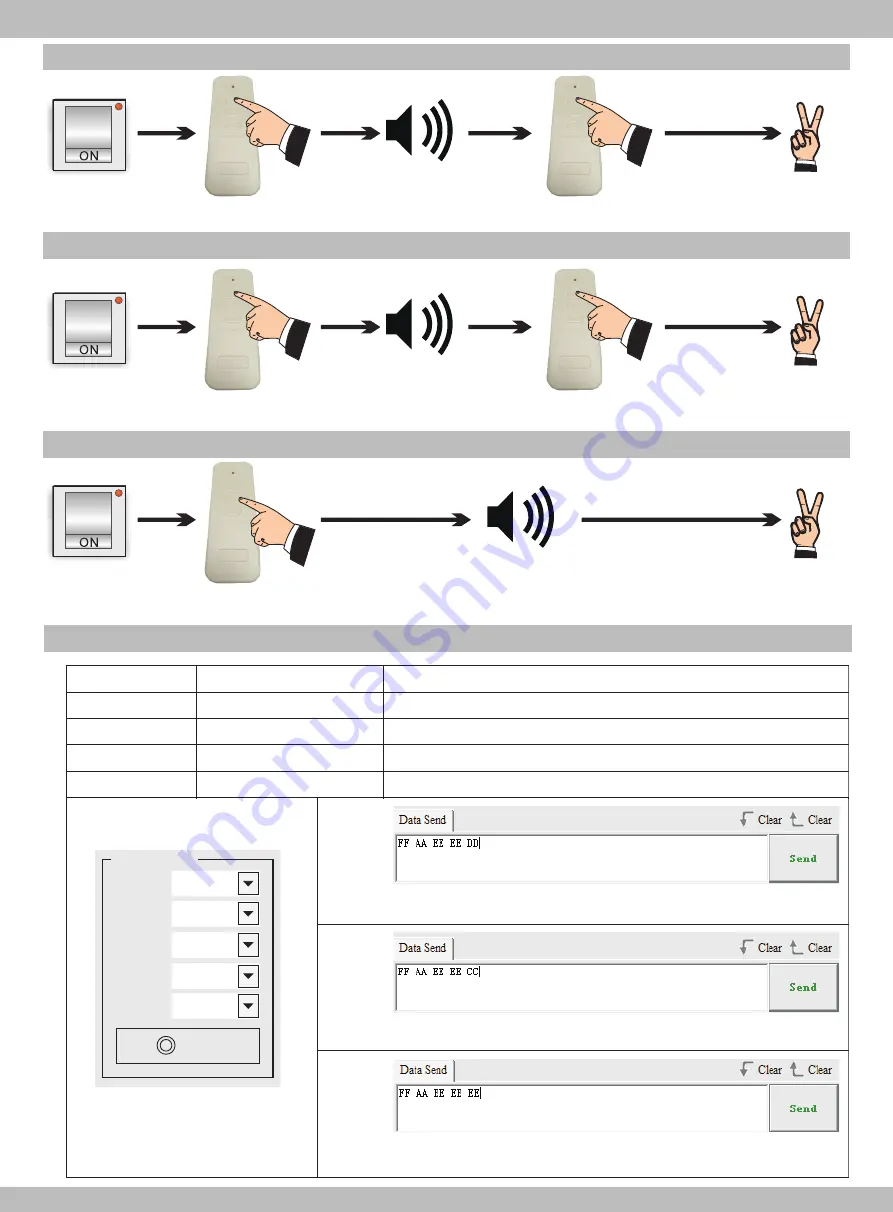
Pair


Code

5.

RF D

eleted

Receiver


power

Slowly


press


the

 "

up

button


three


times

Successful


code

Power


on


20S


long


press


the


remote


control

 “

up”  

Hear


the

 "

Di

~

Di

two


sounds


to


release


the


button

6

Intelligent


A

pp


R

eset


O

peration

7.RS

-

485


C

entral


C

ontrol

 / 

C

omputer


C

onnection


O

peration


P

arameters

Hear


the

 "

Di

~

Di

three


sounds

Receiver


power

Slowly


press


the

 "

down

button


three


times

Successfully


deleted

Power


on


20S


long


press


the


remote


control

 “

up”

Hear


the

 "

Di

~

Di

two


sounds


to


release


the


button

Hear


the

 "

Di

~

Di

five


sounds

Receiver


power

Reset


successfully

Power


on


20S


long


press


the


remote


control

 “

stop”

Hear


the

 "

Di

~

Di

five


sounds


to


release


the


button

Press


about


10S

Number

Operating

Operational


Instruction

1

Baud


rate

2400,n,8,2

2

Up

FF  AA  EE  EE  DD

3

Stop

FF  AA  EE  EE  CC

4

Down

FF  AA  EE  EE  EE

    Open


the


serial


debugging


tool

,

Select


the


serial


port


you


plugged


into


the


device

,

And


adjust


the


baud


rate


to


2400


bands

,

Click


again


to


open

1

.

Serial


port


setting

Input


FF


AA


EE


EE


DD


Click


Send


to


go


up

Input


FF


AA


EE


EE


CC


Click


Send


to


stop

2.UP

3.STOP

4.DOWN

Input


FF


AA


EE


EE


EE


Click


Send


to


go


down

COM


Configs

Channel

Baud rate

Parity bits

Data bits

Stop bits

COM7#S

2400

NONE

8

2

Open

Summary of Contents for WIFI-01

Page 1: ...pération manuelle de commutateur 1 Appuyez sur le bouton de direction pour libérer en 1 seconde l écran s allumera dans la direction souhaitée jusqu à la prochaine commande 2 Appuyez sur le bouton directionnel et maintenez le enfoncé pendant plus d une seconde L écran s arrête immédiatement après le relâchement du bouton Ne touchez pas le métal pour éviter les interférences de signal Métal Haut ST...

Page 2: ... récepteur Réinitialisation réussie Appuyez 20 secondes sur le bouton stop de la télécommande Vous entendrez 5 bip vous pourrez relâcher le bouton Appuyez 10 secondes Numéro Fonctionnement Instruction opérationnelle 1 Débit en bauds 2400 n 8 2 2 Haut FF AA EE EE DD 3 Stop FF AA EE EE CC 4 Bas FF AA EE EE EE Ouvrez l outil de débogage série sélectionnez le port série que vous avez branché sur l app...

Page 3: ...t avec une application soit par commande vocale via un système domotique Pour vous connecter à l écran scannez le QR code et suivez les indications Vous pouvez consulter le tutoriel en cliquant sur ce lien https www kimexinternational com cms smart wifi aspx ...

Page 4: ...lectric awnings roller blinds etc MANUAL SWITCH Number of RF connections 20pcs WIFI MANUAL SWITCH RF IR DV12V TRIGGER RS 485 Do not touch metal to avoid signal interference Metal UP STOP DOWN WIFI 01 RECEIVER AC 110V 230V When the input voltage is 110V please use a 110V motor When the input voltage is 220V please use a 220V motor Motor Power input N Neutral Blue E Earth Yellow Green L Live brown N...

Page 5: ...ear the Di Di five sounds Receiver power Reset successfully Power on 20S long press the remote control stop Hear the Di Di five sounds to release the button Press about 10S Number Operating Operational Instruction 1 Baud rate 2400 n 8 2 2 Up FF AA EE EE DD 3 Stop FF AA EE EE CC 4 Down FF AA EE EE EE Open the serial debugging tool Select the serial port you plugged into the device And adjust the ba...

Page 6: ...lect this item can not be connected After adding the device successfully click Done Press and hold the remote control stop button within 10 seconds after power on when hedi are five Di sounds on the screen product reset to enter the pairing state enter the pairing state and click to confirm After the completion of the smart life App interface click ae the projection screen to enter the operation i...

Page 7: ... Google Home Pairing description interface Amazon Alexa Pairing description interface Google Home Amazon Alexa connection description Open smart life Click to Me 1 2 According to the pairing instructions voice control of the projection screen can be performed using speakers such as Google Home and Amazon Alexa 1 Google Home can change the name of the device to perform the command operation that is...

Reviews: