background image

8 Port /16 Port /24 Port/32 Port


User Manual 


- 27 -


5.IP Settings 

5.1 Initial IP Configuration via Network 

IP - KVM factory default settings:


DHCP 

forbidden 

Default IP address 

192.168.0.70 

Default Subnet mask 

255.255.255.0 

1

  Read the CD and double click JAVA, ensure the Internet is available and install 

the JAVA step by step according to indications. 


2

  Copy the PSETUP to the computer in use and double click PSETUP. 


3

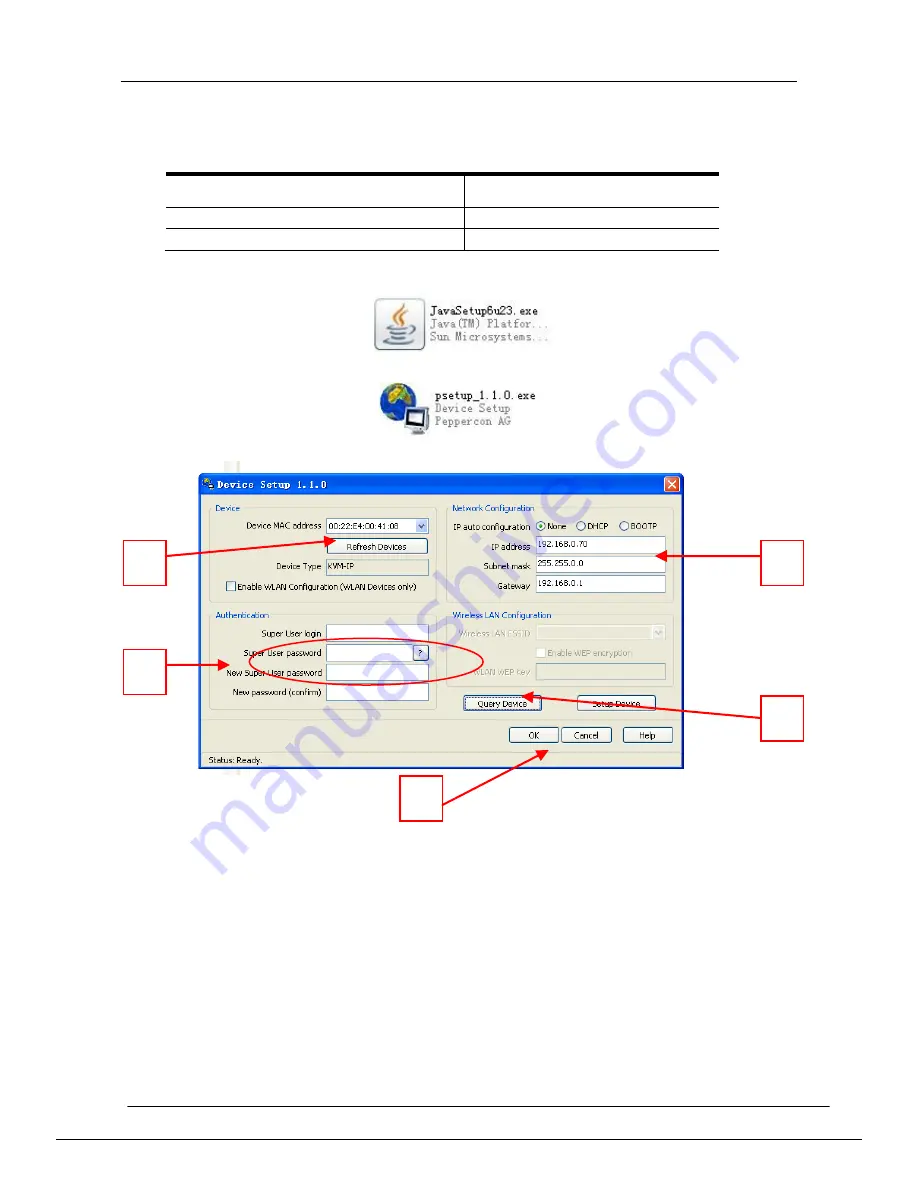
  Below menu appears on the screen: 


Operating instructions


1)  It  automatically  gets  the  MAC  address,  if  it  is  failed  to  do  so,  press  the 

Refresh Devices according to above number 1.   

2)  Click Query Device (

above number 2), it shows the IP KVM’s IP address as 

well as gateway information (see above number 3). 

3)  Choose  None  in  IP  auto  configuration,  set  up  the  IP  address  in  above 

number  3  according  to  your  network  area  (eg.192.168.X.XXX)  .Input  your 
account and password after setting the network path (above number 4). 

User Login: 

super


Password: 

pass 

            Click OK to save your settings. 

  4)    If you choose DHCP in IP auto configuration, there is no need to modify the 

IP address, it will automatically get the proper IP address. 

~Please remember the setting IP address for remote control~


Summary of Contents for DL2908i

Page 1: ...1 Rack Dual Rail CAT5 KVM over IP Console 8 Ports 16 Ports 24 Ports 32 Ports User Manual www szkinan com all right reserved Shenzhen KinAn Technology Co Ltd Printing date 2015 01 Version V2 0...

Page 2: ...er is Dead 8 2 4 Rack Mounting 9 2 5 Install KVM Components 10 2 6 Cascade Installation 11 2 7 Opening the Console 13 2 8 Closing the Console 13 3 LED Operation 16 3 1 LED Functions 16 3 2 Operating t...

Page 3: ...User Management 60 Changing Password 61 Users and Groups 62 7 4 KVM Settings 64 User Console 64 Keyboard Mouse 68 Video 69 7 5 Device Setings 71 Network 71 Dynamic DNS 72 Security 75 Certificate 76 S...

Page 4: ...multiple ports KVM switches in a 1U height console It can control multiple computers with a set of device including monitor keyboard and mouse Thus save much cost and space to separately equip keyboa...

Page 5: ...virtual media and hardware redirection Support any operating system even in BIOS level during start up or in blue screen Support remote control via Java network browser SSL certificate management Aut...

Page 6: ...13 12 11 10 9 1 2 3 4 5 6 7 8 1 2 3 4 5 6 7 8 CONSOLE 5 4 RS232 LAN CONSOLE RS232 LAN 100V 240V AC 47 63Hz 2 3 1 6 RTN 48V 36V 72V DC IN 100V 240V AC 47 63Hz 16 15 14 13 12 11 10 9 1 2 3 4 5 6 7 8 16...

Page 7: ...scription Local Host 8 16 24 32 PC server Local Console One USB keyboard one USB mouse and one monitor Remote Console 1 PC or multiple computers connected to the network Software Item Description Loca...

Page 8: ...te management device Nevertheless KVM over IP gives the administrator valuable information about the type of a hardware failure Serious hardware failures can be categorized into five different categor...

Page 9: ...he switch in a depth of 650 850mm 17 670 800mm 19 in a standard 19 rack With one person hold the switch in place and the other person slides the L bracket into the switch s side mounting brackets from...

Page 10: ...the ground 2 Connect the KVM adapter to the host 3 Connect the KVM adapter to the KVM port with CAT5 cable 4 Connect the female port of the power cable to the KVM power socket then the male port to 22...

Page 11: ...the CAT5 cable to any RJ45 port of the console and connect the other port to the RJ45 port with Chain in of the KVM switch 2 Repeat above operation to cascade more KVM switches 8 Port max cascade 8 l...

Page 12: ...dule LED indication Components Function Power LED Green light flashing The module has been powered on Green light keeps on The module has been connected to the KVM switch Link LED Flashing quickly The...

Page 13: ...32 Port User Manual 13 2 7 Opening the Console Release the release catch 2 1 3 unlocking Pull the LED panel all the way out until it clicks into place Rotate the LED module all the way back to expose...

Page 14: ...6 Port 24 Port 32 Port User Manual 14 module can be rotated up to108 Pull the keyboard module all the way out until it clicks into place Note The keyboard module can t bear extra load or any surface p...

Page 15: ...the power LED is green Power on the computer or server after power on the KVM 8 Port 16 Port The LED of the connected port is green 24 Port 32 Port There is no port LED The factory default pass word...

Page 16: ...iguration SL SL Press this button moves your menu to make corresponding adjustment LED state Green running Red power off or access non standard VESA signal Flash green energy saving mode or no signal...

Page 17: ...ss Enter 2 Press Page Up or Page Down quickly moves to next BANK 3 Press any key from 0 9 to enter any port of current station type BANK PORT to enter other stations To access the OSD menu through mou...

Page 18: ...onitor OSD Hotkey set OSD hotkeys Lout Time off to set the time out value Tool F4 Reset RGB Press Enter reset RGB Beeper On press Enter switch Bee sounds Mouse Hot On press Enter to close touchpad ope...

Page 19: ...acters Diagram 4 1 1 Diagram 4 1 2 Note You can set up an account and password according to diagram 4 1 2 then User setup ok pops up showing that you have done your set and if Password Not Match pops...

Page 20: ...NULL If you set this function the port will be not displayed on the user s OSD menu Note The administrator always has full access to all the ports E g 1 If you want to set access permission of User1...

Page 21: ...iagram 4 1 6 Diagram 4 1 7 1 Open BRC mode F1 BRC Mode OFF Enter BRC Mode ON diagram 4 1 6 2 Open the port that need broadcast function Press key select the port that need broadcast function F7 a spea...

Page 22: ...ts according to the set scanning interval Power On Use this function to scan all signal ports with according to the set scanning interval Quick View Use this function to scan all ports with quick view...

Page 23: ...apsLock F12 F12 Ctrl Ctrl KVM Hotkey Lout Time off 0 off 01 99M set the screen saver timeout it is automatically log out if the current operator is no longer operate for a while then the KVM will be l...

Page 24: ...on Mouse Hot On To open and close the mouse with this function We can t operate the OSD when it is Off Restore Values Restore to original factory default values About KVM It shows the KVM version info...

Page 25: ...t editing Press Esc to cancel and exit the editing Note The NAME characters include All alpha characters A Z All numeric characters 0 9 Default value SYSTEMS Select ports with keys Press F7to include...

Page 26: ...ort KVM to port 2 see diagram 4 1 5 we can connect 8 computers to the 8 port KVM Press Pa UP to select port on current station then press Enter to operate the port 2 Return to OSD main menu Note 1 Pre...

Page 27: ...s the MAC address if it is failed to do so press the Refresh Devices according to above number 1 2 Click Query Device above number 2 it shows the IP KVM s IP address as well as gateway information see...

Page 28: ...ckets below press Enter key IP auto configuration None DHCP BOOTP IP address 192 168 0 70 Subnet mask 255 255 255 0 Gateway 0 0 0 0 for none 0 0 0 0 IP auto configuration With this option you can spec...

Page 29: ...ing to your network area 2 A screen appears as shown in above to indicate you to type your account and password after connected User name super Password pass 3 Then below screen appears Click Console...

Page 30: ...the remote host system the Remote Console window on your local window system is just one window among others In order to make keyboard and mouse work your Remote Console window must have the local inp...

Page 31: ...e Activates the mouse synchronization process Choose this option in order to synchronize the local with the remote mouse cursor This is especially necessary when using accelerated mouse settings on th...

Page 32: ...8 Port 16 Port 24 Port 32 Port User Manual 32 Diagram 6 3 Remote console options menu Diagram 6 4 Remote Console Options Menu Scaling...

Page 33: ...8 Port 16 Port 24 Port 32 Port User Manual 33 Diagram 6 5 Remote Console Options Menu Cursor Diagram 6 6 Video Settings panel...

Page 34: ...8 Port 16 Port 24 Port 32 Port User Manual 34 Diagram 6 7 soft keyboard Diagram 6 8 Soft Keyboard Mapping...

Page 35: ...8 Port 16 Port 24 Port 32 Port User Manual 35 Diagram 6 9 Encoding Compression...

Page 36: ...8 Port 16 Port 24 Port 32 Port User Manual 36 Diagram 6 10 Predefined Compression Diagram 6 11 Lossy Compression...

Page 37: ...te status console Diagram 6 13 Status Line Both the incoming In and the outgoing Out network traffic are visible in kb s If compressed encoding is enabled a value in brackets displays the compressed t...

Page 38: ...8 Port 16 Port 24 Port 32 Port User Manual 38 7 IP Menu 7 1 Remote console KVM console KVM IP Diagram 7 1...

Page 39: ...tials so that the Telnet management is fully conform to function controls in Web Once you have successfully logged into the KVM over IP a command line will be presented and you can enter according man...

Page 40: ...y wake up the computer when want to use it and thus save the power energy Diagram 7 3 Remote Wake up Set up the computer you need to remotely wake up 1 BIOS setting Enable the wake on settings in BIOS...

Page 41: ...8 Port 16 Port 24 Port 32 Port User Manual 41 Make sure Wake on Magic packet is Enable...

Page 42: ...8 Port 16 Port 24 Port 32 Port User Manual 42 Make sure the following two items are selected...

Page 43: ...te Wakeup to bring up the configuration page 2 Click on More entries to add additional controlled target 3 Key in the server description and the server s IP address 4 Click on Get MAC to get the corre...

Page 44: ...en the computer which connected with IP KVM Floppy Image Diagram 7 4 virtual media floppy disk The maximum image size is limited to 1 44MB To use a larger image mount this image via Windows Share or S...

Page 45: ...find an image file saved at desire destination after you created it with RawWrite 3 Open the browser to log into the IP KVM Click Virtual Media and then Floppy Disk Click the Browse button to choose t...

Page 46: ...nly This drive would be bootable under DOS mode if the motherboard BIOS on the host computer supporting USB BOOTABLE function Notes 1 If using other image creator software the output image extension f...

Page 47: ...ut the image file On Windows 95 98 and Windows ME do not specify the IP address but the server name NetBIOS Name Share folder name The name of the share to be used Image file name The image file name...

Page 48: ...tant to specify correct IP addresses and device names Otherwise IP KVM may not be able to access the referenced image file properly leave the given file unmounted and will display an according error m...

Page 49: ...8 Port 16 Port 24 Port 32 Port User Manual 49 Diagram 7 6 Explorer Context Menu Diagram 7 7 sharing configuration dialog...

Page 50: ...ermissions button Click OK to set the options for this share UNIX and UNIX like OS UNIX Solaris and Linux If you like to access the share via SAMBA SAMBA has to be set up properly You may either edit...

Page 51: ...8 Port 16 Port 24 Port 32 Port User Manual 51 storage Cdrom_image iso 3 Open the remote console and you can see the virtual CD as below picture...

Page 52: ...or Windows You can get the RawWrite software from the website http www chrysocome net rawwrite Diagram 7 8 RawWrite for Windows selection dialog From the menu select the tab Read Enter or choose the n...

Page 53: ...evice dev fd0 and saves the output in the specified output file tmp floppy image Adjust both parameters exactly to your needs input device etc Creating a CD DVD ISO Image MS Windows To create the imag...

Page 54: ...e is hereby shared over a TCP network connection Devices such as floppy drives hard discs CD ROMs and other removable devices like USB sticks can be redirected It is even possible to enable a write su...

Page 55: ...tion of Drive Redirection Force read only connections If enabled the Write Support for the Drive Redirection is switched off It is not possible to write on a redirected device Click Apply to submit yo...

Page 56: ...rive to be redirected and click OK Select the drive you would like to redirect All available devices drive letters are shown here Please note that the whole drive is shared with the remote computer no...

Page 57: ...The factory default Username is super and the default Password is pass Click Connect to redirect drive Warning Please be cautious that if Allow Write Support is selected all data on the shred media m...

Page 58: ...8 Port 16 Port 24 Port 32 Port User Manual 58 3 2 If click on Connect ISO Select the ISO image file and click Open 4 Finally the established Drive Redirection connection will be displayed...

Page 59: ...should not be a serious problem when the note above is respected If the write support is enabled a drive which is not locked might be damaged by the Drive Redirection Clicking on the Disconnect button...

Page 60: ...s in the boot order or the boot manager LILO GRUB This case was reported for some Windows versions 2000 XP other OS might not be fully excluded This behavior depends on the BIOS version used in that m...

Page 61: ...e Password Diagram 7 13 Setting Passwords Change password of currently logged in user Old Password type in current password New Password type in new password Confirm New Password re type new password...

Page 62: ...th 1 pre configured user account that has fixed permissions The account super has all possible rights to configure the device and to use all functions IP KVM offers Upon delivery the account super has...

Page 63: ...hanges the displayed user settings To delete an user press the button Delete Note The IP KVM is equipped with an host independent processor and memory unit which both have a limitation in terms of the...

Page 64: ...l 64 7 4 KVM Settings User Console The following settings are user specific That means the super user can customize these settings for every users separately Changing the settings for one user does no...

Page 65: ...8 Port 16 Port 24 Port 32 Port User Manual 65 Diagram 7 14 User Console Setting...

Page 66: ...in order to allow a faster transmission of data Therefore compression level 0 no compression uses only 16 Bit color depth At lower bandwidths only 4 Bit 16 colors and 2 Bit 4 gray scales are recommen...

Page 67: ...o leave the single mouse mode Remote Console Button Keys Button Keys allow simulating keystrokes on the remote system that cannot be generated locally The reason for this might be a missing key or the...

Page 68: ...use an additional acceleration setting The IP KVM tries to detect the acceleration and speed of the mouse during the mouse sync process Fixed mouse speed Use a direct translation of mouse movements be...

Page 69: ...ognized immediately A small filter displays all changes instantly but may lead to a constant amount of network traffic even if the display content is not really changing depending on the quality of th...

Page 70: ...8 Port 16 Port 24 Port 32 Port User Manual 70 7 5 Device Settings...

Page 71: ...ser Manual 71 Network The Network Settings panel allows changing network related parameters Each parameter will be explained below Once applied the new network settings will immediately come into effe...

Page 72: ...Changing the network settings of the IP KVM might result in losing connection to it In case you change the settings remotely make sure that all the values are correct and you still have an option to a...

Page 73: ...ake part in the service with the Dynamic DNS Server and assign a certain hostname to it He will get a nickname and a password in return to the registration process This account information together wi...

Page 74: ...t allowed in the Nickname Password You have used this password during your manual registration with the Dynamic DNS Server Check time The IP KVM registers itself for initiating the IP address of IP KV...

Page 75: ...8 Port 16 Port 24 Port 32 Port User Manual 75 Security Diagram 7 22 IP Filter Settings...

Page 76: ...lobal access mechanism through Internet However it is possible to generate and install a new base64 X 509 certificate that is unique for a particular IP KVM In order to do that the IP KVM is able to g...

Page 77: ...to your administration machine with the Download CSR button Send the saved CSR string to a CA for certification You will get the new certificate from the CA after a more or less complicated traditiona...

Page 78: ...name This is the network name of the IP KVM once it is installed in the user s network usually the fully qualified domain name It is identical to the name that is used to access the IP KVM with a web...

Page 79: ...ge Password Some certification authorities require a challenge password to authorize later changes on the certificate e g revocation of the certificate The minimal length of this password is 4 charact...

Page 80: ...8 Port 16 Port 24 Port 32 Port User Manual 80 Serial Port Diagram 7 27 Serial Port...

Page 81: ...sistent so you have to adjust it again after IP KVM loses power for more than a few minutes To avoid this you can use a NTP timeserver which sets up the internal clock automatically to the current UTC...

Page 82: ...lure or a firmware update are logged to a selection of logging destinations Each of those events belongs to an event group which can be activated separately The common way to log events is to use the...

Page 83: ...have to define a file name that is unique for each device When you change the NFS settings and press the button Apply the NFS share will be mounted immediately That means the NFS share and the NFS ser...

Page 84: ...Firmware updated by user device Internal log file cleared by user device Security Violation security Host Power host Host Reset host Connection to Remote Console failed reason console several Connecti...

Page 85: ...s maintenance activities on the IP KVM These include viewing its status update firmware view the event log and reset the unit Device Information The Device Status page contains a table with informatio...

Page 86: ...ou to download the IP KVM data file with specific support information This is an XML file with certain customized support information like the serial number etc You may send us this information togeth...

Page 87: ...he Remote Console is opened in exclusive mode the term exclusive mode is added For more information about this option see the Section called Remote Console Control Bar To display the user activity the...

Page 88: ...ial features A new firmware update is a binary file which will be sent to you by email or which you can download from the supplier web site If the firmware file is compressed file suffix zip then you...

Page 89: ...tion Warning IP KVM will verify firmware checksum before proceed upgrade procedure The mechanism help to prevent false firmware file to damage IP KVM It is crucial to keep a steady power supply during...

Page 90: ...of the currently running firmware and the version number of the uploaded firmware Pressing Update will store the new version and substitute the old one completely 4 After the firmware updated success...

Page 91: ...et specific parts of the device This involves resetting keyboard mouse USB video engine or the IP KVM device itself In general the IP KVM requires a reset when implementing a firmware update In the ev...

Page 92: ...licking on Reset of Reset Device will reboot the IP KVM system It will close all current connections to the administration console and to the Remote Console The whole process will take about one minut...

Page 93: ...compatible 101 104 keys keyboard can emulate the functions of the Mac keyboard The emulation mappings are listed in the below table PC Keyboard MAC Keyboard Shift Shift Ctrl Ctrl L_Win 1 L_Win 2 L_Wi...

Page 94: ..._Win is used in conjunction with other keys The corresponding functions are shown in the below table PC Keyboard Sun Keyboard L_Win L_Alt Stop L_Win F4 Again L_Win L_Ctrl Props L_Win F5 Undo L_Win F1...

Page 95: ...Y Resolution 1000 points inch 40 points mm Track Ball Eliminates the need for a separate external mouse Keyboard 99 keys 82 keys main keyboard 17 keys independent number pad Remote console KVM console...

Reviews: