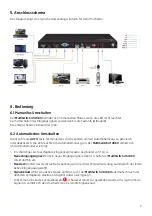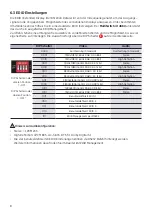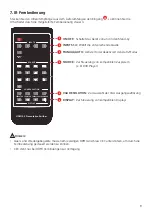
5
4. Gerätebeschreibung
4.1 Vorderseite
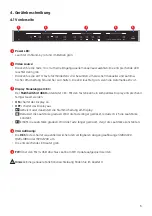
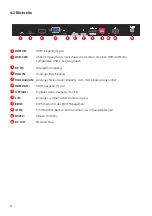
1
Power LED:
• Leuchtet im Stand-by rot und im Betrieb grün.
2
Video source:
• Drücken Sie die Taste 1 bis 4 um eine Eingangsquelle manuell auszuwählen. Die entsprechende LED
leuchtet dann grün.
• Drücken Sie die AUTO Taste für mindestens drei Sekunden, um zwischen manueller und automa-
tischer Umschaltung hin und her zu schalten. Die LED leuchtet grün, wenn die Automatik aktiv ist.
3
Display Steuerung per CEC:
Der
MultiSwitch 41 4K60
unterstützt CEC. Mit den Tasten kann ein kompatibles Display entsprechend
ferngesteuert werden.
• ON
schaltet das Display an.
• OFF
schaltet das Display aus.
•
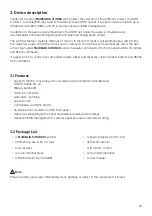
HDMI V2.0 4x1 Presentation Switcher with Audio Extraction
3. Panel Description
3.1 Front Panel
①
Power LED:
Illuminates red when the device is in standby, or illuminates green
when the device is power on.
②
VIDEO SOURCE:
l
Press
1~4
button to select input source respectively, and its corresponding LED
illuminates green.
l
Press and hold the
AUTO
button at least three seconds to enable automatic
switching mode, and its LED illuminates green.
③
DISPLAY CONTROL:
l
Press
ON
to turn on the display device.
l
Press
OFF
to turn off the display device.
l
Press
to mute/unmute audio of display device.
l
Press
to decrease the audio volume gradually, or press and hold it to
decrease the audio volume constantly.
l
Press
to increase the audio volume gradually, or press and hold it to
increase the audio volume constantly.
④
VGA RESOLUTION:
l
When the VGA input is selected, press
RES
button repeatedly can set the
output resolution to 1280x720, 1920x1080 or 1920x1200.
l
One of three LEDs illuminates green to indicate which output resolution is
selected.
⑤
FW:
Micro-USB port for firmware upgrade.
FW
VIDEO SOURCE
DISPLAY CONTROL
ON
OFF
1
2
3
4
AUTO
RES
1920x1080
1280x720
1920x1200
VGA RESOLUTION
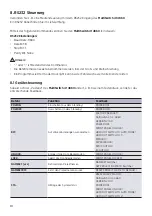
1
2
3
4
5
Aktiviert oder deaktiviert die Stummschaltung am Display.
•
HDMI V2.0 4x1 Presentation Switcher with Audio Extraction
3. Panel Description
3.1 Front Panel
①
Power LED:
Illuminates red when the device is in standby, or illuminates green
when the device is power on.
②
VIDEO SOURCE:
l
Press
1~4
button to select input source respectively, and its corresponding LED
illuminates green.
l
Press and hold the
AUTO
button at least three seconds to enable automatic
switching mode, and its LED illuminates green.
③
DISPLAY CONTROL:
l
Press
ON
to turn on the display device.
l
Press
OFF
to turn off the display device.
l
Press
to mute/unmute audio of display device.
l
Press
to decrease the audio volume gradually, or press and hold it to
decrease the audio volume constantly.
l
Press
to increase the audio volume gradually, or press and hold it to
increase the audio volume constantly.
④
VGA RESOLUTION:
l
When the VGA input is selected, press
RES
button repeatedly can set the
output resolution to 1280x720, 1920x1080 or 1920x1200.
l
One of three LEDs illuminates green to indicate which output resolution is
selected.
⑤
FW:
Micro-USB port for firmware upgrade.
FW
VIDEO SOURCE
DISPLAY CONTROL
ON
OFF
1
2
3
4
AUTO
RES
1920x1080
1280x720
1920x1200
VGA RESOLUTION
1
2
3
4
5
Reduziert die Lautstärke graduell. Wird die Taste länger gedrückt, reduziert sich die Lautstärke
konstant.
•
HDMI V2.0 4x1 Presentation Switcher with Audio Extraction
3. Panel Description
3.1 Front Panel
①
Power LED:
Illuminates red when the device is in standby, or illuminates green
when the device is power on.
②
VIDEO SOURCE:
l
Press
1~4
button to select input source respectively, and its corresponding LED
illuminates green.
l
Press and hold the
AUTO
button at least three seconds to enable automatic
switching mode, and its LED illuminates green.
③
DISPLAY CONTROL:
l
Press
ON
to turn on the display device.
l
Press
OFF
to turn off the display device.
l
Press
to mute/unmute audio of display device.
l
Press
to decrease the audio volume gradually, or press and hold it to
decrease the audio volume constantly.
l
Press
to increase the audio volume gradually, or press and hold it to
increase the audio volume constantly.
④
VGA RESOLUTION:
l
When the VGA input is selected, press
RES
button repeatedly can set the
output resolution to 1280x720, 1920x1080 or 1920x1200.
l
One of three LEDs illuminates green to indicate which output resolution is
selected.
⑤
FW:
Micro-USB port for firmware upgrade.
FW
VIDEO SOURCE
DISPLAY CONTROL
ON
OFF
1
2
3
4
AUTO
RES
1920x1080
1280x720
1920x1200
VGA RESOLUTION
1
2
3
4
5
Erhöht die Lautstärke graduell. Wird die Taste länger gedrückt, steigt die Lautstärke konstant an.
4
VGA Aufl ösung:
• Die
RES
Taste schaltet sequentiell zwischen den verfügbaren Ausgangsaufl ösungen 1280x720,
1920x1080 oder 1920x1200 um.
• Die entsprechende LED leutet grün.
5
FW:
Über den Micro-USB Anschluss kann ein FW Update aufgespielt werden.
Hinweis
: Eine genauere Funktionsbeschreibung fi nden Sie im
Kapitel 6
.
HDMI V2.0 4x1 Presentation Switcher with Audio Extraction
3. Panel Description
3.1 Front Panel
①
Power LED:
Illuminates red when the device is in standby, or illuminates green
when the device is power on.
②
VIDEO SOURCE:
l
Press
1~4
button to select input source respectively, and its corresponding LED
illuminates green.
l
Press and hold the
AUTO
button at least three seconds to enable automatic
switching mode, and its LED illuminates green.
③
DISPLAY CONTROL:
l
Press
ON
to turn on the display device.
l
Press
OFF
to turn off the display device.
l
Press
to mute/unmute audio of display device.
l
Press
to decrease the audio volume gradually, or press and hold it to
decrease the audio volume constantly.
l
Press
to increase the audio volume gradually, or press and hold it to
increase the audio volume constantly.
④
VGA RESOLUTION:
l
When the VGA input is selected, press
RES
button repeatedly can set the
output resolution to 1280x720, 1920x1080 or 1920x1200.
l
One of three LEDs illuminates green to indicate which output resolution is
selected.
⑤
FW:
Micro-USB port for firmware upgrade.
FW
VIDEO SOURCE
DISPLAY CONTROL
ON
OFF
1
2
3
4
AUTO
RES
1920x1080
1280x720
1920x1200
VGA RESOLUTION
1
2
3
4
5
1
2
3
4
5


