background image

n

Manual de instalación

e


Montageanleitung

Istruzioni di montaggio

i


!

d

Montage instructies

f


Notice de montage


g


Installation instructions

f


Attention aux étapes :

g


Check installation steps :

e


Atención a los pasos :

i


Attenzione ai passi :

n


Aandacht voor de stappen :                     

d


Achtung vor den Schritten :

P. 7 - 32 - 34

DES1475

Summary of Contents for Kinemoon Style REC664

Page 1: ...di montaggio i d Montage instructies f Notice de montage g Installation instructions f Attention aux tapes g Check installation steps e Atenci n a los pasos i Attenzione ai passi n Aandacht voor de s...

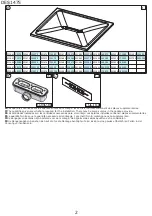
Page 2: ...voor de montage De bijgeleverde zakjes bevatten extra onderdelen dDie Mengenangaben beziehen sich auf die f r die Montage ben tigten Teile Es kann eine gewisse berzahl an Teilen in der Packung vorhand...

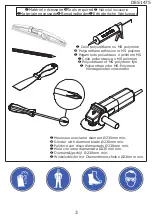
Page 3: ...ora con disco diamantado 230mm min i Mola con lama diamantata 230mm min n Diamantslijpschijf 230mm min d Winkelschleifer mit Diamanttrennscheibe 230mm min f Colle polyur thane ou MS polym re g Polyure...

Page 4: ...e area e Zone MAXIMA de recorte i Limite MASSIMO di taglio n MAXIMAAL aanpasbaar deel d 10cm fDECOUPE OPTIONNELLE DU RECEVEUR gZONE AVAILABLE FOR OPTIONAL RECUTTING eRECORTE OPCIONAL iTAGLIO OPZIONALE...

Page 5: ...10cm maxi 20cm maxi 1 2 6mm DES1475 5...

Page 6: ...ensare lo spazio tra le venature del piatto con uno strato di materiale adesivo n Breng met een spatel een laag polyurethaan lijm of MS polymeer lijm aan op de zaagranden en vul de tussenliggende ruim...

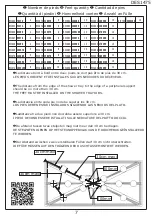
Page 7: ...stand tussen twee stelpoten mag niet meer dan 30 cm bedragen DE STELPOTEN DIENEN OP HET STEUNOPPERVLAK VAN DE DOUCHEBAK GE NSTALLEERD TE WORDEN dDer Abstand zwischen zwei verstellbaren F en darf 30 cm...

Page 8: ...argeur minimum 2 silicone d tanch it souple trait antifongique 3 l ment de soutien du joint silicone 4 silicone d appui 5 colle polyur thane ou MS polym re Il est indispensable d avoir un support impu...

Page 9: ...sion br lures chocs travaux prot ger le rayures d capants receveur contre toute Pendant toute la dur e des Ne pas utiliser d acide chlorhydrique ni de d graissant puissant Le montage d une soupape ant...

Page 10: ...port p riph rique indispensable 4 Encastr et pos sans pieds r glables 0 00 X 0 5 Y 0 5 0 00 X 1 Y 1 0 00 10 14 X 1 Y 1 Pr paration de l implantation Pr paration de l implantation Pr paration de l impl...

Page 11: ...p riph rique indispensable 4 Encastr et pos sans pieds r glables 0 00 prof 7 C C Y 1 X 1 16 26 D D 0 00 10 14 Y 1 X 1 Pr paration de l implantation Pr paration de l implantation Pr paration de l impla...

Page 12: ...one minimum width of 5mm 2 flexible sealing silicone treated antifungal 3 support Element silicone seal 4 silicone support 5 polyurethane adhesive or MS polymer It s essntial to have a rigid support o...

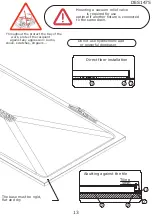
Page 13: ...at and dry shock scratches strppers work protect the recipient against any aggression burns Throughout the protect the tray of the Do not use hydrochloric acid or powerful degreaser Mounting a vacuum...

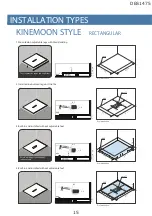
Page 14: ...ble legs The tray must be supported on all sides 4 Built in and installed without adjustable feet 0 00 X 0 5 Y 0 5 0 00 X 1 Y 1 0 00 10 14 X 1 Y 1 Pre installation Pre installation Pre installation Pr...

Page 15: ...ble feet Pose d un support p riph rique indispensable 4 Built in and installed without adjustable feet 0 00 prof 7 C C Y 1 X 1 16 26 D D 0 00 10 14 Y 1 X 1 Pre installation Pre installation Pre instal...

Page 16: ...anqueidad blanda tratada antihongos 3 soporte de la junta de silicona 4 silicona de apoyo 5 pegamento poliuretano o pol mero MS Es imprescindible instalar el plato en una zona que sea imputrescible en...

Page 17: ...5 Suelo r gido plano y seco indispensable rayaduras etc proteger el plato de golpes quemaduras Durante las obras No utilizar cido clorh drico o desengrasante potente La instalaci n de un venteo es ne...

Page 18: ...Instalaci n de un soporte perif rico esencial 4 Instalaci n a ras de suelo sin pies ajustables 0 00 X 0 5 Y 0 5 0 00 X 1 Y 1 0 00 10 14 X 1 Y 1 Preparaci n de la instalaci n Preparaci n de la instalac...

Page 19: ...aci n de un soporte perif rico es imprescindible 4 Instalaci n a ras de suelo sin pies regulables 0 00 prof 7 C C Y 1 X 1 16 26 D D 0 00 10 14 Y 1 X 1 Preparaci n de la instalaci n Preparaci n de la i...

Page 20: ...minimo 2 silicone di tenuta antimuffa 3 elemento di tenuta del silicone 4 supporte in silicone 5 colla poliuretanica o MS polimero E essanziale avere un supporto inalterabile su tutti i lati del piatt...

Page 21: ...lo robusto e non umido il piatto da graffi colpi attrezzi bruciature Durante la posa proteggere Non utilizzare acido cloridrico o forti sgrassatori Il montaggio di una valvola di sicurezza richiesto p...

Page 22: ...i regolabili Intallazione di un supporto periferico 4 Installato a filo pavimento 0 00 X 0 5 Y 0 5 0 00 X 1 Y 1 0 00 10 14 X 1 Y 1 Predisposizione impianto Predisposizione impianto Predisposizione imp...

Page 23: ...regolabili Intallazione di un supporto periferico 4 Installato a filo pavimento 0 00 prof 7 C C Y 1 X 1 16 26 D D 0 00 10 14 Y 1 X 1 Predisposizione impianto Predisposizione impianto Predisposizione i...

Page 24: ...liconenafwerking behandeld met een anti schimmellaag 3 element ter ondersteuning van de siliconenstrip 4 aanbrengen van siliconenkit 5 polyurethaan lijm of MS ployleer Markeer de positie van de afvoer...

Page 25: ...schokken en beschadigingen tijdens de werkzaamheden door krassen etc tegen brandplekken Bescherm de douchebak Geen chloorhoudende producten en ontvetters gebruiken De Montage van een afdichtingsklep v...

Page 26: ...e verstelbare poten Aanbrengen van rendversteviging is noodzakelijk 4 Ingebouwd zonder in hoogte verstelbare poten 0 00 X 0 5 Y 0 5 0 00 X 1 Y 1 0 00 10 14 X 1 Y 1 Voorbereiding montage Voorbereiding...

Page 27: ...verstelbare poten Aanbrengen van rendversteviging is noodzakelijk 4 Ingebouwd zonder in hoogte verstelbare poten 0 00 prof 7 C C Y 1 X 1 16 26 D D 0 00 10 14 Y 1 X 1 Voorbereiding montage Voorbereidin...

Page 28: ...gizid ausr steten Silikon Mindestbreite von 5mm 2 flexible Silikonabdichtung 3 Tra ger Element Unterbau Silikondichtung 4 Silikontr ger 5 Polyurethan Klebstoff oder MS Ploymer Wandanschl sse umlaufend...

Page 29: ...hten Verbrennungen St e Kratzer oder auf ausreichenden Schutz Abbeizmittel gegen aggressive Mittel achten W hrend den Installationsarbeiten Verwenden Sie keine s urehaltigen oder andere aggressive Ent...

Page 30: ...tzung 4 Bodengleiche Montage ohne Wannenf e 0 00 X 0 5 Y 0 5 0 00 X 1 Y 1 0 00 10 14 X 1 Y 1 Montagevorbereitung Fertigfu doden mit Wannenf e Montagevorbereitung Fertigfu doden mit Wannenf e Montagevo...

Page 31: ...zung 4 Bodengleiche Montage ohne Wannenf e 0 00 prof 7 C C Y 1 X 1 16 26 D D 0 00 10 14 Y 1 X 1 Montagevorbereitung Fertigfu doden mit Wannenf e Montagevorbereitung Fertigfu doden mit Wannenf e Montag...

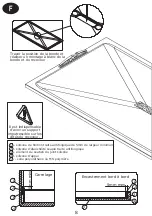
Page 32: ...plots glue polyurethane or MS polymer e Ubicacion de los puntos de pegamento poliuretano o polimero MS i Posizione dei punti di colla poliuretanica o MS polimero n Breng de polyurethaan lijm of MS po...

Page 33: ...B B B A B B fNe pas serrer gDo not overtighten eNo apretar iNon stringere nNiet vast schroeven dNicht festziehen A DES1475 33...

Page 34: ...24h DES1475 34...
Page 35: ...48 352 8 7 21 6LWH LQGXVWULHO KDXPHV HQ 5HW 1 SWLWXGH DX QHWWR DJH VDWLVIDLVDQW XUDELOLWp VDWLVIDLVDQW DES1475 35...

Page 36: ...A NEDERLAND BELGI SAV SERVICE HELPLINES ASSISTENZA POST VENDITA SERVICIO POSTVENTA 04697 33102 49 0 6074 30928 0 0382 6181 43 1 710 60 70 01 748 17 44 93 544 60 76 31 475 487 100 31 475 487 100 BELGIQ...

Reviews: