background image

 5mm mini 

 5mm mi

ni


2

Inbouw van rand tot rand

4

1

3

5

3

Tegelwerk

2

4

1

 1  - siliconenafwerking behandeld met een anti-schimmellaag van 

5mm mino

2  - waterdichte siliconenafwerking behandeld met een anti-schimmellaag

3  - element ter ondersteuning van de siliconenstrip
4  - aanbrengen van siliconenkit
5  - polyurethaan lijm of MS ployleer


Markeer de positie van de afvoer en  

situeer de afvoer en de douchebak 

op de gewenste plaats

Het is van essentieel

belang dat de douchebak

aan de zijkanten een

ondoordringbare steun heeft

24

Summary of Contents for Kinemoon Style REC664

Page 1: ...di montaggio i d Montage instructies f Notice de montage g Installation instructions f Attention aux tapes g Check installation steps e Atenci n a los pasos i Attenzione ai passi n Aandacht voor de s...

Page 2: ...voor de montage De bijgeleverde zakjes bevatten extra onderdelen dDie Mengenangaben beziehen sich auf die f r die Montage ben tigten Teile Es kann eine gewisse berzahl an Teilen in der Packung vorhand...

Page 3: ...ora con disco diamantado 230mm min i Mola con lama diamantata 230mm min n Diamantslijpschijf 230mm min d Winkelschleifer mit Diamanttrennscheibe 230mm min f Colle polyur thane ou MS polym re g Polyure...

Page 4: ...e area e Zone MAXIMA de recorte i Limite MASSIMO di taglio n MAXIMAAL aanpasbaar deel d 10cm fDECOUPE OPTIONNELLE DU RECEVEUR gZONE AVAILABLE FOR OPTIONAL RECUTTING eRECORTE OPCIONAL iTAGLIO OPZIONALE...

Page 5: ...10cm maxi 20cm maxi 1 2 6mm DES1475 5...

Page 6: ...ensare lo spazio tra le venature del piatto con uno strato di materiale adesivo n Breng met een spatel een laag polyurethaan lijm of MS polymeer lijm aan op de zaagranden en vul de tussenliggende ruim...

Page 7: ...stand tussen twee stelpoten mag niet meer dan 30 cm bedragen DE STELPOTEN DIENEN OP HET STEUNOPPERVLAK VAN DE DOUCHEBAK GE NSTALLEERD TE WORDEN dDer Abstand zwischen zwei verstellbaren F en darf 30 cm...

Page 8: ...argeur minimum 2 silicone d tanch it souple trait antifongique 3 l ment de soutien du joint silicone 4 silicone d appui 5 colle polyur thane ou MS polym re Il est indispensable d avoir un support impu...

Page 9: ...sion br lures chocs travaux prot ger le rayures d capants receveur contre toute Pendant toute la dur e des Ne pas utiliser d acide chlorhydrique ni de d graissant puissant Le montage d une soupape ant...

Page 10: ...port p riph rique indispensable 4 Encastr et pos sans pieds r glables 0 00 X 0 5 Y 0 5 0 00 X 1 Y 1 0 00 10 14 X 1 Y 1 Pr paration de l implantation Pr paration de l implantation Pr paration de l impl...

Page 11: ...p riph rique indispensable 4 Encastr et pos sans pieds r glables 0 00 prof 7 C C Y 1 X 1 16 26 D D 0 00 10 14 Y 1 X 1 Pr paration de l implantation Pr paration de l implantation Pr paration de l impla...

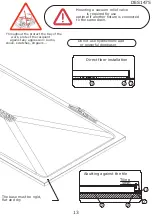
Page 12: ...one minimum width of 5mm 2 flexible sealing silicone treated antifungal 3 support Element silicone seal 4 silicone support 5 polyurethane adhesive or MS polymer It s essntial to have a rigid support o...

Page 13: ...at and dry shock scratches strppers work protect the recipient against any aggression burns Throughout the protect the tray of the Do not use hydrochloric acid or powerful degreaser Mounting a vacuum...

Page 14: ...ble legs The tray must be supported on all sides 4 Built in and installed without adjustable feet 0 00 X 0 5 Y 0 5 0 00 X 1 Y 1 0 00 10 14 X 1 Y 1 Pre installation Pre installation Pre installation Pr...

Page 15: ...ble feet Pose d un support p riph rique indispensable 4 Built in and installed without adjustable feet 0 00 prof 7 C C Y 1 X 1 16 26 D D 0 00 10 14 Y 1 X 1 Pre installation Pre installation Pre instal...

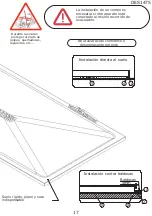
Page 16: ...anqueidad blanda tratada antihongos 3 soporte de la junta de silicona 4 silicona de apoyo 5 pegamento poliuretano o pol mero MS Es imprescindible instalar el plato en una zona que sea imputrescible en...

Page 17: ...5 Suelo r gido plano y seco indispensable rayaduras etc proteger el plato de golpes quemaduras Durante las obras No utilizar cido clorh drico o desengrasante potente La instalaci n de un venteo es ne...

Page 18: ...Instalaci n de un soporte perif rico esencial 4 Instalaci n a ras de suelo sin pies ajustables 0 00 X 0 5 Y 0 5 0 00 X 1 Y 1 0 00 10 14 X 1 Y 1 Preparaci n de la instalaci n Preparaci n de la instalac...

Page 19: ...aci n de un soporte perif rico es imprescindible 4 Instalaci n a ras de suelo sin pies regulables 0 00 prof 7 C C Y 1 X 1 16 26 D D 0 00 10 14 Y 1 X 1 Preparaci n de la instalaci n Preparaci n de la i...

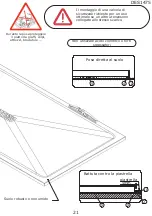
Page 20: ...minimo 2 silicone di tenuta antimuffa 3 elemento di tenuta del silicone 4 supporte in silicone 5 colla poliuretanica o MS polimero E essanziale avere un supporto inalterabile su tutti i lati del piatt...

Page 21: ...lo robusto e non umido il piatto da graffi colpi attrezzi bruciature Durante la posa proteggere Non utilizzare acido cloridrico o forti sgrassatori Il montaggio di una valvola di sicurezza richiesto p...

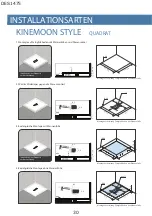
Page 22: ...i regolabili Intallazione di un supporto periferico 4 Installato a filo pavimento 0 00 X 0 5 Y 0 5 0 00 X 1 Y 1 0 00 10 14 X 1 Y 1 Predisposizione impianto Predisposizione impianto Predisposizione imp...

Page 23: ...regolabili Intallazione di un supporto periferico 4 Installato a filo pavimento 0 00 prof 7 C C Y 1 X 1 16 26 D D 0 00 10 14 Y 1 X 1 Predisposizione impianto Predisposizione impianto Predisposizione i...

Page 24: ...liconenafwerking behandeld met een anti schimmellaag 3 element ter ondersteuning van de siliconenstrip 4 aanbrengen van siliconenkit 5 polyurethaan lijm of MS ployleer Markeer de positie van de afvoer...

Page 25: ...schokken en beschadigingen tijdens de werkzaamheden door krassen etc tegen brandplekken Bescherm de douchebak Geen chloorhoudende producten en ontvetters gebruiken De Montage van een afdichtingsklep v...

Page 26: ...e verstelbare poten Aanbrengen van rendversteviging is noodzakelijk 4 Ingebouwd zonder in hoogte verstelbare poten 0 00 X 0 5 Y 0 5 0 00 X 1 Y 1 0 00 10 14 X 1 Y 1 Voorbereiding montage Voorbereiding...

Page 27: ...verstelbare poten Aanbrengen van rendversteviging is noodzakelijk 4 Ingebouwd zonder in hoogte verstelbare poten 0 00 prof 7 C C Y 1 X 1 16 26 D D 0 00 10 14 Y 1 X 1 Voorbereiding montage Voorbereidin...

Page 28: ...gizid ausr steten Silikon Mindestbreite von 5mm 2 flexible Silikonabdichtung 3 Tra ger Element Unterbau Silikondichtung 4 Silikontr ger 5 Polyurethan Klebstoff oder MS Ploymer Wandanschl sse umlaufend...

Page 29: ...hten Verbrennungen St e Kratzer oder auf ausreichenden Schutz Abbeizmittel gegen aggressive Mittel achten W hrend den Installationsarbeiten Verwenden Sie keine s urehaltigen oder andere aggressive Ent...

Page 30: ...tzung 4 Bodengleiche Montage ohne Wannenf e 0 00 X 0 5 Y 0 5 0 00 X 1 Y 1 0 00 10 14 X 1 Y 1 Montagevorbereitung Fertigfu doden mit Wannenf e Montagevorbereitung Fertigfu doden mit Wannenf e Montagevo...

Page 31: ...zung 4 Bodengleiche Montage ohne Wannenf e 0 00 prof 7 C C Y 1 X 1 16 26 D D 0 00 10 14 Y 1 X 1 Montagevorbereitung Fertigfu doden mit Wannenf e Montagevorbereitung Fertigfu doden mit Wannenf e Montag...

Page 32: ...plots glue polyurethane or MS polymer e Ubicacion de los puntos de pegamento poliuretano o polimero MS i Posizione dei punti di colla poliuretanica o MS polimero n Breng de polyurethaan lijm of MS po...

Page 33: ...B B B A B B fNe pas serrer gDo not overtighten eNo apretar iNon stringere nNiet vast schroeven dNicht festziehen A DES1475 33...

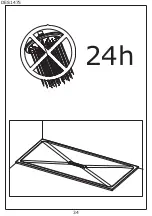
Page 34: ...24h DES1475 34...
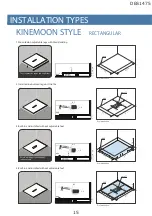
Page 35: ...48 352 8 7 21 6LWH LQGXVWULHO KDXPHV HQ 5HW 1 SWLWXGH DX QHWWR DJH VDWLVIDLVDQW XUDELOLWp VDWLVIDLVDQW DES1475 35...

Page 36: ...A NEDERLAND BELGI SAV SERVICE HELPLINES ASSISTENZA POST VENDITA SERVICIO POSTVENTA 04697 33102 49 0 6074 30928 0 0382 6181 43 1 710 60 70 01 748 17 44 93 544 60 76 31 475 487 100 31 475 487 100 BELGIQ...

Reviews: