background image

ADJUSTMENTS & OPERATION

USING THE LASER GUIDE SYSTEM

The laser guide system is controlled by the laser guide switch and will only turn on when
the bandsaw is plugged into a power source. This laser guide is used for ripping
operations only and the rip fence should be used. 

Warning! Do not stare directly into the laser beam.

1) Mark the line of the cut on the workpiece and turn on laser guide.
2) Align the line of cut on the workpiece with the laser guide beam.
3) Adjust the rip fence against the side of the workpiece.
4) Start the bandsaw.
5) When the blade reaches its maximum speed, feed the workpiece slowly into the blade.
6) Once cut is finished, turn bandsaw and laser off and remove your workpiece and

cut-off piece off the table.

ADJUSTING LASER GUIDE SYSTEM

If your laser guide does not seem to be aligned with the blade kerf, adjustments can be
made. 
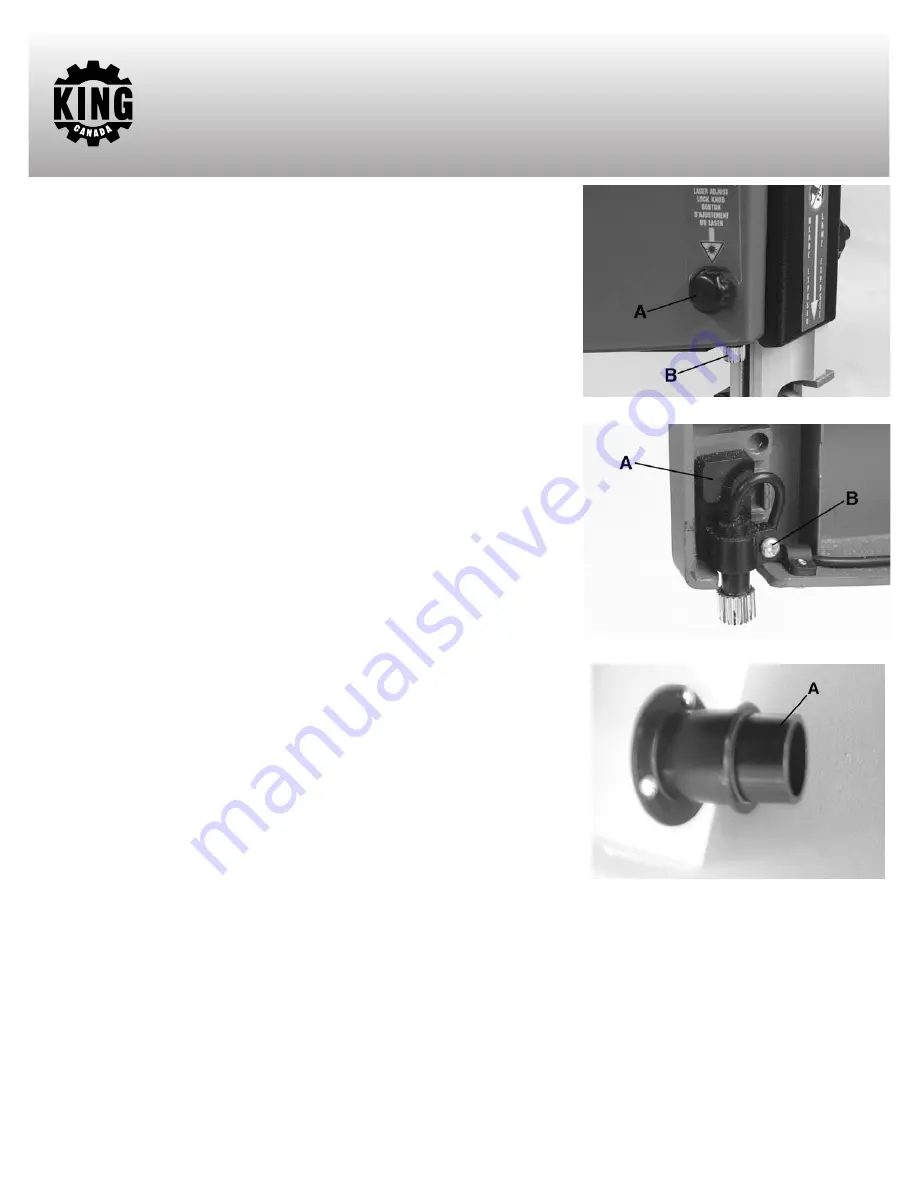
1) Loosen laser guide adjust knob (A) Fig.16.
2) Place a scrap piece of wood on the table and make a partial cut to indicate the blade

kerf, stop bandsaw and leave scrap piece of wood in table.

3) Align the laser tip (B) Fig.16 with the blade by moving the laser assembly (A) Fig.17 side

to side, you can also turn the laser tip by loosening the fixing screw (B) Fig.17 until the
laser beam is perfectly aligned with the blade kerf, once aligned, hold laser tip,
retighten laser guide adjust knob and fixing screw.

USING DUST CHUTE- HIGHLY RECOMMENDED

1) This bandsaw comes with a 1-1/4” dust chute and adaptor (A) Fig.18 which accepts a

standard 1-1/4” vacuum hose or 1-1/4” dust collector adaptors. Note: Adaptor must be
inserted inside the dust chute.

Note: Wood dust and chips in a confined area can give rise to fire or an explosion.
Keep ignition sources away from bandsaw. Keep saw dust to a minimum by
cleaning the inside of the bandsaw after every use.

BASIC BAND SAW OPERATIONS

A bandsaw is basically a curve cutting machine. It is also used for straight line cutting such

as crosscutting, ripping, mitering, beveling, compound cutting. 

This bandsaw was

designed to cut wood, wood-like products and plastics only.

For general cuts, follow the pattern lines by pushing and turning the workpiece

simul-taneously. Don’t attempt to turn the workpiece while engaged in the blade without
pushing it. If you don’t push the workpiece in this situation, the workpiece could bind or
twist the blade.

A curve cut is best performed by keeping the pattern line with the blade while turning the workpiece

before

the radius or the curve is cut. The

blade should cut in the middle of the pattern line (saw kerf) since wood cutting bandsaw blades are thin. 

WARNING! To avoid blade contact, adjust the upper guide assembly so that it barely clears the workpiece.

1) Use both hands while feeding the workpiece into the blade. Hold the workpiece firmly against the table. Use gentle pressure. Do not force

the workpiece, but gently allow the blade to cut.

2) The smallest diameter circle that can be cut out is determined by the width of the blade. A 1/4” blade will cut a minimum diameter of approx.

1-1/2”. A 1/8” wide blade will cut a minimum diameter of approx. 1/2”.

NOTE:  Relief cuts are made when an intricate curve (too small a radius for the blade) is to be cut. A relief cut is made by cutting through the
scrap section of a workpiece to the curve in a pattern line and then carefully backing the blade out. Several relief cuts should be made for
intricate curves. Then follow the pattern line as sections are cut off of the curve “relieving” blade pressure.

FIGURE 16

FIGURE 17

FIGURE 18

Summary of Contents for KC-902C

Page 1: ...9 WOOD BANDSAW WITH LASER INSTRUCTION MANUAL COPYRIGHT 2009 ALL RIGHTS RESERVED BY KING CANADA TOOLS INC MODEL KC 902C ...

Page 2: ...ents repairs done by an unauthorized service center alterations and lack of maintenance King Canada shall in no event be liable for death injuries to persons or property or for incidental special or consequential damages arising from the use of our products To take advantage of this limited warranty return the product at your expense together with your dated proof of purshase to an authorized King...

Page 3: ...elry rings watch because they could get caught in moving parts Non slip footwear is recommended Wear protective hair covering to contain long hair Roll up long sleeves above the elbows 12 ALWAYS WEAR SAFETY GLASSES Always wear safety glasses ANSI Z87 1 Everyday eye glasses only have impact resistant lenses thet are NOT safety glasses Also use a face or dust mask if cutting operation is dusty 13 DO...

Page 4: ... tension is properly adjusted To reduce the risk of accidental blade contact minimize blade breakage and provide maximum blade support always adjust the upper blade guide and blade guard to just clear the workpiece Caution Never cut metals with this bandsaw only wood and wood products Use extra caution with large very small or awkward workpieces Use extra supports tables blocks etc for any workpie...

Page 5: ...ower cord or plug is necessary do not connect the equipment grounding conductor to a live terminal Check with a qualified electrician or service personnel if the grounding instructions are not completely understood or if in doubt as to whether the tool is properly grounded Use only 3 wire extension cords that have 3 prong grounding plugs and 3 pole receptacles that accept the tool s plug Repair or...

Page 6: ... from inside the machine A 1 1 4 vacuum hose or dust collector adaptor can be used for optimal sawdust removal 15 Table lock knob Loosening this knob allows the table to be tilted for bevel cutting 16 Bevel scale pointer The bevel scale shows the degree to which the table is tilted for bevel cutting 17 Upper blade guide lock knob Loosen this knob before adjusting blade guide height 18 Upper blade ...

Page 7: ...ic nut C to the table and tighten INSTALLING RIP FENCE AND MITER GAUGE ON TABLE IF NEEDED The rip fence A Fig 6 is used as a fence to guide the workpiece for ripping operations and the miter gauge B is used for angled miter cuts and also to push the workpiece into the blade 1 Slide rip fence A Fig 6 onto the table and secure it by pushing down on the lock handle C It may be necessary to rotate the...

Page 8: ... desired angle using the bevel angle scale B Fig 8 and pointer C as a guide 3 Retighten the table lock knob by turning it clockwise to secure the table angle SETTING TABLE SQUARE TO THE BLADE 1 Loosen the upper blade guide assembly lock knob A Fig 7 and position the upper blade guide assembly all the way up Retighten the lock knob 2 Loosen the table lock knob A Fig 8 3 Place a small square on the ...

Page 9: ... blade midway between the two wheels The blade should move slightly with firm finger pressure It is recommended that the blade movement be only 1 8 NOTE Be careful not to overtension or undertension the blade Overtensioning may cause the blade to break while undertensioning may cause the blade to slip off the wheels Proper blade tension is necessary for accurate cutting TRACKING THE BLADE NOTE The...

Page 10: ...the gullet of the blade behind the blade teeth Tighten the hex nut and bolt 5 Adjust the upper blade guide pins A Fig 13 Loosen the two set screws B and press the two guide pins evenly against the sides of the blade Make sure that you don t pinch the blade Release the guide pins and rotate the upper wheel moving the blade downward Make sure that one guide pin is not further away from the blade tha...

Page 11: ...e to fire or an explosion Keep ignition sources away from bandsaw Keep saw dust to a minimum by cleaning the inside of the bandsaw after every use BASIC BAND SAW OPERATIONS A bandsaw is basically a curve cutting machine It is also used for straight line cutting such as crosscutting ripping mitering beveling compound cutting This bandsaw was designed to cut wood wood like products and plastics only...

Page 12: ...l replacement parts listed in this manual To avoid electrical hazards always reassemble exactly as the original assembly TROUBLE Motor will not run Blade does not run in the approximate center of the upper wheel Bandsaw slows down when cutting Blades breaking Saw is noisy when running Blade will not cut straight Blade guide will not stay in position PROBABLE CAUSE 1 Defective On Off switch or powe...

Reviews: