INSTALLATION
INSTALLATION
CUTTING CONDUIT AND INSTALLING WALL
ANCHORS
1. Remove PVC conduit from the hole in the wall.
2. Straighten and then insert the 4 wires at the rear
of the 6 outlet power panel through the PVC
conduit.
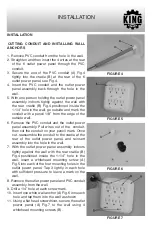
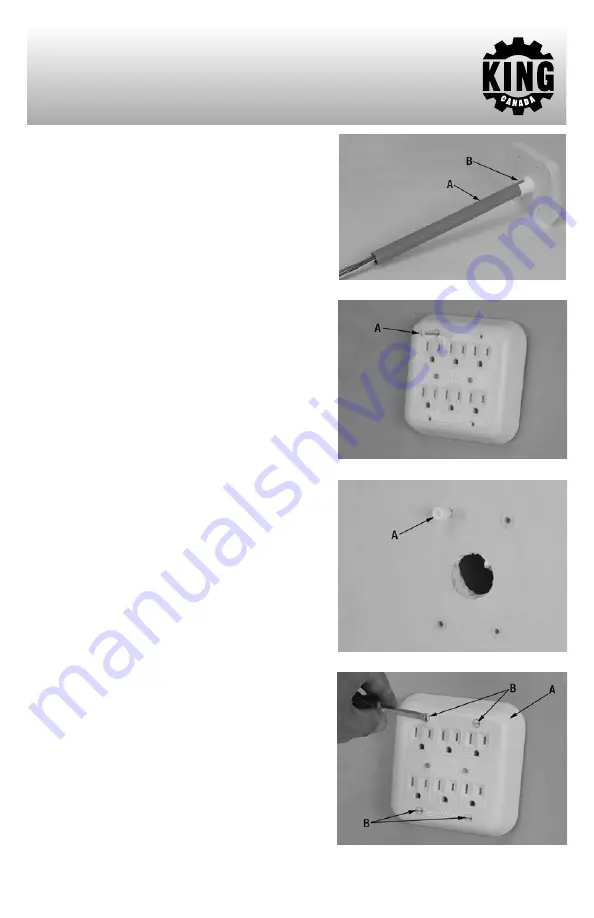
3. Secure the end of the PVC conduit (A) Fig.4
tightly into the cradle (B) at the rear of the 6
outlet power panel, see Fig.4.
4. Insert the PVC conduit and the outlet power
panel assembly back through the hole in the
wall.
5. With one person holding the outlet power panel
assembly indoors tightly against the wall with
the rear cradle (B) Fig.4 positioned inside the
1-1/4” hole in the wall, go outside and mark the
conduit with a pencil 1/8” from the edge of the
outside wall.
6. Remove the PVC conduit and the outlet power
panel assembly. Pull wires out of the conduit,
then cut the conduit on your pencil mark. Once
cut, reassemble the conduit to the cradle at the
rear of the outlet power panel, and reinsert
assembly into the hole in the wall.
7. With the outlet power panel assembly indoors
tightly against the wall with the rear cradle (B)
Fig.4 positioned inside the 1-1/4” hole in the
wall, insert a whitehead mounting screw (A)
Fig.5 into each of the four mounting holes in the
outlet power panel. Tap it lightly in each hole
with sufficient pressure to leave a mark on the
wall.
8. Remove the outlet power panel and PVC conduit
assembly from the wall.
9. Drill a 1/4” hole at each screw mark.
10. Insert one white wall anchor (A) Fig.6 into each
hole and tap them into the wall as shown.
11. Using a flat head screwdriver, secure the outlet
power panel (A) Fig.7 to the wall using 4
whitehead mounting screws (B).
FIGURE 4
FIGURE 5
FIGURE 6
FIGURE 7

