background image

STARTING ENGINE, LOADING 

& SPLITTING LOGS

STARTING YOUR ENGINE

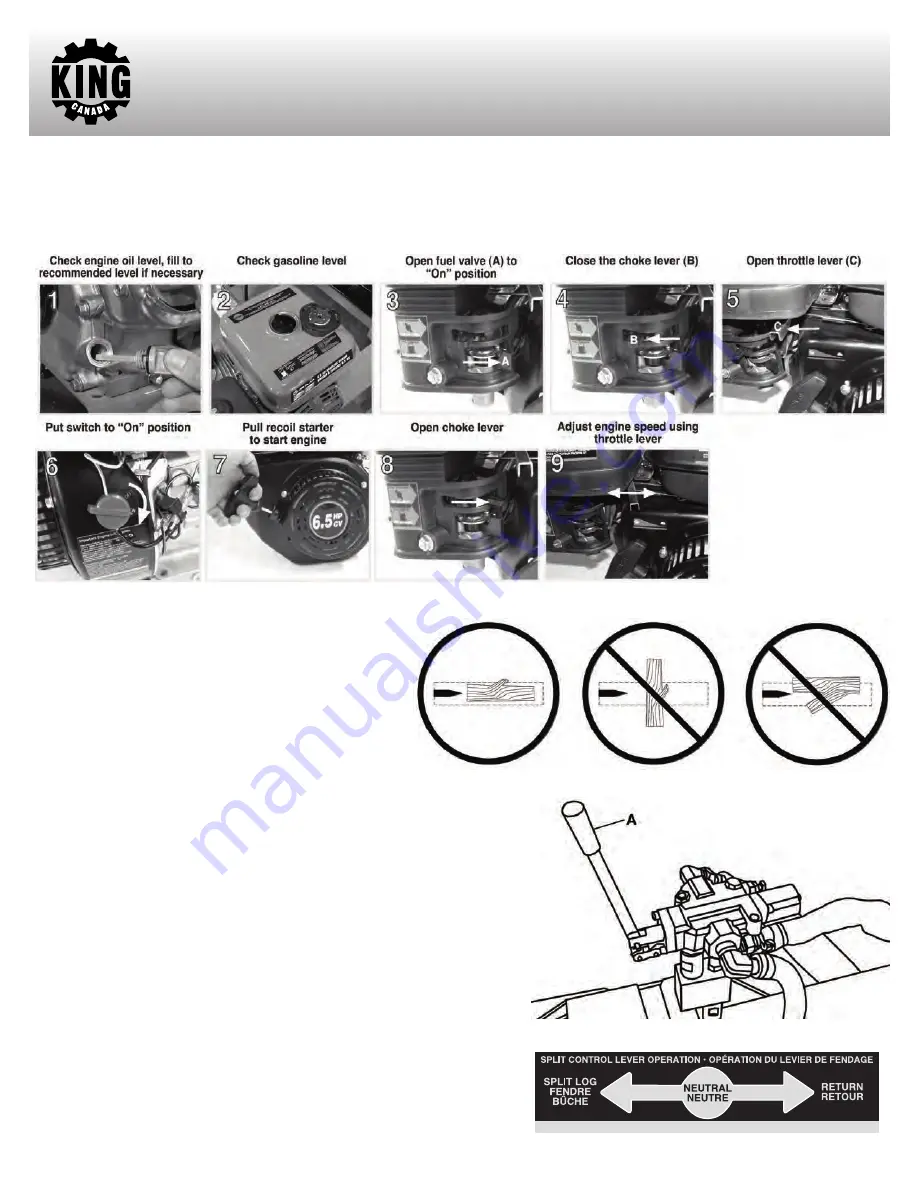
To safely start your engine, follow these steps (Fig.19).

Note: No choke is required on warm engines. Pull the recoil starter handle until resistance is felt, then pull it out with a rapid full arm stroke. Let

the starter rope rewind slowly, repeat if necessary. Allow engine to run at no load for 5 minutes upon each initial start-up to allow engine to stabi-

lize.

STOPPING YOUR ENGINE

1) Move the throttle lever (step 9, Fig.19) towards the right.

2) Turn the engine switch (step 6, Fig.19) to the “OFF” position

(upwards).

3) Close the fuel shut-off valve (step 3, Fig.19) by moving it to-

wards the left.

LOADING LOGS (Fig.20)

Load log onto beam with a cut end against the endplate – posi-

tioned for a lengthwise cut.

Notes:

a) The log splitter is designed only for cutting lengthwise with the grain, NOT for

cutting across the grain.

b) This log splitter is designed for cutting logs only up to a maximum of 16” in di-

ameter and 21” long. Larger diameter logs could get stuck on the wedge and

longer logs will not fit on the beam.

wARNING:

ALWAYS keep hands and feet away from the endplate, wedge, and

partially split logs while loading, operating and unloading the log splitter.

Important safety instruction: Vertical position loading: Place the log on the endplate

and turn it until it leans against the beam and is stable. If the log is too big or oddly

shaped, stabilize the log with wooden shims between the log and endplate or

ground. DO NOT use your leg or knee to stabilize the log. NEVER stabilize the log

by placing your hand on top of the log.

Splitting Operation

1) Move split control lever (A) Fig.21 toward endplate to extend wedge and split 

log.

2) Release split control lever to stop wedge movement when log is split.

WARNING: Cracks in logs can close quickly and pinch fingers. Keep fingers away

from any cracks that open in partially split logs.

Figure 19

Figure 20

Figure 21

Figure 22

Summary of Contents for Power Force KCG-20LS

Page 1: ...UCTION MANUAL COPYRIGHT 2016 ALL RIGHTS RESERVED BY KING CANADA TOOLS INC Read this manual Do not attempt to operate the log splitter until you have read and understood the safety operation and mainte...

Page 2: ...improper maintenance improper modification or the use of accessories and or attachments not specifically recommended Repairs necessary because of operator abuse or negligence or the failure to install...

Page 3: ...ThE ENGINE IS RUNNING Gasoline and gasoline vapors can become ignited by coming in con tact with hot components such as the muffler engine exhaust gases or from an electrical spark Turn engine off an...

Page 4: ...on The use of earplugs or other hearing protection device is recommended No Loose dangling clothing Loose or dangling apparel can become entangled in moving parts Never wear jewelry or loose fitting c...

Page 5: ...the oil level using this oil gauge dipstick 21 Power ON OFF switch This switch must be switched to ON be fore pulling recoil starter 22 Recoil starter Starts the engine 23 Fuel Shut off valve Regulat...

Page 6: ...2 hex bolts and 2 nylon hex nuts C already in place 2 Tighten bolts nylon hex nuts to 90 ft lbs with a torque wrench Installing outrigger legs to towbar 1 Connect an outrigger leg A Fig 3 to the fron...

Page 7: ...ts horizontal position Fix beam into position using the horizontal beam spring lock bolt A Fig 6 Installing gas engine pump assembly to the axle tank 1 Position the gas engine pump assembly A Fig 7 on...

Page 8: ...y tightening the hose clamps Note Secure all hose threaded couplings to the control valve to 44 45 ft lbs using a torque wrench Tighten all other threaded couplings to 47 ft lbs using a torque wrench...

Page 9: ...ning can burn or punc ture skin resulting in wounds that could cause blood poisoning infection disability gangrene amputation or death Therefore the following instructions should be heeded at all time...

Page 10: ...leaking or spraying on hot engine can ignite 4 Lock both outrigger legs A Fig 17 in the DOWN position before operating 5 Block the wheels to prevent unintended movement of the log splitter SET LOG SP...

Page 11: ...e grain b This log splitter is designed for cutting logs only up to a maximum of 16 in di ameter and 21 long Larger diameter logs could get stuck on the wedge and longer logs will not fit on the beam...

Page 12: ...to prevent carburetor flooding and reduce the chance of fuel leakage 4 Lock the front outrigger leg A Fig 23 in the DOWN position and the rear support leg B in the UP position before you move the log...

Page 13: ...used all gasoline must be drained from the tank and carburetor to prevent gum deposits from forming on these parts and causing possible malfunction of the engine To drain gasoline 3 Turn fuel shut of...

Page 14: ...plug 1 Dismantle the spark plug cap A Fig 29 by pulling it off the spark plug B Using a spark plug wrench undo the spark plug by turning it counterclockwise 2 Check to see if there is carbon sediment...

Reviews: