INITIAL SET-UP BEFORE OPERATION
INITIAL SETUP BEFORE OPERATION
ENGINE FUEL LEvEL
wARNING! Make sure there is enough fuel in the fuel tank before operating.
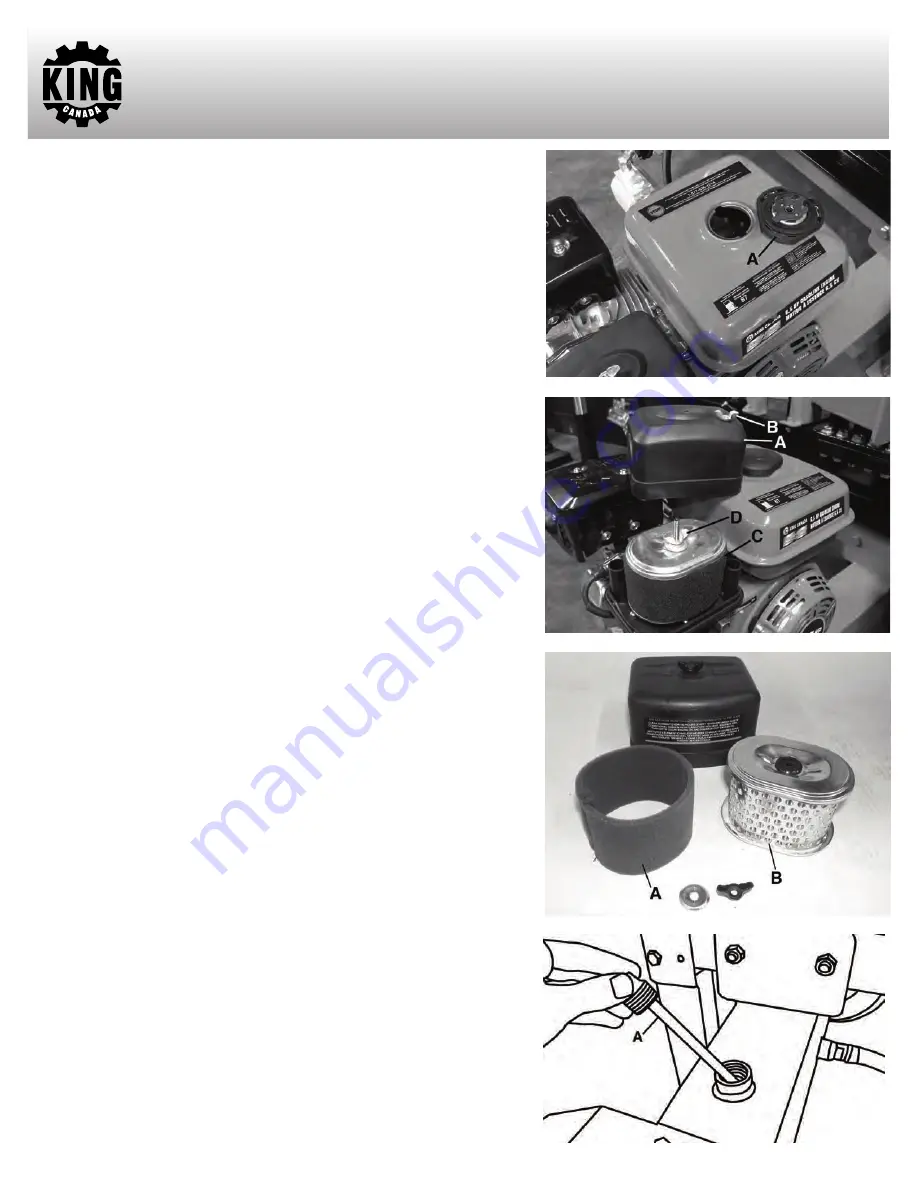
1) If it is necessary to add fuel, first make sure the engine switch is OFF, then open
the fuel cap (A) Fig.13 by turning it counterclockwise.
2) When refueling, keep in mind all safety precautions and make sure to add enough
fuel based on usage. Use clean unleaded gasoline with a minimum of 87 octane.
Do not mix oil with gasoline. Fuel tank capacity: 3,6 litres.
ENGINE AIR CLEANER FILTERS
The air cleaner filters should be checked before every start-up and after prolonged
storage, the following steps should be done when checking air cleaner filters;
1) Remove the wing nut (B) Fig.14, lift to remove the air cleaner cover (A) as shown.
2) Remove the wing nut and washer (D) Fig.14, lift and remove air filters (C) Fig.14
from its base. Remove the foam filter (A) Fig.15 from the paper filter (B), wash foam
filter in kerosene, squeeze kerosene out, soak foam filter in engine oil and squeeze
engine oil out.
3) In a well ventilated area, use pressurized air to blow dust out of the paper filter (B)
from the side opposite the filter’s normal air flow (clean side).
4) Replace filters and replace the air cleaner filter cover. Secure all parts with wing
nuts.
FILL LOG SPLITTER (AxLE/TANK) wITh hYDRAULIC FLUID
wARNING:
High fluid pressures and temperatures are developed in hydraulic log
splitters. Hydraulic fluid escaping through a pin hole sized opening can burn or punc-
ture skin, resulting in wounds that could cause blood poisoning, infection, disability,
gangrene, amputation, or death. Therefore, the following instructions should be
heeded at all times when inspecting or servicing the hydraulic components of the log
splitter.
-NEvER
check for leaks with your hand. Leaks can be located by holding a piece of
cardboard or wood (at least two feet long) with your hand at one end and passing the
other end over the suspected area (wear eye protection). Look for discoloration of the
cardboard or wood.
-NEvER
adjust the pressure of the pump or valve.
-If injured by escaping fluid
, no matter how small the wound is, see a doctor at once.
A typical injection injury may be a small wound that does not look serious. However,
severe infection or reaction can result if proper medical treatment is not administered
immediately by a doctor who is familiar with injection injuries.
1) Remove hydraulic oil dipstick (A) Fig.16.
2) Approximate hydraulic oil capacity: 12 litres.
3) Fill axle/tank with ISO 32 hydraulic oil. Use a funnel. Fill until the oil level reaches
approximately 1” from the top of the oil dipstick.
4) Start engine (see starting engine section for instructions) and use the control valve
lever (see operation section for instructions) to extend and retract wedge 5 (five)
times to remove air from the high pressure lines. This step can also be done by
manually cranking the engine by pulling the recoil starter handle several times.
5) With wedge retracted, check oil level again, fill the axle/tank until the oil level
reaches approximately 1” from the top of the oil dipstick. Reinstall oil dipstick.
Figure 13
Figure 14
Figure 15
Figure 16


