background image

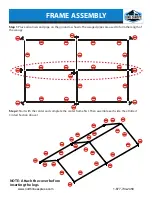
FRAME ASSEMBLY

Step 1: Place all corners and pipe on the ground as shown. The swaged pipes are used to form the length of 

the canopy.

Step 2: Start with the center and complete the center frame first. Then assemble each side. (See Dotted 

Circled Section Above)

NOTE:  Attach the cover before 

inserting the legs.

www.northlineexpress.com

1-877-734-2458

Summary of Contents for GC1020BK-CB

Page 1: ...ng Canopy Item GC1020BK CB With 6 Legs Black Mesh Cover Elastic Ball Straps Foot Pads Storage Bag WARNING Keep all flame and heat sources away from this tent fabric It is not fire proof The fabric will burn if left in continuous contact with any flame source www northlineexpress com 1 877 734 2458 ...

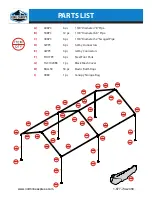
Page 2: ...8 Pipe C 4X6PC 6 pc 1 3 8 Diameter 52 Swaged Pipe D 3WPC 6 pc 3 Way Donnectors E 4WPC 3 pc 4 Way Connectors F FOOTPC 6 pc Steel Foot Pads G TGC1020BK 1 pc Black Mesh Cover H BALL50 50 pc Elastic Ball Straps I CB80 1 pc Canopy Storage Bag I www northlineexpress com 1 877 734 2458 ...

Page 3: ...wn The swaged pipes are used to form the length of the canopy Step 2 Start with the center and complete the center frame first Then assemble each side See Dotted Circled Section Above NOTE Attach the cover before inserting the legs www northlineexpress com 1 877 734 2458 ...

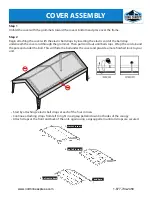
Page 4: ...e pole and under the ball This will hide the ball under the cover and provide a more finished look to your unit Start by attaching 2 elastic ball straps at each of the four corners Continue attaching straps from left to right in a zigzag pattern down both sides of the canopy Attach straps at the front and back of the unit again using a zigzag pattern until all straps are secured COVER ASSEMBLY sta...

Page 5: ...e 3 way connectors the same way See illustration Repeat step for the other side Make sure the hooks on the foot pads face the outside so that the straps on the leg skirts can be attached Step C Secure hook and loop straps on the leg skirts around the corner legs and attach the lower strap to the foot pads and pull tight NOTE The foot pads are NOT for anchoring the canopy IMPORTANT Once the legs an...

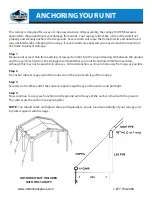
Page 6: ...ound and the eye of each anchor We strongly recommend that your unit be anchored 36in from each leg although this may not be possible in all cases DO install anchors as close to 36in away from legs as possible Step 2 Tie anchor cable or rope around the connector at the top of each leg of the canopy Step 3 Securely tie the other end of the cable or rope through the eye of the anchor and pull tight ...

Page 7: ...ric The tent fabric will burn if left in continuous contact with any flame source DO NOT cook underneath or near canopy DO NOT store or use flammable liquids underneath or near canopy DO NOT ignite or store fireworks underneath or near canopy DO NOT use bleach to clean cover DO NOT dry clean cover DO NOT wash cover in washing machine or dry in dryer Hand wash with mild soap and water only DO NOT a...

Page 8: ...u know strong weather is predicted remove the cover or take down the canopy unit completely The cover is designed to be quickly and easily removed Warranty All components of this canopy feature a 1 year limited warranty and are warranted to be free from defects in material and workmanship for a period of 1 year You must complete and return the enclosed warranty card promptly after purchase Please ...

Reviews: