background image

4

GB

Please read the operating instructions carefully and
observe the safety regulations at all costs. Keep the
operating instructions together with the triangular
sander.

SAFETY INSTRUCTIONS

Warning! When using electric tools, basic safety
precautions should always be followed to reduce the
risk of fire, electric shock and personal injury, in-
cluding the following.
Read all these instructions before attempting to operate
this product and safe these instructions.

For safe operation:

1. Keep work area clean

– Cluttered areas and benches invite injuries.

2. Consider work area environment

– Don't expose power tools to rain. Don't use power
tools in damp or wet locations. Keep work area well lit.
Don't use power tools in presence of flammable liquids
or gases.

3. Guard against electric shock

– Prevent body contact with grounded surfaces (e.g.
pipes, radiators, ranges refrigeratiors).

4. Keep children away

– Do not let visitors contact tool or extension cord. All
visitors should be kept away from work area.

5. Store idle tools

– When not is use, tools should be stored in dry, high, or
locked-up place, out of the reach of children.

6. Don't force tool

– It will do the job better and safer at the rate for which it
was intended.

7. Use right tool

– Don't force small tools or attachments to do the job of
heavy duty tool. Don't use tools for purposes not
intended: for example, don't use circular saw for cutt- ing
tree limbs or logs.

8. Dress properly

– Do not wear loose clothing or jewelry. They can be
caught in moving parts. Rubber gloves and nonskid
footwear are recommended when working outdoors.
Wear protective nair covering to contain long hair.

9. Use  safety glasses

– Also use face or dust mask if cutting operation is
dusty.

10. Don't abuse cord

– Never carry tool by cord or yank it to disconnect it from
receptacle. Keep cord from heat, oil and sharp edges.

11. Secure work

– Use clamps or a vise to hold work. It's safer than using
your hand and it frees both hands to operate tool.

12. Don't overreach

– Keep proper footing and balance at all times.

13. Maintain tools with care

– Keep tools sharp and clean for better and safer
performance. Follow instructions for lubricating and
changing accessories. Inspect tool cords periodically
and, if damaged, have repaired by authorized service
facility. Inspect extension cords periodically and replace
if damaged. Keep handles dry, clean and free from oil
and grease.

14. Disconnect tools

– When  not  in  use,  before  servicing,  and  when
changing accessories such as blades, bits and cutters.

15. Remove adjusting keys and wrenches

– Form the habit of checking to see that keys and
adjusting wrenches are removed from tool before turning
it on.

16. Avoid unintentional starting

– Don't carry plugged-in tool with finger on switch. Be
sure switch is off when plugging in.

17. Outdoor use extension cords

– When tool is used outdoors, use only extension cords
intended for use outdoors and so marked.

18. Stay alert

– Watch what you are doing. Use common sense. Do
not operate tool when you are tired.

19. Check damaged parts

– Before further use of the tool, a guard or other part
that is damaged should be carefully checked to
determine that it will operate properly and perform its
intended function. Check for alignment of moving parts,
binding of moving parts, breakage of parts, mounting,
and any other conditions that may affect its operation. A
guard or other part that is damaged should be properly
repaired or replaced by an authorized service center
unless otherwise indicated elsewhere in this instructions
manual. Have defective switches replaced by an
authorized service center. Do not use tool if switch does
not turn it on and off.

20.

Warning

– The use of any other accessory or attachment other
than recommended it this operating instruction or the
Einhell catalog may present a risk of personal injury.

21. Have your tool repared by an expert

– This electric appliance is in accordance with the
relevant safety rules repairing of electric appliances may
be carried out only by experts otherwise it may cause
considerable danger for the user.

22. Connect the dust extraction device

Wherever there are facilities for fitting a dust 
extraction system, make sure it is connected and used.

23. Always remove the plug from the socket before doing 

any work on the machine (cleaning, changing sanding 
paper etc.).

24. Never remove the plug from the socket by pulling on the 

power cable.

Anleitung KCD 180  13.11.2001 8:21 Uhr  Seite 4

Summary of Contents for 44.642.10

Page 1: ...sanleitung Dreieckschleifer Operating Instructions Triangular Sander Instructions de service Ponceuse triangulaire Gebruiksaanwijzing Driehoek schuurmachine Art Nr 44 642 10 Anleitung KCD 180 13 11 2001 8 21 Uhr Seite 1 ...

Page 2: ...e mit beiden Händen 2 D 12 Überdehnen Sie nicht Ihren Standbereich Vermeiden Sie abnormale Körperhaltung Sorgen Sie für sicheren Stand und halten Sie jederzeit das Gleichgewicht 13 Pflegen Sie Ihre Werkzeuge mit Sorgfalt Halten Sie Ihre Werkzeuge scharf und sauber um gut und sicher zu arbeiten Befolgen Sie die Wartungsvorschriften und die Hinweise für Werkzeugwechsel Kontrollieren Sie regelmäßig d...

Page 3: ...x 90 mm Baujahr 1997 Inbetriebnahme Nehmen Sie das Schleifpapier und legen es auf den Schleif teller Achten Sie darauf das sich die Löcher für die Staub absaugung überdecken Das Schleifpapier mit einem fest Druck per Hand fixieren Netzspannung beachten Die Spannung der Stromquelle muß mit den Angaben auf dem Typenschild des Gerätes übereinstimmen EIN AUS SCHALTEN Zum Einschalten des Gerätes muß nu...

Page 4: ...mance Follow instructions for lubricating and changing accessories Inspect tool cords periodically and if damaged have repaired by authorized service facility Inspect extension cords periodically and replace if damaged Keep handles dry clean and free from oil and grease 14 Disconnect tools When not in use before servicing and when changing accessories such as blades bits and cutters 15 Remove adju...

Page 5: ...ting plate SWITCHING ON OFF To switch on simply move the switch at the bottom of the tool from 0 to 1 Replacing the sanding paper The sanding pad features Velcro type backing for fast fixing of the sanding paper without a mechanical clamping device Before you attach new sanding paper remove all dust from the sanding pad by tapping and cleaning with a brush or compressed air Dust extractor The dust...

Page 6: ...3 Entretenez vos outils soigneusement Maintenez vos outils affûtes et propres afin de travailler mieux et plus sûrement Observez les prescriptions d entretien et les indications de changement de l outillage Vérifiez régulièrement l état de la fiche et du câble d alimentation et en cas d endommagement faites les changer par un spécialiste reconnu Vérifiez le câble de rallonge périodiquement et remp...

Page 7: ...n à la tension du secteur La tension de la source de courant doit être identique à celle indiquée sur la plaque signalétique de l appareil MARCHE ARRET Afin de mettre l appareil en marche il suffit de mettre l interrupteur situé à la partie inférieure de l appareil de 0 à la position 1 Changement du papier émeri Le disque à rectifier est muni d un système de bande Velcro pour papiers émeri Ceci pe...

Page 8: ...veiliger te kunnen werken Volg de onderhoudsvoorschriften en de adviezen omtrent het verwisselen van gereedschappen op Kontroleer regelmatig het snoer en laat dit bij beschadiging door een erkende vakman vernieuwen Kontroleer regelmatig het verlengsnoer en vervang het indien het is beschadigd Houdt de handgrepen droog en vrij van olie en vet 14 Trek de stekker uit het stopkontakt Als het apparaat ...

Page 9: ...schuurpapier met de hand goed vastdrukken De netspanning in acht nemen de spanning van de stroombron moet overeenkomen met de spanning aangeduid op het kenplaatje van het toestel IN UITSCHAKELEN U schakelt het toestel in door de schakelaar aan de onderkant van het toestel van 0 op 1 te plaatsen Verwisselen van schuurpapier Het schuurplateau is voorzien van een klithechtingssysteem voor schuurpapie...

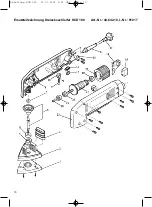
Page 10: ...10 Ersatzteilzeichnung Dreiecksschleifer KCD 180 Art Nr 44 642 10 I Nr 91017 Anleitung KCD 180 13 11 2001 8 21 Uhr Seite 10 ...

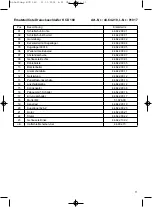
Page 11: ...useteil rechts 44 642 10 01 09 Kohlebürste 44 642 00 35 10 Bürstenhalter 44 642 00 10 11 Knickschutztülle 44 642 00 11 12 Netzleitung 44 642 00 12 13 Zugentlastungsschelle 44 642 00 13 14 Anschlußplatine 44 642 00 14 15 Kondensator 44 642 00 36 16 Paßgummi f Schalter 44 642 00 16 17 Ein Ausschalter 44 642 00 17 18 Mutter M4 51 026 00 19 Kegelrad 44 642 00 19 20 Kugellager 626 Z 44 642 00 20 21 Rot...

Page 12: ...ive CE relative à la compatibilité électro magnétique 89 336 CEE avec les modifications y apportées serienummer op het produkt conform de volgende richtlijnen is EG laagspanningsrichtlijn 73 23 EWG EG richtlijn Elektro magnetische compatibiliteit 89 336 EWG met wijzigingen avec les modifications y apportées Type du fabricant que la machine le produit EC Conformiteitsverklaring De ondertekenaar ver...

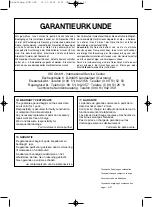
Page 13: ... 30 November 1998 und ist mit Kaufbeleg wie Rechnung Lieferschein oder deren Kopie nachzuweisen Innerhalb der Garantiezeit beseitigen wir alle Funktionsfehler am Gerät die nachweisbar auf mangelhafte Ausführung oder Materialfehler zurückzuführen sind Die dazu benötigten Ersatzteile und die anfallende Arbeitszeit werden nicht berechnet Während der Garantiezeit können defekte Dreieckschleifer unfrei...

Reviews: