background image

43

EN

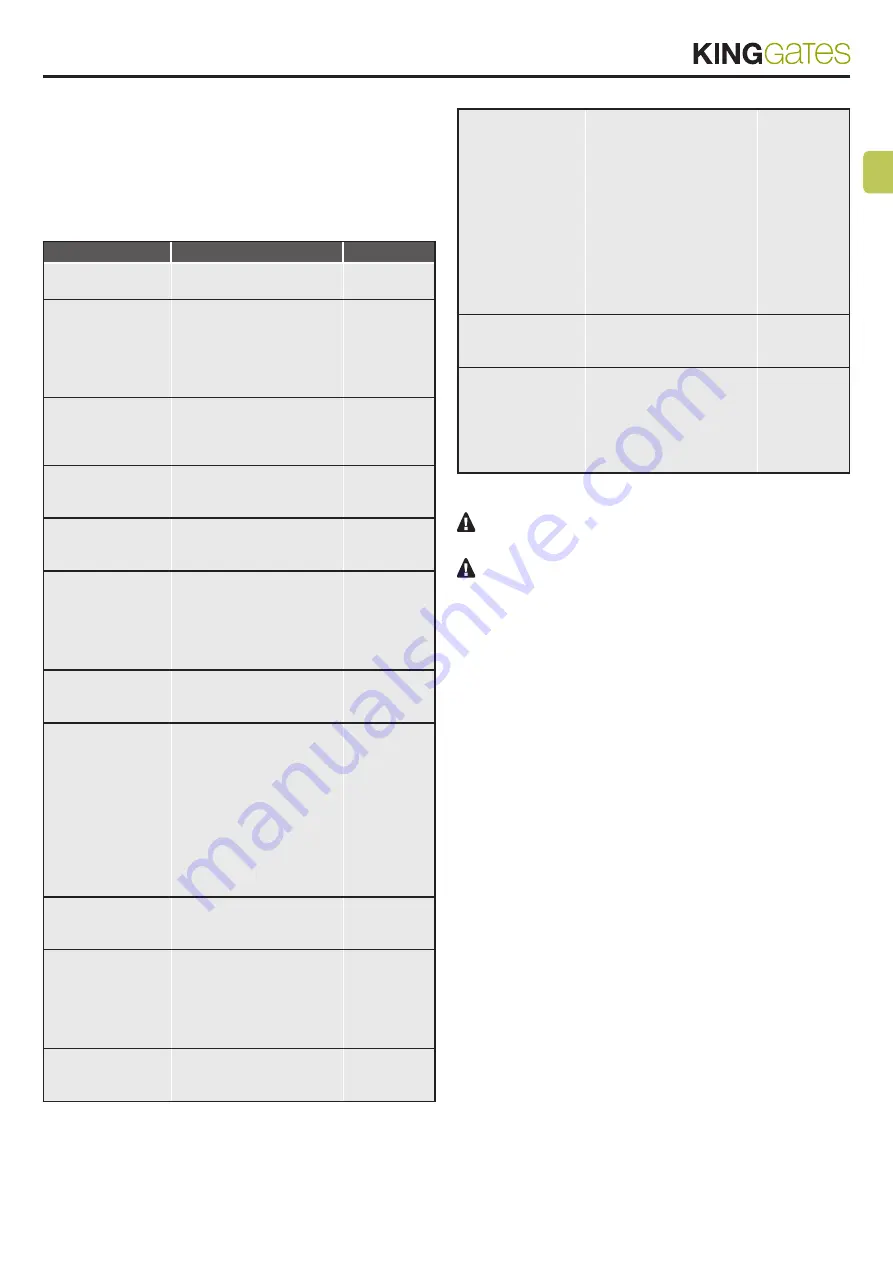
6.2 - 

Advanced programming of the 

automation’s movement

With this procedure, the control unit memorizes the times and power 
required for opening and closing the system.
Moreover, this procedure allows for setting:
- start point of slowdowns or their deletion.

STEP

ACTION

RESULT

1

PUT THE DOOR TO HALF 

WAY POSITION

2

PRESS THE 

SET

 BUTTON 

FOR 2 SECONDS

The yellow 
"

set

" LED 

flashes (if 

not, refer to 

Paragraph 

14.1)

3

PRESS THE 

RADIO


BUTTON FOR 1 SECOND

The yellow 
"

set

" LED 

turns on in 

fixed mode

4

THE DOOR PARTIALLY 

OPENS

The yellow 
"

set

" LED 

stays on

5

THE DOOR MOVES TO 

FULL CLOSING POSITION

The yellow 
"

set

" LED 

flashes

6

PRESS THE 

SET


BUTTON OR A BUTTON 

OF A PROGRAMMED 

TRANSMITTER

 OR 

CLOSE THE 

WIRED


START


CONTACT

The yellow 
"

set

" LED 

stays on

7

THE DOOR PERFORMS 

THE OPENING OVEMENT

The yellow 
"

set

" LED 

stays on

8

PRESS THE 

SET


BUTTON OR A BUTTON 

OF A PROGRAMMED 

TRANSMITTER

 OR 

CLOSE THE 

WIRED


START


CONTACT

 TO 

SET THE SLOWDOWN 

START POINT (*), TO HAVE 

NO SLOWDOWN, WAIT 

FOR THE MOVEMENT TO 

BE COMPLETED

The yellow 
"

set

" LED 

stays on 

9

THE DOOR COMPLETES 

THE OPENING PHASE

The yellow 
"

set

" LED 

stays on

10

PRESS THE 

SET


BUTTON OR A BUTTON 

OF A PROGRAMMED 

TRANSMITTER

 OR 

CLOSE THE 

WIRED


START


CONTACT


The yellow 
"

set

" LED 

stays on

11

THE DOOR PERFORMS 

A FULL CLOSING 

MOVEMENT

The yellow 
"

set

" LED 

stays on

12

DURING MOVEMENT: 
PRESS THE 

SET


BUTTON OR A BUTTON 

OF A PROGRAMMED 

TRANSMITTER

 OR 

CLOSE THE 

WIRED 


START 


CONTACT 

 TO 

SET THE SLOWDOWN 

START POINT 

 (*)

, TO 

HAVE NO SLOWDOWN, 

WAIT FOR THE 

MOVEMENT TO BE 

COMPLETED 

The yellow 

set

” LED 

stays on in 

fixed mode

13

THE DOOR COMPLETES 

THE CLOSING PHASE

The yellow 
"

set

" LED 

turns off

14

END OF THE 

PROGRAMMING 

PROCEDURE

The LEDs 

return to 

the normal 

operation 

configuration

(*) Minimum slowdown time must be 3 seconds.


 If the “FORCE” potentiometer is adjusted, the automa-

tion’s movement must be reprogrammed.

  The  red  “Error”  LED  flashes  during  the  automation’s 

movement when a mechanical stress point is detected (this 
corresponds to increased motor effort).

Adjust OBSTACLE Adjust OBSTACLE and FORCE knobs 
(slightly turn them clockwise) to solve this and check gate 
mechanics if necessary.

Summary of Contents for ROLLS

Page 1: ...nd warnings for installation and use FR Instructions et consignes pour l installation et l utilisation DE Anleitung und Warnhinweise für die Installation und Nutzung ES Instrucciones y advertencias para la instalación y uso PT Instruções para instalação e programação Made in Italy ...

Page 2: ...retenu responsable des éventuelles erreurs de traduction interprétation ou d impression DE Die Firma haftet nicht für eventuelle Druck oder Übertragungsfehler und behält sich das Recht vor ohne Vorankündigung Änderungen vorzunehmen die für angemessen erachtet werden Die auszugsweise Wiedergabe ist ohne Zustimmung des Herstellers untersagt Die angegebenen Abmessungen sind unverbindlich Die Original...

Page 3: ...eting a single transmitter 41 5 6 Remote tools free transmitter programming 41 6 Programming the door path 42 6 1 Basic programming of the automation s movement 42 6 2 Advanced programming of the automation s movement 43 7 Testing and commissioning 44 8 LED indication 44 8 1 Input status LED indication 44 8 2 Error status LED 44 9 RESET procedure 45 10 Devices connectable to the control unit 46 10...

Page 4: ...ig 1 Taking into account the hazards which could occur during installation and product operation the automation system should be installed ac cording to the following procedure Ensure there is a system device which is a means of disconnection from the supply mains This device must have a contact separation in all poles which ensures full disconnection under overvoltage category III conditions All ...

Page 5: ...d as an intruder pro tection system Additional devices must be in stalled alongside the automation system to guar antee effective protection Do not allow children to play with the fixed con trol devices Keep remote control devices out of their reach as well The automation system must not be used until it has been commissioned as described in chap ter 5 Testing and commissioning The packing materia...

Page 6: ...sh effective conditions the force required to move the leaf throughout its stroke must be measured to ensure that this value does not exceed the nominal torque specified in section 16 Technical specifications also to avoid overheating the control unit provides a limiter based on engine effort and cycle duration that intervenes when the maximum limit is exceeded N B 1 kg 9 81 N for example 500 N 51...

Page 7: ...Pause time for automatic re closing adjustable to between 0 and 180 sec with knob Paragraph 4 2 Obstacle sensitivity adjustment with knob Paragraph 4 2 Motor force adjustment with knob Paragraph 4 2 Incorporated radio receiver 433 92MHz compatible with King Gates rolling transmitters 6 indication LEDs Paragraph 8 Slow speed opening and closing customizable through dedicat ed programming 2 5 Techni...

Page 8: ...nsioner device As in fig 13 WARNING The gearmotor could break if the belt is TOO taut and it could cause unpleasant noise if it is TOO slack F fig 13 The installation of ROLLS must be carried out by qualified person nel in compliance with current legislation standards and regulations and the directions provided in this manual 3 1 Preliminary checks Before proceeding with the installation of ROLLS ...

Page 9: ...Assembly of guide supplied GRB3 The GRB3 guide is already assembled All you have to do is tension ing the belt using the M8 nut F fig 13 6 1 3 2 4 4a 4b 4c 1 2 3 7 B 5 A 1 2 3 9 B D 1 2 8 D C 12 A 2 1 10 11 13 F E ...

Page 10: ...o screws plugs or rivets according to the installation surface 03 Secure the brackets H using the screws I and nuts L select ing the hole most suited to ensure distance B as shown in fig 16 1 2 16 H L I B 0 400 mm 04 Using a ladder lift the gearmotor until the brackets are touching the ceiling Trace the drilling points and then return the gearmotor to the ground 05 06 Drill at the outlined points ...

Page 11: ...or again 1 2 23 Q R 3 3 Installation of other devices If other devices are needed install them following the directions pro vided in the corresponding instructions Check the devices which can be connected to ROLLS in fig 1 and in section 3 5 Description of electrical connections 3 4 Electrical connections 01 Open the cover by removing the cover plastic 1 and unscrewing the screw 2 fig 24 Slide the...

Page 12: ...er supply 230V ac 13 14 Aerial Antenna ground 13 Antenna signal 14 TIMER FUNCTION if START contact is kept closed for instance through a timer controlled or bistable relay control unit opens the door and leaves the door opened The automa tion does not accept closing commands neither automatic nor wired until START contact is reopened In this mode dip switch 1 STEP is set to OFF and dip 2 AUTO to O...

Page 13: ...g Turning the knob clockwise increases the pause time from 0 to 180 seconds Please note this knob is functional only when AUTO dip switch is put to ON The variation of the FORCE potentiometer requires re peating the programming of the door path par 6 32 4 1 Dip switch adjustment SET 3 HAZ 4 5 6 7 8 9 10 L N ON 1 2 3 4 FORCE OBST RADIO START SET 3 HAZ 4 5 6 7 8 9 10 L N FORCE OBST RADIO START DIP S...

Page 14: ... fixed mode 2 PRESS THE START BUT TON FOR 1 SECOND The red radio LED remains lit in fixed mode and the red error LED turns on in fixed mode 3 PRESS THE DESIRED BUTTON OF ALL THE TRANSMITTERS TO BE PROGRAMMED The red radio LED flashes and the red error LED turns on in fixed mode 4 PRESS THE RADIO BUT TON UNTIL THE RADIO LED TURNS OFF OR WAIT 20 SECONDS TO EXIT THE PROCEDURE The red radio LED and th...

Page 15: ... radio LED flashes quickly to signal the deletion in progress 3 WAIT FOR THE END OF THE PROCEDURE The red radio LED turns off 5 5 Deleting a single transmitter This operation deletes a single transmitter from the memory STEP ACTION RESULT 1 PRESS THE RADIO BUTTON FOR 4 SECONDS AND RELEASE IT WHEN THE RADIO LED STARTS FLASHING The red radio LED flashes if not refer to Paragraph 14 1 2 PRESS THE SET...

Page 16: ...8 THE DOOR PERFORMS A FULL CLOSING MOVEMENT WITH SLOWDOWNS 9 END OF THE PROGRAMMING PROCEDURE If the FORCE potentiometer is adjusted the automa tion s movement must be reprogrammed The red Error LED flashes during the automation s movement when a mechanical stress point is detected this corresponds to increased motor effort Adjust OBSTACLE and FORCE knobs slightly turn them clockwise to solve this...

Page 17: ...SLOWDOWN WAIT FOR THE MOVEMENT TO BE COMPLETED The yellow set LED stays on 9 THE DOOR COMPLETES THE OPENING PHASE The yellow set LED stays on 10 PRESS THE SET BUTTON OR A BUTTON OF A PROGRAMMED TRANSMITTER OR CLOSE THE WIRED START CONTACT The yellow set LED stays on 11 THE DOOR PERFORMS A FULL CLOSING MOVEMENT The yellow set LED stays on 12 DURING MOVEMENT PRESS THE SET BUTTON OR A BUTTON OF A PRO...

Page 18: ...d and S2 Photo terminal 3 open red contact S1 Edge open and S2 Photo closed yellow contacts S1 Edge and S2 Photo both closed off contacts S1 Edge and S2 Photo both open RED START LED on in fixed mode if the Start contact terminals 5 8 is closed off if the Start contact terminals 5 8 is open 36 RED STOP LED on in fixed mode if the Stop contact terminals 6 8 is closed off if the Stop contact termina...

Page 19: ...ncoder 7 Obstacle detection due to current 9 RESET procedure Reset procedure deletes door travel parameters par 6 and all ad vanced functions par 11 It can be performed in case of program ming mistakes and it brings the STAR GDO control board back to factory settings This reset doesn t affect memorized radio transmitters see par 5 for radio trasmitters management STEP ACTION RESULT 1 PRESS THE STA...

Page 20: ...d be cross installed see Fig 38c Connection of the TX transmitter Connection of the RX receiver Viky30 VA 8 or 10 OV 7 1 2 VA 8 or 10 0V 7 S2 Photo 3 or S1 Edge 9 1 2 3 4 5 VA 8 or 10 38a 38b 1 2 3 4 5 6 7 8 9 10 14 13 L N 10 2 10 5 10 4 10 3 10 3 10 6 10 1 10 2 10 1 Warning light TERMINALS 1 2 The warning light is an accessory used for signaling any movement of the gate leaf Connected lamps 24V 1...

Page 21: ...a timer controlled or bistable relay control unit opens the gate and leaves the gate opened The automa tion does not accept closing commands neither automatic nor wired until START contact is reopened In this mode dip switch 1 STEP is set to OFF and dip 2 AUTO to ON to ensure that the gate never remains locked open If multiple START contacts are connected connect the contacts in parallel 38c If ST...

Page 22: ...after SET is pressed backjump 4 example 2 current backjump 5 after SET is pressed 2 times backjump 1 The yellow set LED remains lit in fixed mode and the red error LED indicates the backjump level saving of the set backjump The control unit has additional special features not required for most of standard installations All descriptions are reported here below 12 Backjump adjustment 6 PRESS THE RAD...

Page 23: ...2 PRESS THE RADIO BUTTON FOR 1 SECOND 2 1a If the Sic LED is off the AUX output is deactivated if the setting is correct go to Point 4 if not proceed to Point 3a The SIC LED is switched off 3a Setting the AUX output on the Phototest terminals 4 and 8 PRESS THE SET BUTTON FOR 1 SECOND The SIC LED lights up in red or 3b Setting the AUX output on the Flash terminals 1 and 2 PRESS THE SET BUTTON AGAIN...

Page 24: ... 10 SECONDS TO EXIT THE PROCEDURE All the LEDs go back to standard behavior 13 2 Selection of the type of devices connected to S1 Edge Default S1 Edge set for devices with normally closed con tact terminal 9 This procedure allows for setting the S1 Edge output for managing 8 2kOhm resistive edges The control unit constantly verifies the integrity of the edge by meas uring the resistance between th...

Page 25: ...tentiometer slightly in a clockwise direction a make sure that the control unit stops feeding the motor at the end of its stroke 3 If not sufficient turn the POWER knob slightly clockwise and reprogram automation s movement 4 Avoid reduce the slowdown travel phase Intervention of the safety devices Check that the orange SIC LED and the red STOP LED remain lit during the entire manoeuvre If there a...

Page 26: ...ealth risks As indicated by the adjacent symbol the product may not be disposed of together with domestic waste Sort the materials for disposal according to the methods envisaged by current legislation in your area or return the product to the retailer when purchasing an equivalent product WARNING Local regulations may envisage the application of heavy fines in the event of improper disposal of th...

Page 27: ...d power 250W 300W Insulation class 1 a safety grounding system is required ROLLS courtesy light LED Flashing Light Output for 1 flashing light 24V 15W Working temp 20 C 55 C Use in acid saline or potentially explosive atmosphere No Protection class IP 40 use only in indoor or protected environments Dimensions 414 x 264 x h 110 mm Guide technical characteristics Code Transmission type Guide length ...

Page 28: ...inery Annex II part 1 section B Directive 2006 42 EC OF THE EUROPEAN PARLIAMENT AND COUNCIL of 17 May 2006 related to machinery and which amends the directive 95 16 EC recast It is hereby declared that the pertinent technical documentation has been compiled in compliance with appendix VII B of directive 2006 42 EC and that the following essential requirements have been observed 1 1 1 1 1 2 1 1 3 1...

Page 29: ...acturer s details Timbro Stamp Azienda Company Località Address Provincia Province Recapito telefonico Tel Referente Contact person King Gates S r l Phone 39 0434 737082 Fax 39 0434 786031 info king gates com www king gates com Technical support Monday Friday 8 30 12 30 14 18 UTC 01 00 time 39 0434 1859988 More ...

Reviews: