background image

ASSEMBLY

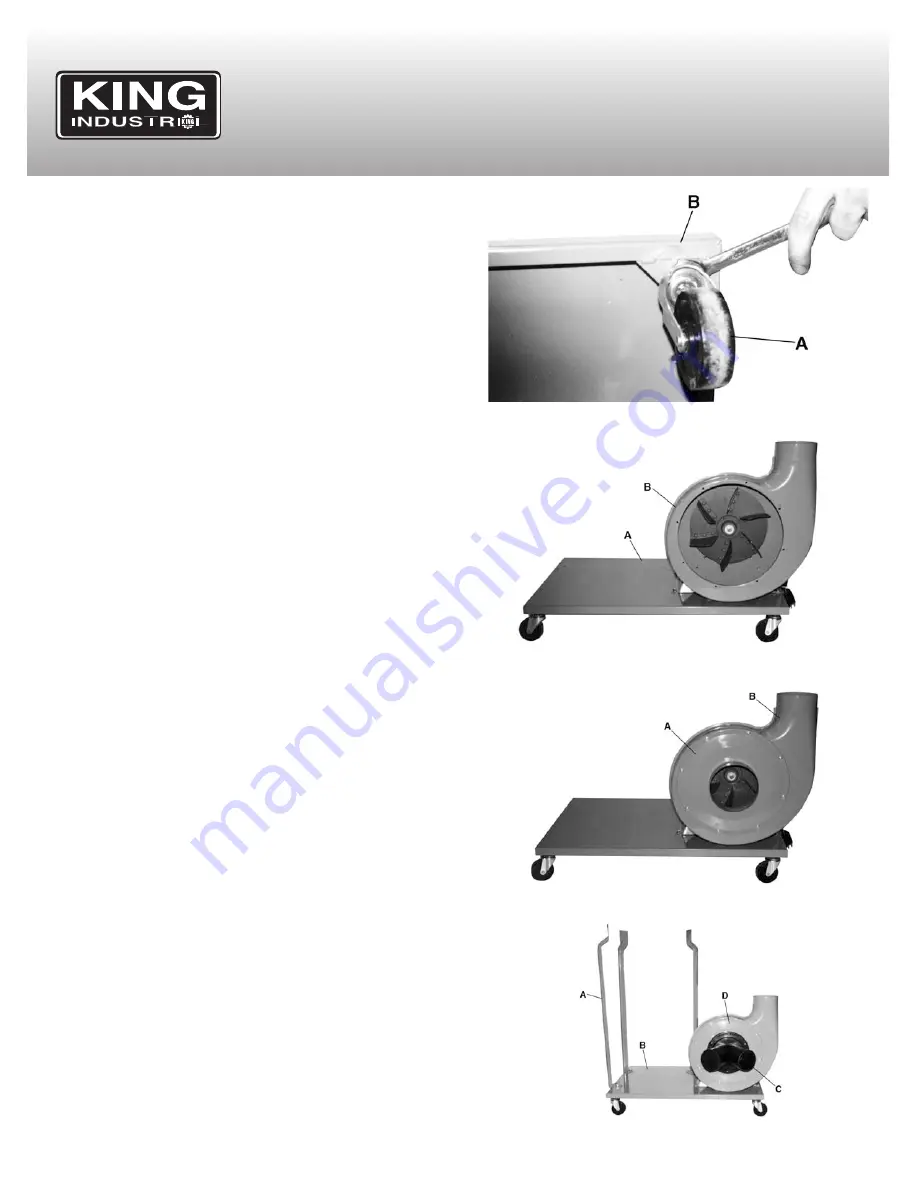
1. Install the four casters (A) Fig.5 to the under side of the base (B). Do

not remove the lock washers and nuts from caster roller shafts; these
act as spacers. Insert caster shaft into threaded hole on the underside
of the base, turn until it is snug, then tighten nut with wrench.

2. Place base with casters (A) Fig.6 on the ground and attach the motor

and fan housing assembly (B) to the base using 4 hex. bolts and 4 flat
washers.

3. Attach inlet cover (A) Fig.7 to fan housing (B) using 8 pan hd screws.

4. Attach the three support brackets (A) Fig.8 to the base (B) using 6

hex. bolts and 6 flat washers. Hand tighten only at this point.

5. Attach hose adapter (C) to inlet cover (D) by pressing it into the inlet

cover opening.

FIGURE 5

FIGURE 6

FIGURE 7

FIGURE 8

Summary of Contents for KC-3109C

Page 1: ...INSTRUCTION MANUAL MODEL KC 3109C COPYRIGHT 2012 ALL RIGHTS RESERVED BY KING CANADA TOOLS INC 2 HP 1200 CFM DUST COLLECTOR ...

Page 2: ...ing Canada shall in no event be liable for death injuries to persons or property or for incidental special or consequential damages arising from the use of our products To take advantage of this limited warranty return the product at your expense together with your dated proof of purshase to an authorized King Canada service center Contact your retailer or visit our web site at www kingcanada com ...

Page 3: ...ng when changing accessories or attachments 16 AVOID ACCIDENTAL STARTING Make sure the swich is in the OFF position before plugging in 17 USE RECOMMENDED ACCESSORIES Consult the manual for recommended accessories Follow the instructions that accompany the accessories The use of improper accessories may cause hazards 18 NEVER STAND ON TOOL Serious injury could occur if the tool tips over Do not sto...

Page 4: ...ANENT INJURY DO NOT CONNECT THE POWER CORD UNTIL THE FOLLOWING STEPS HAVE BEEN COMPLETED 1 Assembly mounting and alignment 2 Learn the function and proper use of the ON OFF switch 3 Read and understand all instructions and operating procedures throughout the manual BEFORE EACH USE 1 Inspect your dust collector If any parts are missing bent or fail in any way or any electrical components do not wor...

Page 5: ...es and ordinances WARNING TO MAINTAIN PROPER GROUNDING OF YOUR DUST COLLECTOR DO NOT REMOVE OR ALTER THE GROUNDING PRONG IN ANY MANNER WARNING IF NOT PROPERLY GROUNDED THIS DUST COLLECTOR CAN CAUSE ELECTRICAL SHOCK PARTICULARLY WHEN USED IN DAMP LOCATIONS TO AVOID SHOCK OR FIRE IF THE POWER CORD IS WORN OR DAMAGED IN ANY WAY HAVE IT REPLACED IMMEDIATELY EXTENSION CORDS The use of an extension cord...

Page 6: ...the shipping carton 2 Report any damage to your retailer 3 Do not discard any shipping materials until after the dust collector has been assembled and is running properly Contents of the shipping carton Fig 4 1 Bag hanger 1 Base 1 Hanger bracket 1 Hose 3 Support brackets 1 Motor fan assembly 1 Transparent bottom collection bag 1 Cloth upper filter bag KC 3109C only 2 Hose clamps 2 Retainer straps ...

Page 7: ...with wrench 2 Place base with casters A Fig 6 on the ground and attach the motor and fan housing assembly B to the base using 4 hex bolts and 4 flat washers 3 Attach inlet cover A Fig 7 to fan housing B using 8 pan hd screws 4 Attach the three support brackets A Fig 8 to the base B using 6 hex bolts and 6 flat washers Hand tighten only at this point 5 Attach hose adapter C to inlet cover D by pres...

Page 8: ...7 Slide hose clamps A Fig 10 onto each end of the hose B Attach hose between the fan housing C and the main housing D Tighten clamps to secure hose using a screwdriver 8 Insert bag hanger A Fig 11 into hanger bracket B and then hook the top dust bag to hanger Insert retainer strap C through keeper straps of the top dust bag D and fasten to the upper lip of the main housing E KC 3109C only 9 Positi...

Page 9: ... up to speed Motor overheats PROBABLE CAUSE 1 Defective cord plug switch and or motor 2 Blown fuse 1 Loose connectors 2 Filterbag and or collection bag releasing sawdust 1 Picked up large wood chips and debris 2 Loose impeller 3 Rubbing impeller 1 Motor 1 Circuit overloaded with lights appliances and other motors 2 Undersized extension cord or extension cord is too long 3 General overloading of po...

Reviews: