background image

AsseMbly

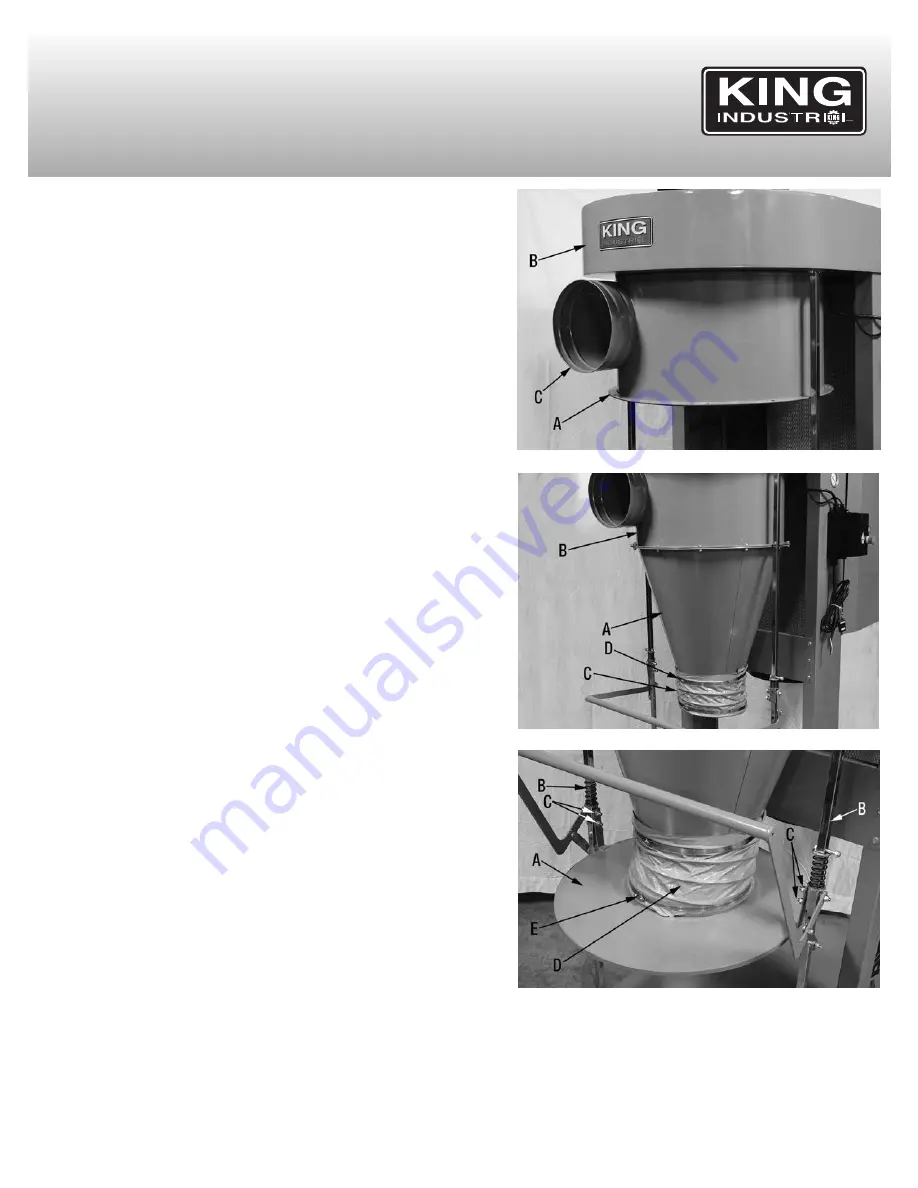
19. With the help of another person, install the intake housing (A) Fig.12 to the

bottom of the main impellor housing (B) using 6 hex. bolts. Make sure the

inlet opening (C) is facing in the correct direction as shown in Fig.12.

20. Install the cyclone funnel (A) Fig.13 to the bottom of the intake housing (B)

using 12 flange head hex. bolts and flange head hex. nuts.

21. Position the collapsible hose (C) Fig.13 over the opening of the cyclone

funnel and secure it in place using the hose clamp (D).

22. Install drum lid (A) Fig.14 to the drum lid supports (B). Secure drum lid

using the 4 flange hex. nuts and washers (C).

23. Position the collapsible hose (D) Fig.14 over the lip of the drum lid. Secure

collapsible hose to drum lid using the bottom hose clamp (E).

FIgure 12

FIgure 13

FIgure 14

Summary of Contents for KC-8500C

Page 1: ...InstructIon MAnuAl COPYRIGHT 2019 ALL RIGHTS RESERVED BY KING CANADA TOOLS INC 5 HP cyclone dust collector MODEL KC 8500C...

Page 2: ...tear negligence or accidents repairs done by an unauthorized service center alterations and lack of maintenance King Canada shall in no event be liable for death injuries to persons or property or fo...

Page 3: ...cIdentAl stArtIng Make sure the swich is in the OFF position before plugging in 17 use recoMMended AccessorIes Consult the manual for recommended accessories Follow the instructions that accompany the...

Page 4: ...r to keep airborne wood dust in heavy usage within acceptable limits you must regularly monitor airborne dust and maintain the cyclone dust collector to avoid exceeding dust limits Each application is...

Page 5: ...function or breakdown grounding provides a path of least resistance for electric current to reduce the risk of electric shock wArnIng IF NOT PROPERLY GROUNDED THIS CYCLONE DUST COLLECTOR CAN CAUSE ELE...

Page 6: ...shown using 6 flange head hex bolts 4 Install the drum lid supports F Fig 1 to the base B using 2 flange head hex bolts each support Notice the placement of the drum lid supports as shown in Fig 1 5...

Page 7: ...to clean motor small motor on top of the main impeller housing Follow assembly instruction further in this manual 8 The magnetic switch A Fig 5 hanging under the main impeller housing gets installed t...

Page 8: ...mall canister filter shaft tighten cap screws B Make sure one cap screw is tightened against the flat of the canister filter shaft 17 Next install the auto clean shaft C on canister filter shaft A tig...

Page 9: ...he intake housing B using 12 flange head hex bolts and flange head hex nuts 21 Position the collapsible hose C Fig 13 over the opening of the cyclone funnel and secure it in place using the hose clamp...

Page 10: ...n the drum Slide hose over fitting and secure hose with hose clamp B 28 Connect the other end of the drum pressure hose A Fig 17 to the fitting on the intake housing Slide hose over fitting and secure...

Page 11: ...the magnetic switch and to turn the machine on again first push the Emergency Twist OFF Stop button in then twist it clockwise until it pops out The magnetic switch ON button will only work once the...

Page 12: ...leaning becomes necessary it should be performed by an authorized service centre cAutIon WEARING A PARTICLE MASK RESPIRATOR FOR PROTECTION AGAINST FINE DUST PARTICLES DURING CLEANING IS HIGHLY RECOMME...

Reviews: