background image

instrUction ManUal

MODEL: KC-OVS-TL

COPYRIGHT © 2014 ALL RIGHTS RESERVED BY KING CANADA TOOLS INC.

oscillating spindle sander

04/2019

Summary of Contents for KC-OVS-TL

Page 1: ...instrUction ManUal MODEL KC OVS TL COPYRIGHT 2014 ALL RIGHTS RESERVED BY KING CANADA TOOLS INC oscillating spindle sander 04 2019 ...

Page 2: ...accidents repairs done by an unauthorized service centre alterations and lack of maintenance King Canada shall in no event be liable for death injuries to persons or property or for incidental special or consequential damages arising from the use of our products To take advantage of this limited warranty return the product at your expense together with your dated proof of purshase to an authorized...

Page 3: ... 16 aVoid accidental starting Make sure the swich is in the OFF position before plugging in 17 Use recoMMended accessories Consult the manual for recommended accessories Follow the in structions that accompany the accessories The use of improper accessories may cause hazards 18 neVer stand on tool Serious injury could occur if the tool tips over Do not store materials such that it is necessary to ...

Page 4: ... drum and sleeve storage 12 5 8 sanding sleeve 13 1 2 sanding sleeve 14 1 4 sanding sleeve 15 90º stop bolt 16 2 dust hood spindle sander specifications MODEL KC OVS TL Oscillations per minute 29 Oscillations stroke 15 16 Spindle drum diameter 1 1 2 2 Spindle diameter 1 4 1 2 5 8 Spindle speed 1 720 RPM Table size 14 3 4 x 14 3 4 Dust hood outlet diameter 2 Motor 7 5 Amp Voltage 120V 1 phase 60 Hz...

Page 5: ...ROUNDING PRONG IN ANY MANNER Warning IF NOT PROPERLY GROUNDED THIS SPINDLE SANDER CAN CAUSE ELECTRICAL SHOCK PARTICULARLY WHEN USED IN DAMP LOCATIONS TO AVOID SHOCK OR FIRE IF THE POWER CORD IS WORN OR DAMAGED IN ANY WAY HAVE IT REPLACED IMMEDI ATELY 110V 120V operation As received from the factory your spindle sander is ready to run for 110V 120V operation This spindle sander is intended for use ...

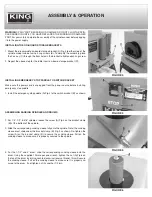
Page 6: ...mergency stop paddle 1 Install the emergency stop paddle A Fig 4 to the switch bracket B as shown asseMbling sanding spindles and drUMs 1 For 1 4 1 2 5 8 spindles loosen the screw A Fig 5 on the bracket clamp B at the bottom of the spindle 2 Slide the corresponding sanding sleeve fully onto the spindle Note the sanding sleeve must slide under the bracket clamp B Fig 5 as shown Re tighten the screw...

Page 7: ... AND OR DAMAGE TO THE MACHINE OR THE WORKPIECE 1 This machine comes 4 table inserts When changing spindles the table insert will need to be changed to the matching size Each table insert has a notch A Fig 8 to fit the alignment pin B in the table to ensure that it is properly fitted and installed in the table opening 2 There are 2 table inserts with round openings A B Fig 9 and 2 with oblong openi...

Page 8: ... place out of the reach of chil dren dUst collection This sander comes with a 2 dust chute A Fig 14 at the rear of the machine al lowing for the connection to a shop vacuum or with the combination of a 2 to 4 hose adaptor for connection to a dust collector Be sure to use appropriate size hose and fittings not included and check that all connections are sealed tightly to minimize airborne dust basi...

Page 9: ...g probleM Motor does not run when power switch is turned ON Motor does not run at full speed Motor does not reach full power Motor overheating Excessive machine vibration Mark on workpiece Sanding drum turns in wrong direction Burns on workpiece solUtion 1 Switch is burned out Replace the switch 2 Connection wire is loose or damaged Tighten or replace the wire 1 Power voltage is too low Test volta...

Reviews: