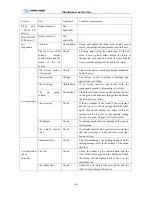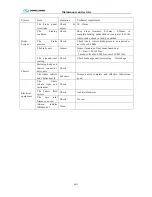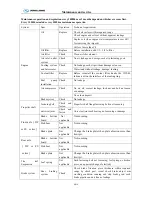
Maintenance and service
M-1
General knowledge
King Long recommends that the bus be maintained according to the Maintenance Schedule in this section.
Perform maintenance at whichever interval occurs first. At each scheduled maintenance interval, perform all
previous maintenance checks they are due for scheduled maintenance.
King-long Bus General Maintenance
Please make periodic inspection and maintenance of bus according to
KING LONG BUS
MAINTENANCE & SERVICE GUIDE
(
2014
)
-EN
to ensure good status. During service, stop bus on a
horizontal road and ensure bus steady and engine stopping. Make functional inspection and running test
after each service.
Important Notice: If bus often runs under poor conditions (such as poor road surface, high dust
concentration, frequent bump etc.), maintenance interval should be shortened. During adding lubricant,
before replacing filter or repairing, clean the place around related parts carefully. Please add lubricant with
clean containers.
Maintenance of engine and chassis assembly
•
For the usage and maintenance of the engine, refer to relevant engine operation and maintenance
manual.
•
For maintenance of transmission and front-rear axle, please refer to relative users’ guide.
•
For use and maintenance of other parts of chassis, if without special user’s guide or maintenance period,
please refer to this manual for maintenance information.
Body maintenance
1. Keep body clean .Timely clean should be made after daily running and don’t scrape body with tool in
order to avoid paint scratch and damage of roll covering.
2. Sealing strips of doors and windows should be kept integrated and seamless. Make timely replacement if
damaged.
3. Prohibit washing body paint with hot water, kerosene and other liquid which has damage to surface paint.
4. Check connections between body and frame frequently. If find something abnormal, repair it in time.
5. Frequently check fasteners inside vehicle and tighten them in time.
6. Frequently check conditions of passenger door. If find something abnormal, do adjustment in time.
7. Frequently check conditions of all lamps. If find any damage, replace it in time.
ABS or EBS system maintenance and service:
1.
Please cut off ECU control box to avoid the high voltage from outside to make damage to the ECU,
when use the outer power supply to charge the battery.
2.
When the vehicle need electric welding, cut off the ECU .never use the multimeter to measure the ECU
box.
3.
Inspect the engine voltage for stabilization periodically.
Summary of Contents for XMQ6127 series
Page 18: ...Operation Instruction CI 1 Figure 17 Set MotPPR Figure 18 Clear Trip A Figure 19 Clear Trip B...
Page 32: ...Operation Instruction P A 1 2 Control panel operation...
Page 33: ...Operation Instruction P A 1...
Page 34: ...Operation Instruction P A 1...
Page 35: ...Operation Instruction P A 1...
Page 36: ...Operation Instruction P A 1...
Page 41: ...Operation Instruction 0 G 1 1 1 2 2 Pushbutton Settings...
Page 42: ...Operation Instruction 0 G 1 1 2 Starting the Engine 1 3 Selecting the Gear...
Page 43: ...Operation Instruction 0 G 1 1 4 Setting Off 1 5 Driving Ranges...
Page 44: ...Operation Instruction 0 G 1 1 5 1 Downhill Travel 1 5 2 Downhill Travel 1 5 3 Kickdown...
Page 46: ...Operation Instruction 0 G 1 1 6 Stopping Parking...
Page 51: ...Operation Instruction 0 G 1 1 11 1 Limp Home Mode 1 12 Auxiliary Control Unit...
Page 52: ...Operation Instruction 0 G 1 1 12 1 Operating Instructions for the Auxiliary Control Unit...
Page 53: ...Operation Instruction 0 AB 1 WABCO ABS BASIC INTRODUCTION...
Page 54: ...Operation Instruction 0 AB 1...
Page 55: ...Operation Instruction 0 AB 1...
Page 56: ...Operation Instruction 0 AB 1...
Page 57: ...Operation Instruction 0 AB 1...
Page 58: ...Operation Instruction 0 EC 1 ECAS System Introduction 1 System introduction...
Page 59: ...Operation Instruction 0 EC 1 3 System function...
Page 60: ...Operation Instruction 0 EC 1...
Page 77: ...Operation Instruction 0 E 1 CAN bus module...
Page 158: ...Appendix A 4 Air braking schematic diagram...
Page 159: ...A 5 Electric schematic diagram of the complete vehicle 1...
Page 160: ...A 6 Electric schematic diagram of the complete vehicle 2...
Page 161: ...A 7 Electric schematic diagram of the complete vehicle 3...
Page 162: ...A 8 Electric schematic diagram of the complete vehicle 4...

