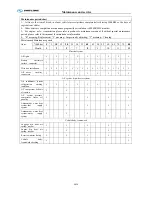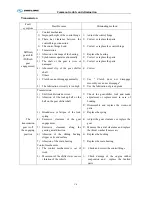
Common trouble and elimination
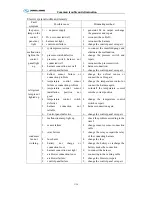
C-11
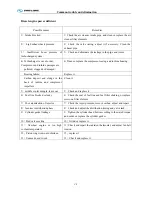
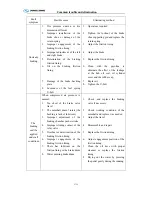
Fault
symptom
Possible cause
Eliminating method
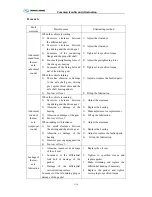
Leakage of
the rear
axle
lubrication
4.
Blocking or damage of the
ventilation plug
5.
Axle housing cracks
6.
Damageor distortion of the
coupling flange sealing surface
7.
Malfunction of bearing leads to
radial run out of coupling
flange
8.
Axle housing distortion caused
by overloading
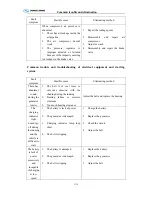
5.
Clean or replace the ventilation
plug
6.
Repair or replace the axle housing
7.
Adjust or replace the coupling
flange
8.
Replace the bearing
9.
Adjust or replace the axle housing
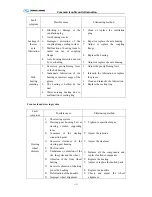
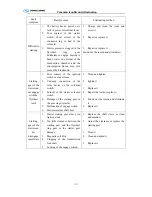
Hub
bearing
jamming
1.
Excessive pre-tightening force
of the hub bearing
2.
Inadequate lubrication of the
bearing or incorrect usage of the
grease
3.
The bearing is defiled by the
dust
4.
Water entering bearing due to
malfunction of sealing ring
1.
Adjust the pre-tightening force
2.
Intensify the lubrication or replace
the grease
3.
Clean and intensify the lubrication
4.
Replace the sealing ring
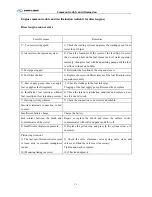
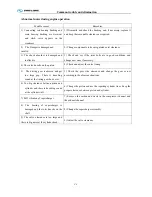
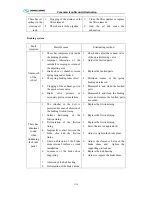
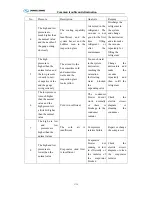
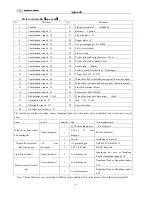
Front axle and steering system
Fault
symptom
Possible cause
Eliminating method
Steering
wheel
shimmy
1.
The steering system
1)
Steering gear housing bolt or
steering column supporting
loose
2)
Looseness of the steering
connection point
3)
Excessive clearance of the
steering gear housing
2.
The front axle
1)
Umbalance or abrasion of the
rim, the spoke and the wheel
2)
Abrasion of the front wheel
bearing
3)
Excessive abrasion of the king
pin or the bushing
4)
Deformation of the knuckle
5)
Improper wheel alignment
1
)
Tighten to specified torque
2
)
Adjust the junction
3
)
Adjust the clearance
1
)
Balance all the components and
replace faulted components.
2
)
Replace the bearing
3
)
Adjust or replace the faulted parts
4
)
Replace the knuckle
5
)
Check and adjust the wheel
alignment
Summary of Contents for XMQ6127 series
Page 18: ...Operation Instruction CI 1 Figure 17 Set MotPPR Figure 18 Clear Trip A Figure 19 Clear Trip B...
Page 32: ...Operation Instruction P A 1 2 Control panel operation...
Page 33: ...Operation Instruction P A 1...
Page 34: ...Operation Instruction P A 1...
Page 35: ...Operation Instruction P A 1...
Page 36: ...Operation Instruction P A 1...
Page 41: ...Operation Instruction 0 G 1 1 1 2 2 Pushbutton Settings...
Page 42: ...Operation Instruction 0 G 1 1 2 Starting the Engine 1 3 Selecting the Gear...
Page 43: ...Operation Instruction 0 G 1 1 4 Setting Off 1 5 Driving Ranges...
Page 44: ...Operation Instruction 0 G 1 1 5 1 Downhill Travel 1 5 2 Downhill Travel 1 5 3 Kickdown...
Page 46: ...Operation Instruction 0 G 1 1 6 Stopping Parking...
Page 51: ...Operation Instruction 0 G 1 1 11 1 Limp Home Mode 1 12 Auxiliary Control Unit...
Page 52: ...Operation Instruction 0 G 1 1 12 1 Operating Instructions for the Auxiliary Control Unit...
Page 53: ...Operation Instruction 0 AB 1 WABCO ABS BASIC INTRODUCTION...
Page 54: ...Operation Instruction 0 AB 1...
Page 55: ...Operation Instruction 0 AB 1...
Page 56: ...Operation Instruction 0 AB 1...
Page 57: ...Operation Instruction 0 AB 1...
Page 58: ...Operation Instruction 0 EC 1 ECAS System Introduction 1 System introduction...
Page 59: ...Operation Instruction 0 EC 1 3 System function...
Page 60: ...Operation Instruction 0 EC 1...
Page 77: ...Operation Instruction 0 E 1 CAN bus module...
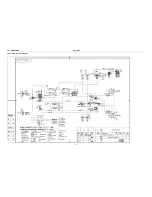
Page 158: ...Appendix A 4 Air braking schematic diagram...
Page 159: ...A 5 Electric schematic diagram of the complete vehicle 1...
Page 160: ...A 6 Electric schematic diagram of the complete vehicle 2...
Page 161: ...A 7 Electric schematic diagram of the complete vehicle 3...
Page 162: ...A 8 Electric schematic diagram of the complete vehicle 4...

