background image

SAFETY INSTRUCTIONS 


The hair and beard trimmer, the power cord must not come into ·9 contact  


with water or any other liquid because of the risk of an electric shock. For  


this reason you should never use the appliance near a wash-basin or while 

having a bath. 

Unplug the mains lead immediately if the recharger or trimmer falls into water. Use the 

trimmer with dry hands only. 

Unplug when the appliance is not being used. Keep the appliance away from children. 

Never use the hair and beard trimmer, the guide comb, the power cord if they show signs 

of damage. 

Only use the recharge cord wire supplied with the trimmer otherwise the appliance could 

be damaged. 

The trimmer should be used to cut natural hair only. Be sure not to expose the appliance 

to temperatures below-10 or above +40 for any length of time. 

Regular cleaning and careful handling ensure that you will have perfect results and long 

-term service torm your trimmer. 

Have repairs to the trimmer, power cord carried out by a specialist workshop. Inexpert 

repairs may cause considerable risk to the user. 

Furniture today often has a wide range of varnish or plastic finishes and is treated with 

various substances. 

Should this hair and beard trimmer be given to other people to use, please remember to 

pass on this instruction manual. 

RECHARGING 

Before turning on your hair and beard trimmer, the battery needs to be charged fully. 

Slide the switch up to the on position and connect trimmer to the power cord. 

The control lamp lights up and the battery are charged.the control lamp does not go off 

once the battery is fully charged. 

This appliance is equipped with overcharge protection. It takes 10 to 14 hours to charge 

the first time. The fully charged product can be used for approximately 30 minutes, It 

then takes 8 hours to recharge the battery.

Tips 

The new battery do not initially reach their maximum charge capacity. To obtain the 

maximum charge capacity, the battery should be fully charged prior to being used for the 

first time and then the hair and beard trimmer should be used until the battery is 

completely flat. The battery should then be fully recharged. To increase the life of the


Summary of Contents for K 079

Page 1: ...Model No K 079 Favorito Sa Kesme Makinesi Hair Clipper Kullanma K lavuzu Instruction Manual K 079 Favorito Sa Kesme Makinesi Hair Clipper...

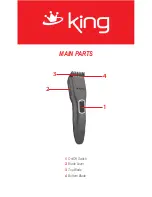
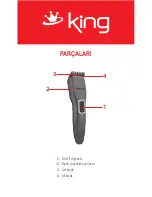
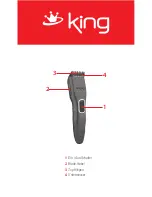
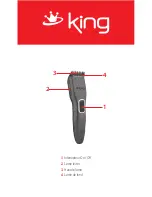
Page 2: ...MAIN PARTS 1 4 2 3 On Off Switch Blade Lever Top Blade Bottom Blade 1 2 3 4...

Page 3: ...by a specialist workshop Inexpert repairs may cause considerable risk to the user Furniture today often has a wide range of varnish or plastic finishes and is treated with various substances Should t...

Page 4: ...gth set for 6 8 10 12 15 mm Remove the guide comb if you want to cut hair to a length of 1 mm Trimming and cutting you beard Push the switch uptowards the on Shaping your beard and shaving the back of...

Page 5: ...the oil supplied with the trimmer should run out use only acid free oil such as sewing machine oil Replacing the cutting head Use only original accessories You can obtain accessories such as the cutt...

Page 6: ...PAR ALARI 1 4 2 3 On Off d mesi B ak y kseklik ayarlay c st b ak Alt b ak 1 2 3 4...

Page 7: ...mel sonu lar alman z ve uzun m rl kullanman z sa lar Cihaz n tamiri i in veya fi li kablonun de i mesi i in en yak n yetkili servise g t r n z Uzman ki ilerce yap lmayan tamirler kullan c ya risk olu...

Page 8: ...KALINIZA EK L VERME VE ENSE TRA I l tara n cihazdan ay r n z ve cihaz ON konumuna getirerek al t r n z D zeltme ba l n ula lmas zor olan yerlere ula arak sakal n za kesin hatlar vermek i in kullanabil...

Page 9: ...ara gibi aksesuarlar zel ma azalardan temin edebilirsiniz Kesici ba l kendiniz keskinle tirmeye kalk may n z Cihaz kapat n z Kesici ba l kesici ba l n ya lanmas b l m nde anlat ld ekilde yerine geri t...

Page 10: ...1 4 2 3 Ein Aus Schalter Blade Hebel Top Klingen Untermesser 1 2 3 4...

Page 11: ...paraturen am Trimmer Netzkabel durchgef hrt von einer Fachwerkstatt Unsachgem e Reparaturen k nnen erhebliche Gefahren f r den Benutzer entstehen M bel heute hat oft eine Vielzahl von Lack oder Kunsts...

Page 12: ...ersuchen zu viel Haar auf einmal geschnitten Lassen Sie das Ger t frei laufen f r eine kurze Zeit vor Beginn F hrungskamm Die F hrungskamm k nnen Sie Haar gleichm ig mit der L nge Set f r 6 8 10 12 15...

Page 13: ...dem Sie den Schneidkopf Klammer in die Kerbe auf dem Cover der Trimmer bis sie h rbar einrasten Entfernen Sie bersch ssiges l durch Abwischen mit einem Tuch Wenn die mit dem Trimmer zugef hrte l ausla...

Page 14: ...1 4 2 3 Interrupteur On Off Lame levier Haut de lame Lame de fond 1 2 3 4...

Page 15: ...nettoyage r gulier et une manutention prudente assurer que vous aurez un r sultat parfait et service long terme Torm votre tondeuse Vous avez des r parations la tondeuse cordon d alimentation effectu...

Page 16: ...ier l g rement les cheveux Seulement couper de petites quantit s Couper les cheveux dans les milieux renforcer progressivement jusqu ce que vous atteigniez la longueur d sir e La t te de coupe devient...

Page 17: ...taler l huile Remplacer la t te de coupe en faisant glisser le clip de la t te de coupe dans l encoche sur le couvercle de la tondeuse jusqu ce que vous entendiez un d clic Retirer l exc dent d huile...

Page 18: ...1 4 2 3 On Off Leva lama Top lama In basso lama 1 2 3 4...

Page 19: ...a 40 per un certo periodo di tempo Una pulizia regolare e attenta gestione garantire che avrete risultati perfetti e servizio a lungo termine Torm il potatore Avere riparazioni al trimmer cavo di alim...

Page 20: ...sibile bagnare i capelli leggermente Solo tagliare piccole quantit Tagliare i capelli in contesti progressivamente pi strette fino a raggiungere la lunghezza desiderata La testa di taglio diventa lent...

Page 21: ...l olio Sostituire la testa di taglio facendo scorrere la clip testa di taglio nella tacca sul coperchio del trimmer fino a quando si sente che scatta in posizione Rimuovere l eventuale olio in eccess...

Page 22: ...1 4 2 3 1 2 3 4...

Page 23: ...9 10 40 10 14 30 8...

Page 24: ...6 8 10 12 15 1 1 2...

Page 25: ...AA 1 2 V...

Page 26: ...e veya cihaz n etraf n koruyacak yumu ak bir bezle sararak yapmak gerekir Yanl ambalajlama esnas nda plastik par alar k r labilir elektrik aksam zarar g rebilir NOT R N N M TER YE NT KAL NDEN SONRA Y...

Reviews: