background image


06/07/20 

K7201G 

WHEN 

ASSEMBLING 

YOUR 

KGR7201I  GARDEN  RECYCLER 

MAKE CERTAIN THE SPARK PLUG 
WIRE  IS  DISCONNECTED  AND 
MOVED  AWAY  FROM  THE  SPARK 
PLUG  BEFORE  PROCEEDING  TO 

ASSEMBLE THE UNIT. 


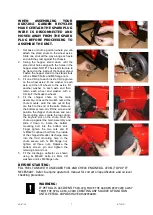
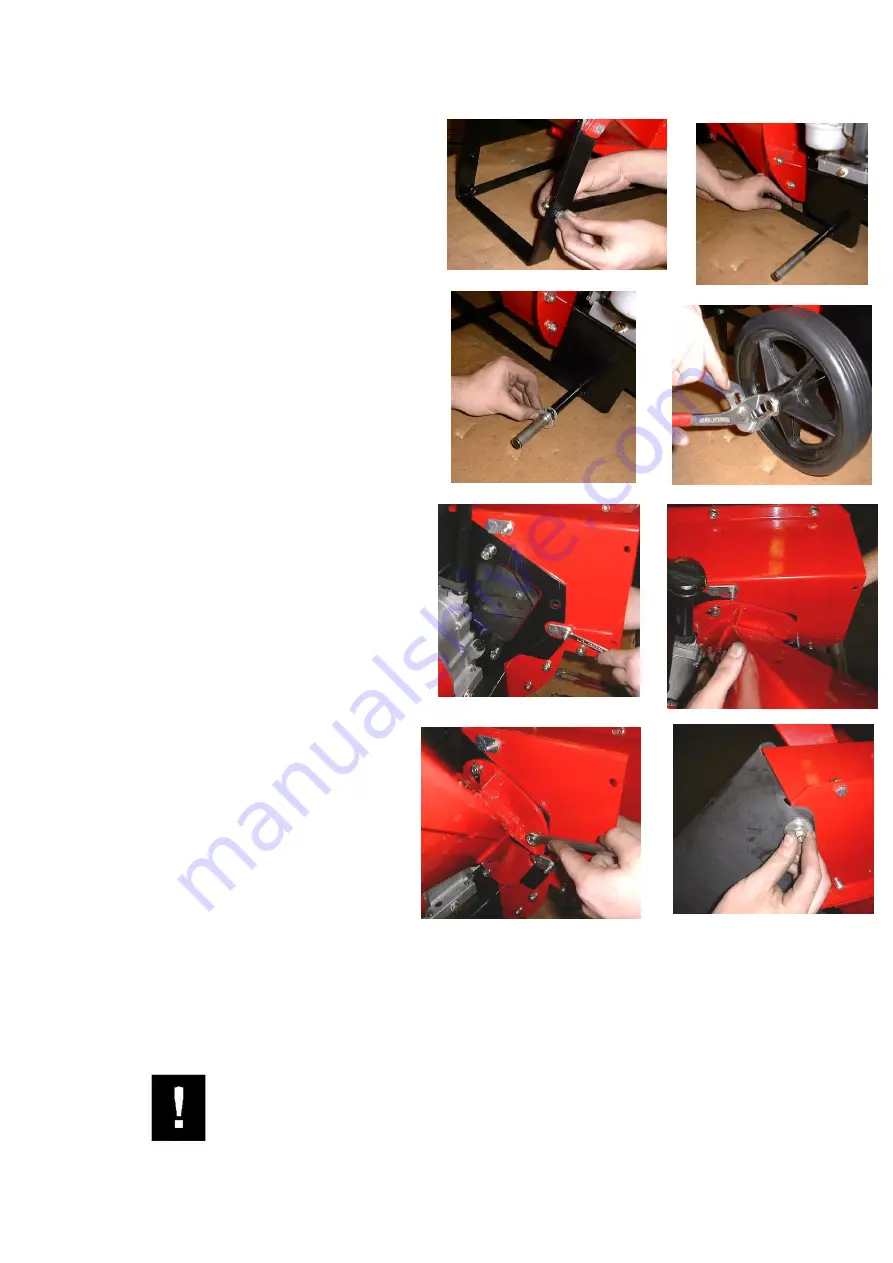
1. 

Set basic unit into a position where you can 
attach  the  stand  struts  to  the  wheel  axles. 
Slide  one  strut  all  the  way  along  each  axle 
end until they rest against the chassis.


2.  Swing  the  hopper  stand  down  until  the 

stand strut holes align  with the holes in the 
hopper stand. NOTE* The stand strut are to 
be placed on the inside of the hopper stand.  
Fasten the hopper stand to the stand struts 
with 2x M8x25 bolts and M8 flange nuts. 

3.  Fit one Circlip to each inside Circlip groove 

on  the  wheel  axles;  fit  one  washer  to  each 
axle  end  then  fit  wheels  to  the  axles.  Fit 
another  washer  to  each  axle  end  then 
retain  each  wheel  and  washer  with  a 
Circlip. Fit hubcaps to wheels. 

4.  Fit  the  chipper  chute  to  the  main 

assembly-: Loosen the two M8 nuts at the 
chute  mounts,  wind  the  nuts  out  till  they 
are flush to the end of the bolts. Remove 
the bottom screen pin,  lift the screen and 
position the chipper chute above and over 
the mounting area. Locate the top nut into 
the  keyhole  slot  on  the  chute.  Hold  the 
chute  up  against  the  main  assembly  and 
slide  it  down  to  locate  the  bottom 
mounting  bolt  into  the  bottom  slot. 
Finger  tighten  the  two  nuts  and  fit 
1xM8x25  cuphead  bolt  from  the  inside 
of the chipper/shredder discharge area 
into  the  third  mounting  hole  in  the 
chute  secure  with  1x  M8  flange  nut, 
tighten  all  three  nuts.  Replace  the 
bottom  screen  pin  and  tighten  the 
retaining bolt and nut. 

5.  Fit  the  discharge  deflector  as  shown 

using  4x  M8x20  bolts,  4x  8mm  I/D 
washers and 4x M8 flange nuts. 


BEFORE STARTING:  

FILL FUEL TANK WITH UNLEADED FUEL AND CHECK ENGINE OIL LEVEL/TOP UP IF 

NECESSARY. Refer to engine operator’s manual for correct oil specification and oil level 

checking procedure. 


WARNING: 

IF PETROL IS ACCIDENTLY 

SPILLED, MOVE THE GARDEN RECYCLER AWAY 

FROM THE SPILL AREA, AVOID 

CREATING ANY SOURCE OF IGNITION 

UNTIL PETROL VAPORS HAVE 

DISAPPEARED. 


Summary of Contents for KR7201G

Page 1: ...GARDEN RECYCLER Model KR7201G OWNER OPERATORS MANUAL READ THIS MANUAL BEFORE OPERATING MACHINE THIS MACHINE IS CAPABLE OF INFLICTING SERIOUS INJURY IF OPERATED IMPROPERLY READ WARNING CAUTION LABELS ...

Page 2: ...3 Transportation and Insurance charges during transportation of failed unit or any part thereof 4 The labour parts mechanical adjustments or lubricant costs which in the judgement of COX INDUSTRIES or their Authorised dealer are made or should be made as standard maintenance according to the Cox Industries maintenance schedule 5 The replacement of normal maintenance parts such as garden recycler b...

Page 3: ...ment 206 cm3 Bore x Stroke 68 3mm x 55 8 mm Maximum Rated Power 4 1 kW 5 5 hp 3600 RPM Maximum Rated Torque 11 N m 2600RPM Rated Engine Speed No Load Maximum 3600 RPM Idle 1800 RPM Dry Mass 15 3 kg Machine Design and Performance KGR7201 Type Engine PTO Shaft Direct Mounted Flywheel and Housing Mounted Bypass Screen 1 Bolted Chipper Knife Blade and 9 Pivoting Hammer Blades Capacity Chipper Chute 63...

Page 4: ...R ANY INJURY COMPLY WITH THE FOLLOWING SAFETY INSTRUCTIONS FAILURE TO COMPLY WITH THE INSTRUCTIONS MAY RESULT IN PERSONAL INJURY TRAINING Read this owner s manual carefully in its entirety before attempting to assemble or operate this machine Be completely familiar with the controls and the proper use of this machine before operating it Keep this manual in a safe place for future and regular refer...

Page 5: ... the fuel tank indoors while the engine is running or while the engine is still hot Turn the unit off and let the engine cool before refueling Wipe the fuel cap and top of fuel tank area before removing fuel cap to prevent dirt entering tank Fuel your garden recycler in a clean area to avoid getting dirt in petrol tank Do not smoke while refueling Fuel tank cap must be secure at all times except d...

Page 6: ...n the hopper 5 Keep all protective guards on the machine in place and in good working condition 6 Always stand clear of the discharge area when the shredder is running 7 Keep your face and body away from the feed hopper to avoid being struck by any material that may bounce back Do not over reach keep proper balance and footing 8 Do not transport the garden recycler while the engine is running 9 Do...

Page 7: ...wo M8 nuts at the chute mounts wind the nuts out till they are flush to the end of the bolts Remove the bottom screen pin lift the screen and position the chipper chute above and over the mounting area Locate the top nut into the keyhole slot on the chute Hold the chute up against the main assembly and slide it down to locate the bottom mounting bolt into the bottom slot Finger tighten the two nut...

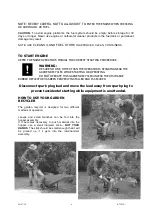
Page 8: ...AN THE OPERATOR IS STANDING NEAR THE GARDEN RECYCLER WHILE STARTING OR OPERATING DO NOT OPERATE THIS GARDEN RECYCLER UNLESS THE DISCHARGE RUBBER DEFLECTOR HAS BEEN PROPERLY INSTALLED AND IS SECURED Disconnect spark plug lead and move the lead away from spark plug to prevent accidental starting while equipment is unattended HOW TO USE YOUR GARDEN RECYCLER The garden recycler is designed for two dif...

Page 9: ... of such parts could create a fire hazard 3 Do not use flammable solutions to clean the air filter LUBRICATION OF THE ENGINE Check engine oil level regularly WHILE THE UNIT IS IN THE UPRIGHT POSITION Wheels and stand on the ground Check the oil every five hours of operation and before each usage Stop engine and wait several minutes before checking oil level Refer to the engine Operators Manual for...

Page 10: ...an fresh fuel 2 Fuel valve control not in on position 2 Move fuel valve control to on position 3 Stop control not in on position 3 Move stop control to on position 4 Spark plug wire disconnected 4 Connect wire to spark plug 5 Faulty spark plug 5 Clean adjust gap or replace Loss of power 1 Spark plug wire loose 1 Connect and tighten spark plug wire operation erratic 2 Blocked fuel line or stale fue...

Page 11: ...06 07 20 11 K7201G Exploded View Enclosure ...

Page 12: ...bber 1 16 W052003 Washer Flat 4 17 72028 Panel Housing Front 1 18 SH0816M Screw Hex 11 19 72010 Screen Bar 1 20 13029 Pin 2 21 BCHSNM6x20 Bolt Cup Sq Neck 2 22 NM6NT Nut Hex Nylon Insert Thin 2 23 72031 Sub Assy Shedder Hopper 1 24 72027 Hopper Shedder 1 25 SH0616M Screw Hex 3 26 72017 Shield Flexible Hopper 1 27 W041216 Washer Flat 3 28 NM6NT Nut Hex Nylon Insert Thin 3 29 72018 Trim 2 30 DEC119 ...

Page 13: ...p 1 3 BCHSNM8X20 Bolt Cup Sq Neck 2 4 NFM8 Nut Hex Flange 4 5 Engine Briggs Stratton 1 6 WS050216 Washer Lock Spring 4 8 STF0618 Screw Hex 4 9 BCHSNM8x25 Bolt Cup Sq Neck 2 10 AM115 Key 1 11 72001 Sub Assy Rotor 1 12 WS06081 5 Washer Lock Spring 1 14 72025 Spacer 1 15 72033 Plate Spacer 1 16 B0632F Bolt Hex 1 17 W05M202 Washer 4 18 B0520F Screw Hex 4 ...

Page 14: ...1 7201300K Flywheel Rotor 1 2 72002 Blade Hammer 9 3 72034 Axle Hammer 3 4 72035 Collar Hammer 3 5 BHSSM8X12 Screw Button Hex Soc 3 6 72005 Blade Knife Chipper 1 7 72024 Deflector Chip 1 8 CSSSM6x25 Screw Csk Hex Soc 3 9 NM6NT Nut Hex Nylon Insert Thin 5 10 SH0616M Screw Hex 2 72001 Sub Assy Rotor ...

Page 15: ...6 07 20 15 K7201G 70 Landseer Street Acacia Ridge Qld 4110 P O Box 6266DC Acacia Ridge Q 4110 Australia PH 07 3323 2222 FAX 07 3344 6233 Web Site Address www coxmowers com au Email sales coxmowers com au ...

Reviews: