background image

Original 

Instructions_MNL_FPLM132H-6_GB_V

0

2

_2

20512

FPLM132H-6

5059340359427

132

Summary of Contents for FPLM132H-6

Page 1: ...Original Instructions_MNL_FPLM132H 6_GB_V02_220512 FPLM132H 6 5059340359427 132 ...

Page 2: ...nctions Operation Care and maintenance Troubleshooting Recycling and disposal Guarantee Customer Care and Technical Helpline Availability of Spare Parts EC declaration of conformity These instructions are for your safety Please read through them thoroughly before use and retain them for future reference Let s get started MNL_FPLMP99H 4_GB_V05_200911 indd 2 9 11 20 5 23 PM 43 ...

Page 3: ...gment Training 1 Read the instructions carefully Be familiar with the controls and the proper use of the product 2 Never allow children or people unfamiliar with these instructions to use the product Local regulations can restrict the age of the operator 3 Never mow while people especially children or pets are nearby 4 Keep in mind that the operator or user is responsible for accidents or hazards ...

Page 4: ... not attempt to start the engine but move the product away from the area of spillage and avoid creating any source of ignition until petrol vapours have dissipated Replace all fuel tank and container caps securely 4 Replace faulty silencers 5 Before using always visually inspect to see that the cutting devices cutting device bolts and cutter assembly are not worn or damaged Replace worn or damaged...

Page 5: ...o not mow excessively steep slopes near drop offs ditches or embankments 10 Avoid using the product in bad weather conditions especially when there is a risk of lightning 11 Use extreme caution when reversing or pulling the product towards you 12 Stop the cutting device s if the product has to be tilted for transportation when crossing surfaces other than grass and when transporting the product to...

Page 6: ...nsure that both hands are in the operating position before returning the appliance to the ground 21 Keep hands and feet away from the cutting means at all times and especially when switching on the engine 22 Do not put hands or feet near or under rotating parts Keep clear of the discharge opening at all times 23 Never pick up or carry a product while the engine is running 24 In case of any situati...

Page 7: ...icles gases and fumes 28 Never start or run the engine indoors The exhaust fumes are dangerous containing carbon monoxide an odourless and deadly gas Operate this product only in well ventilated outdoor areas Maintenance and storage 1 Follow the maintenance and repair instructions for this product Never carry out any modifications of the product Never change the preset rotary speed or the engine a...

Page 8: ...e worn or damaged parts for safety Use only the genuine replacement parts and spare parts 11 Ensure that only replace the recommended cutting means blade with the right type Fuel handling 1 Before refuelling stop the engine disconnect the spark plug connector and let the product cool Fuel and fuel vapours are highly flammable Take care when handling fuel Never smoke when you are refuelling the pro...

Page 9: ...er use the product without an air filter 10 Fuel vapour pressure may build up inside the fuel tank depending on the fuel used weather conditions and the tank venting system To reduce the risk of burns and other personal injuries remove the fuel cap carefully to allow any pressure build up to release slowly 11 Be aware of fire risks explosion and inhalation risks 12 Do not smoke while operating the...

Page 10: ...our clothes and wash any part of your body that has come in contact with fuel before turning the engine on again 22 If fuel is ignited put out the fire with a dry powder fire extinguisher 23 If the fuel tank is drained this should be done outdoors Vibration and noise reduction To reduce the impact of noise and vibration emission limit the time of operation use low vibration and low noise operating...

Page 11: ...engine and disconnect the spark plug connector if there are malfunctions Have the product checked by a qualified professional and repaired if necessary before you operate it again 3 In case of fire stop the engine and disconnect the spark plug connector Take fire extinguishing measures immediately if the product switch is no longer accessible WARNING Never use water to extinguish a product on fire...

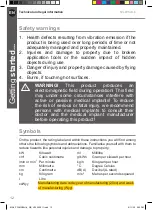
Page 12: ... implants To reduce the risk of serious or fatal injury we recommend persons with medical implants to consult their doctor and the medical implant manufacturer before operating this product Symbols On the product the rating label and within these instructions you will find among others the following symbols and abbreviations Familiarise yourself with them to reduce hazards like personal injuries a...

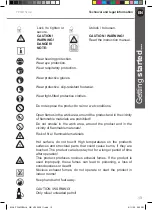
Page 13: ...ials are prohibited Do not smoke in the work area around the product and in the vicinity of flammable materials Risk of fire flammable materials Hot surface do not touch High temperatures on the product s surfaces and structural parts that could cause burns if they are touched The product can also stay hot for a longer period of time after operation This product produces noxious exhaust fumes If t...

Page 14: ...eep the connector away from the plug to prevent accidental starting Stop the engine and disconnect the spark plug connector before assembly cleaning adjustments maintenance storage and transportation Cutting device continues to rotate after the product is switched off Wait until all machine components have completely stopped before touching the product Pay special attention when working on the cut...

Page 15: ...FPLM132H 6 132 UK Conformity Assessed FPLM132H 6 750 g h NP130F L 132 ...

Page 16: ...F5RTC NP130 92 94 2 01 FPLM132H 6 ...

Page 17: ...EN FPLM132H 6 Getting started 17 Your product Your product MNL_FPLMP99H 4_GB_V05_200911 indd 17 9 11 20 5 23 PM 1 2 3 4 5 6 7 8 9 10 11 12 13 14 15 16 17 18 19 20 21 22 23a 23 24 25 ...

Page 18: ...6 Muffler 17 Lever for cutting height adjustment 18 Rear wheel x2 19 Handle support screw x2 20 Handle support 21 Oil tank cap a Oil drain screw 22 Rear deflector guard 23 Grass catcher a Carry handle b Hook c Rod d Rear handle e Rubber clips 24 Hook for recoil starter handle 25 Recoil starter handle 26 Discharge chute 27 Cutting device blade a Spindle b Pin c Blade holder d Cup washer e Hex bolt ...

Page 19: ...roduct and the packaging are not children s toys Children must not play with plastic bags sheets and small parts There is a danger of choking and suffocation You will need items not supplied Suitable personal protective equipment Fuel funnel with filter Petrol and engine oil Fuel collecting container Oil collecting container Lubrication oil grease Suitable torque wrench Suitable screwdriver items ...

Page 20: ...ng height for the convenience if necessary 4 Make sure the brake wire 3 run on the upper side of the lower handle bar 7 Fig 1 Upper handle bar 1 Hold the upper handle bar 1 with the brake lever 2 facing upwards Align the mounting holes of the upper handle bar 1 and the lower handle bars 7 2 Pass the mounting bolt through the mounting holes to the end Fig 2 step 1 3 Place the hook for recoil starte...

Page 21: ...side by turning the remaining mounting knob 4 through the thread of the mounting bolt 5 Fig 3 step 2 1 5 7 24 4 1 2 Fig 2 1 3 4 5 7 1 2 Fig 3 7 Fix the brake wire 3 with the wire clip 6 on the lower handle bar 7 Fig 4 3 6 7 Fig 4 MNL_FPLMP99H 4_GB_V05_200911 indd 21 9 11 20 5 23 PM ...

Page 22: ...ard 22 and hold it in position Fig 6 step 1 3 Carry the grass catcher by its carry handle 23a 4 Align the hooks 23b with the slot and hang the grass catcher onto it Fig 6 correctly 23b 23a 22 1 2 1 5 1 1 5 1 1 5 1 Fig 6 5 Carefully release the rear deflector guard 22 afterwards Fuel and engine oil This product is equipped with a 4 stroke engine Before operation it is necessary to add proper fuel a...

Page 23: ...rating separately Never mix oil with petrol 1 Always use clean fresh unleaded petrol Purchase fuel in quantities that can be used within 30 days 2 Never mix oil with petrol Avoid getting dirt dust or water in the fuel tank 3 Unscrew and remove the fuel tank cap 8 Fig 7 4 Add suitable fuel into the fuel tank Leave a minimum 5 mm of space between the top of the fuel and the inside edge of the tank t...

Page 24: ... oil However for manufacturing reasons it is possible that a small quantity may be in proper oil 4 stroke engine oil e g SAE 10W 30 life Non detergent or 2 cycle engine oils will damage the engine and should not be used 1 Unlock and remove the oil tank cap 21 Fig 9 2 Gradually add good quality engine oil SAE10W 30 Allow the oil to settle 3 insert it into the tank opening without tightening the cap...

Page 25: ...d 25 Quick start Operating controls MNL_FPLMP99H 4_GB_V05_200911 indd 25 9 11 20 5 23 PM Brake lever Recoil starter handle Fuel tank cap Primer Air filter case Spark plug connector Oil tank cap Lever for cutting height adjustment ...

Page 26: ...l starter handle 25 until engine starts Operate Stopping Release the brake lever 2 Storage Empty fuel tank Empty oil tank Clean and maintain Store WARNING This quick start provides only a short overview of how to start and stop the product For safe use it is essential to read the entire instruction manual before first use MNL_FPLMP99H 4_GB_V05_200911 indd 26 9 11 20 5 23 PM ...

Page 27: ...purposes other than those described Brake lever 1 Pull back the brake lever 2 and hold it against the upper handle bar 1 when starting the engine Keep it squeezed during operation Fig 11 2 Release the brake lever 2 to stop the engine 2 1 Fig 11 Recoil starter The recoil starter handle 25 is positioned at the top of the engine 1 Pull back the brake lever 2 and hold it against the upper handle bar 1...

Page 28: ...he blade had come to a complete stop before removing the grass catcher 1 Always attach the grass catcher 23 correctly when using the product for grass collection as described in the Assembly grass catcher section 2 Always carry the grass catcher by its handle 23a Emptying WARNING Switch the engine off and wait that the blade had come to a complete stop before removing the grass catcher Empty the g...

Page 29: ...ur hands or feet to remove grass clippings from the discharge chute 26 Cutting height adjustment Adjust the cutting height according to the needs of your lawn The cutting height depends on the kind of lawn and its actual height When mowing high grass start with the maximum cutting height and make a second cut with a lower cutting height 1 Pull the lever for cutting height adjustment 17 towards the...

Page 30: ...ush the product using the upper handle bar 1 Keep the handle bar dry and free from lubricant to ensure safe support 3 Ensure that the air vents 9 are always unobstructed and clear Clean them if necessary with a soft brush Blocked air vents may lead to overheating and damage the product 4 Stop the engine immediately if you are disturbed while working by other people entering the working area Always...

Page 31: ...step 2 4 Pull the recoil starter handle 25 lightly until you feel resistance then pull it rapidly Do it repeatedly until the engine starts Fig 16 step 3 5 Rest the recoil starter handle 25 onto the hook 24 located on the right hand side of the upper handle bar 1 6 The product begins mowing when you push the product forward 11 1 24 25 1 2 3 2 Fig 16 WARNING The starting position should be as descri...

Page 32: ...emove the spark plug 15a and dry it 2 Pull the recoil starter handle 25 for several times to drain the fuel from the combustion chamber 3 up any spilled fuel and move the product at least 3 metres 10 for the engine to cool down then start the product as described in the Start section Stopping Release the brake lever 2 to stop the engine and blade Fig 18 2 1 Fig 18 MNL_FPLMP99H 4_GB_V05_200911 indd...

Page 33: ... the sides This will keep the rows even and ensures that all the lawn is cut without missing any spots Fig 19 6 Circle around flower beds When reaching a flower bed in the middle of the lawn cut a row or two around the circumference of the bed Fig 19 7 Pay special attention when changing direction 8 Empty the grass catcher 23 regularly WARNING Extensive vibration of the product during operation is...

Page 34: ...broken and worn parts Replace worn parts as necessary or contact an authorised service centre for repair before using the product again WARNING Only perform repairs and maintenance work according to these instructions All further works must be performed by a qualified specialist Cleaning 1 Clean the product with a slightly damp cloth and mild soap Use a brush for areas that are hard to reach 2 In ...

Page 35: ...fficulties to start the engine Maintenance table Part To do Before after each use First month or 5 hours Every 3 months or 25 hours Every 6 months or 50 hours Every year or 100 hours Every 2 years or 250 hours Engine oil check x replace x Air filter check x clean x replace x Spark plug check adjust x x clean x replace x Spark plug cap clean x Fuel tank and filter clean x Fuel tube clean Every 2 ye...

Page 36: ...se some of the original shape The cutting efficiency will be reduced and the cutting device should be replaced 3 Keep the cutting device 27 sharp to ensure a good cutting performance Replace a worn or damaged cutting device with a new one of the same type or have it sharpened by a qualified specialist 4 If jacking the product is not possible tilt it to the right side so that the fuel tank cap 10 s...

Page 37: ...her 1 Inspect the grass catcher 23 before each use Do not use it if you find any damage 2 Clean the grass catcher 23 after operation using water and mild soap 3 Let the grass catcher 23 dry thoroughly before storing to avoid mildew Wires Check the performance of the brake wire 3 before each use Ask a qualified specialist to adjust it if necessary WARNING Do not use the product with defective or lo...

Page 38: ...21 Spark plug NOTE For good performance the spark plug 15a must be properly gapped and free of deposits Inspect the spark plug 15a every 25 hours or before long term storage over 180 days Clean or replace with a new one if necessary type F5RTC 1 Disconnect the spark plug connector 15 Fig 22 2 Loosen the spark plug anti clockwise using the spark plug wrench 28 and remove it carefully Fig 23 MNL_FPL...

Page 39: ...e or the insulation is damaged 8 it in hand tight and then lightly tighten it with the spark plug wrench 28 Fig 24 WARNING Do not over tighten the spark plug 15a to avoid any damage Fuel NOTE if you use petrol kept for more than 30 days 1 Empty the fuel tank when storing the product over 30 days to prevent the fuel deteriorating 2 Place a suitable container under the fuel drain screw 13a to collec...

Page 40: ...p and then remove the dipstick again 4 The oil level must be between the oil level markings approx 400 ml Add 5 6 Wipe the spilt oil with a soft cloth and reattach the oil tank cap 21 Draining engine oil NOTE Drain the oil every 50 hours of operation of every 6 months WARNING Before tilting the product for maintenance the fuel tank or explosion 1 The oil should be clear and thick If the oil is sti...

Page 41: ...milarly qualified specialist Do not attempt to make any adjustments by yourself Muffler Should it be necessary to modify or replace the muffler 16 contact an authorised service center or a similarly qualified specialist Do not attempt to make any adjustments by yourself Valve play Have a qualified specialist check and adjust the valve play Details for the specialist IN 0 1 0 15mm EX 0 15 0 2 mm Sp...

Page 42: ...orage or covering the product with a suitable cloth or enclosure to protect it against dust 6 Empty the fuel tank if you are not going to use the product for an extended period of time more than 30 days and before storing it for the winter Transportation 1 Stop the engine and disconnect the spark plug connector 15 2 Adjust the cutting height to the highest position as described in the Cutting heig...

Page 43: ...is dirty 1 6 Spark plug is loose 1 7 Spark plug gap is incorrect 1 8 Carburetor is flooded with fuel 1 1 Add fuel 1 2 Dry spark plug 1 3 Replace spark plug 1 4 Attach properly 1 5 Clean air filter 1 6 Tighten spark plug 25 30 Nm 1 7 Set gap between electrodes at 0 6 to 0 8 mm 1 8 Remove the spark plug and pull recoil starter handle continuously until carburetor clears itself 1 9 Faulty ignition mo...

Page 44: ... of spark plug is too close 6 1 Set gap between electrodes at 0 6 to 0 8 mm 7 Engine overheats 7 1 Air vents are clogged 7 1 Remove debris from vents 7 2 Incorrect spark plug 7 2 Install correct spark plug and cylinder fins on engine 8 Unsatisfactory result 8 1 Cutting device is dull 8 1 Replace with a new one 8 2 Cutting material exceeds capacity 8 2 Only cut materials acc to the capacity of the ...

Page 45: ... guarantee you must present your proof of purchase such as a sales receipt purchase invoice or other evidence admissible under applicable law please keep your proof of purchase in a safe place For this guarantee to apply the product you purchased must be new it will not apply to second hand or display products Unless stated otherwise by applicable law any replacement product issued under this guar...

Page 46: ... fault repair it and return it Deciding to repair your product rather than buying a replacement and adding to the mountain of waste is a more sustainable choice and you will be doing your bit for the environment please note that before collection all fuel must be removed from petrol powered machines Step 1 Find your proof of purchase and get in touch with the Customer Care and Technical Helpline S...

Page 47: ...chnical Helpline UK 0800 0789647 Eire 1800 932226 Opening hours are Monday Friday 8am 5pm Availability of Spare Parts Contact the customer service helpline for assistance or visit www kingfisher spares com For assistance contact the customer services helpline UK 0800 0789647 uk Kingfisherservice com EIRE 1800 932226 eire kingfisherservice com Further information about this product can also be foun...

Page 48: ...EN 48 EN In more detail EC declaration of conformity MNL_FPLMP99H 4_GB_V05_200911 indd 46 9 11 20 5 23 PM ...

Page 49: ... Procédures d évaluation de conformité Annexe VI de la Directive Procedury oceny zgodności Załącznik VI dyrektywy Proceduri de evaluare a conformitatii Anexa VI a directivei Procedimientos de evaluacion de la conformidad Anexo VI de la directiva Procedimentos de avaliacao de conformidade Anexo VI da diretiva References to the relevant harmonised standards used or references to the other technical ...

Page 50: ...EN 50 EN EC declaration of conformity In more detail MNL_FPLMP99H 4_GB_V05_200911 indd 48 9 11 20 5 23 PM ...

Page 51: ...Kingfisher International Products Limited 3 Sheldon Square London W2 6PX United Kingdom www kingfisher com products ...

Reviews: