background image

www.kingsbottle.com.au

10

PART IV


LAYOUT AND STORAGE

STORAGE

YOUR CABINET WAS DESIGNED TO STORE A MAXIMUM NUMBER OF BOTTLES SECURELY. WE RECOMMEND THAT YOU 
OBSERVE THE TIPS BELOW TO OPTIMIZE LOADING. 

1.

Disperse your bottles even so as not to concentrate weight in any one area. Also, be careful that your bottles do not touch either the 
back of the cabinet or the step at the bottom.  

2.

Also make sure that bottles are not all grouped together either at the top or bottom of the cabinet.  

3.

A refrigerator that is full and has nice allowance for air movement will work more efficiently. 

4.

Never try to adjust shelf with bottles still on it. 

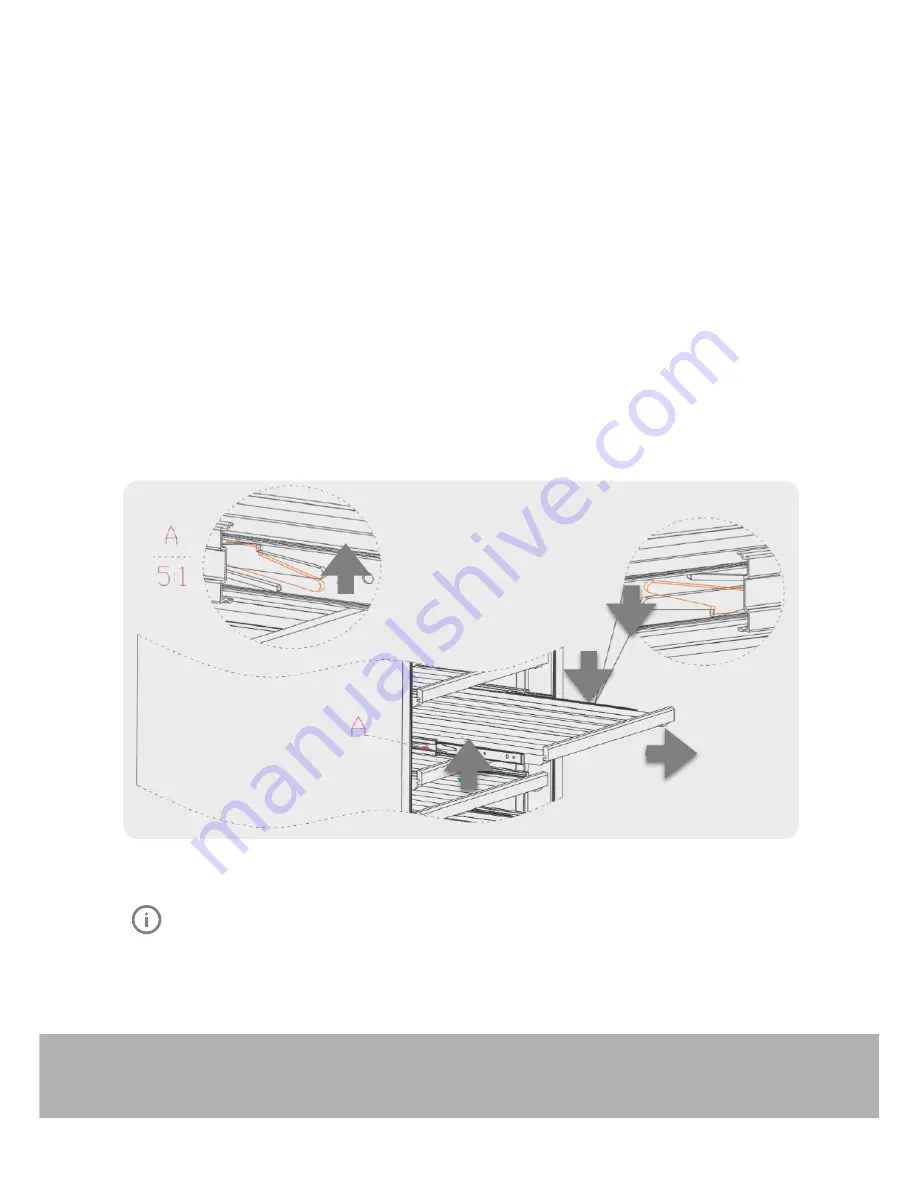
TO REMOVE A ROLLING SHELF: 

1.

Remove all bottles  

2.

Pull the shelf out as far as possible  

3.

Push the LEFT side lever downward but RIGHT side lever upward (as illustrated below) 

4.

Remove the shelf

PLEASE NOTE 

Before modifying your cabinet’s original configuration in any way, be sure to ask your dealer for advice.

Important safety instructions  .  .  .  .  .  .  .  .  .  .  .  .  .   3
Bar refrigerator with ice box features  .  .  .  .  .  .  .  .  .  4
Bar refrigerator without ice box features    .  .  .  .  .  .  .  5
Single door all refrigerator features    .  .  .  .  .  .  .  .  .  6
Bar freezer features    .  .  .  .  .  .  .  .  .  .  .  .  .  .  .  .  7
Single door all freezer features    .  .  .  .  .  .  .  .  .  .  .  8
Installing your new appliance  .  .  .  .  .  .  .  .  .  .  .  .   9 

  Ventilation around your appliance.   .  .  .  .  .  .  .  .  9 

  Installing your refrigerator   .  .  .  .  .  .  .  .  .  .  . 9-10
Initial start-up   .  .  .  .  .  .  .  .  .  .  .  .  .  .  .  .  .  .  . 10
Manual controls  .  .  .  .  .  .  .  .  .  .  .  .  .  .  .  .  .  . 10 

  Controlling the temperature.  .  .  .  .  .  .  .  .  .  .  . 10
Using your appliance – Ice box models .  .  .  .  .  .  .  . 11 

  Making ice    .  .  .  .  .  .  .  .  .  .  .  .  .  .  .  .  .  . 11 

  De-icing the ice box .  .  .  .  .  .  .  .  .  .  .  .  .  .  . 11
Freezer operation   .  .  .  .  .  .  .  .  .  .  .  .  .  .  .  .  . 12
Reversing the ice box door opening direction  .  .  .  .  . 13
Reversing the door opening direction WIM1000 & 

WFM0700 .  .  .  .  .  .  .  .  .  .  .  .  .  .  .  .  .  .  .  . 14
Reversing the door opening direction WIM1200, 

WRM1300, WRM2400, WFM0900 & WFM1800   . 15
Care and maintenance .  .  .  .  .  .  .  .  .  .  .  .  .  .  .  .  

  Changing the light bulb  .  .  .  .  .  .  .  .  .  .  .  .  . 16
General information   .  .  .  .  .  .  .  .  .  .  .  .  .  .  .  . 17 

  Cleaning the appliance  .  .  .  .  .  .  .  .  .  .  .  .  . 17 

  Safety .  .  .  .  .  .  .  .  .  .  .  .  .  .  .  .  .  .  .  .  . 17 

  Switching off your appliance .  .  .  .  .  .  .  .  .  .  . 17
Troubleshooting   .  .  .  .  .  .  .  .  .  .  .  .  .  .  .  .  .  . 18
Warranty  .  .  .  .  .  .  .  .  .  .  .  .  .  .  .  .  .  .  .  .  . 19

Congratulations and thank you for choosing our 

refrigerator/freezer. We are sure you will find your new 

appliance a pleasure to use. Before you use the appliance, 

we recommend that you read through the relevant sections 

of this manual, which provides a description of your 

appliance and its functions.

To avoid the risks that are always present when you use 

an electric appliance, it is important that the appliance is 

installed correctly and that you read the safety instructions 

carefully to avoid misuse and hazards.

We recommend that you keep this instruction booklet  

for future reference and pass it on to any future owners.

After unpacking the appliance, please check it is not 

damaged. If in doubt, do not use the appliance but contact 

your local customer care centre.

TIPS & INFORMATION

+/2146#06h%*'%-(14#0;&#/#)'514/#4-5

 If you find  

the refrigerator is damaged or marked, you must report it 

within 7 days if you wish to claim for damage/marks  

under the manufacturers warranty. This does not affect  

your statutory rights.

ENVIRONMENTAL TIPS

+0(14/#6+1010&+5215#.(1475'45

s¬¬-OST¬OF¬THE¬PACKING¬MATERIALS¬ARE¬RECYCLABLE¬0LEASE¬

dispose of those materials through your local recycling 

depot or by placing them in appropriate collection 

containers.

s¬¬)F¬YOU¬WISH¬TO¬DISCARD¬THIS¬PRODUCT¬PLEASE¬CONTACT¬


your local authorities and ask for the correct method  

of disposal.

%106'065

%10)4#67.#6+105

%106'065

COMPRESSOR REFRIGERATORS

Summary of Contents for KB152 Series

Page 1: ...UAL KB152 308 405 SINGLE ZONE REFRIGERATORS CAREL CONTROLLER COMPRESSOR REFRIGERATORS PLEASE NOTE EVERY TIME THE UNIT IS POWERED ON THERE WILL BE A 6 MINUTE DELAY FOR THE COMPRESSOR TO START KB405W KB308W KB152W KB405B KB308B KB152B ...

Page 2: ...carefully to avoid misuse and hazards We recommend that you keep this instruction booklet for future reference and pass it on to any future owners After unpacking the appliance please inspect it to verify it is not damaged If in doubt do not use the appliance but contact us or your local customer care centre CONTENTS COMPRESSOR REFRIGERATORS TABLE OF CONTENTS Chapter Contents Page Part I Important...

Page 3: ...u may cause an explosion s 7HEN YOU DISPOSE OF YOUR OLD REFRIGERATORS AND FREEZERS remove any doors Children can suffocate if they get trapped inside s 4HIS APPLIANCE CONTAINS INSULATION FORMED WITH mAMMABLE blowing gases Avoid safety hazards by carefully disposing of this appliance WARNING The refrigerator must be plugged into its own dedicated 220 240V 50Hz AC electrical outlet The plug must be ...

Page 4: ...rol board 2 Housing 3 Ventilation DC Fan 4 Shelf 5 Front grill 6 Door hinge 7 Controller 8 Door 9 Adjustable stand feet YOUR REFRIGERATOR ALSO INCLUDES TWO KEYS TO OPERATE THE ROUNDED LOCKING MECHANISM WHICH IS SHOWN AT THE LOWER CENTRE POSITION OF THE DIAGRAM COMPRESSOR REFRIGERATORS ...

Page 5: ...ional 8mm feet that drop the units height to 848mm if required These front venting models can be built into cabinetry Builders should allow an additional 20mm either side behind and on top of the unit These extra spaces enable units to be placed in the position efficiently accommodate the door when open and without power cords being damaged KB308 598 mm 685 mm 1408 mm KB405 598 mm 685 mm 1821 mm ...

Page 6: ...nit comes with an optional key lock The keys are located inside the plastic bag that contains the user manual To lock the door simply reverse the operation making sure the metal pin is engaged completely Then remove the key and place it in a secure place for safekeeping To unlock the door insert the key into the lock and turn counterclockwise ot t ward am sed nt on ent ement ways 3 Compare the ali...

Page 7: ...iance lines up with a stud Move the appliance away from the wall and position bracket on the mark Mark and drill pilot holes into the center of the stud with a 2 5mm drill bit Attach a bracket to the stud with the long screws provided Move the appliance into its final position taking care to line up the wall bracket close enough to the bracket on the back of the appliance to strap them together Th...

Page 8: ... display shelves to show your bottle label You could refer to the instruction to remove the 2nd 4th shelves at the top use the screws to fill the holes on the wall after shelves removed and then change the 1st 3rd 5th shelves to display shelves Note This changes will reduce the total storage capacity remove the 2nd 4th shelves change the 1st 3rd 5th standard shelves to display shelves ...

Page 9: ...shelves to show your bottle label You could refer to the instruction to remove the 2nd shelf at the top use the screws to fill the holes on the wall after shelves removed and then change the 1st 3rd shelves to display shelves Note This changes will reduce the total storage capacity remove the 2nd shelf change the 1st 3rd standard shelves to display shelves KB308W KB308W ...

Page 10: ...opening direction 13 Reversing the door opening direction WIM1000 WFM0700 14 Reversing the door opening direction WIM1200 WRM1300 WRM2400 WFM0900 WFM1800 15 Care and maintenance Changing the light bulb 16 General information 17 Cleaning the appliance 17 Safety 17 Switching off your appliance 17 Troubleshooting 18 Warranty 19 Congratulations and thank you for choosing our refrigerator freezer We ar...

Page 11: ... ON or OFF 1 Decrease the value 2 Holding the button for half a second turns the interior light ON or OFF 1 Use SET after selecting values with the up and down arrows 2 alarm mute button UP POWER DOWN LIGHT SET MUTE KEYBOARD ADJUST TEMPERATURE 1 Press the SET MUTE button for more than 3 seconds until the display shows the code ST st 2 Use the UP and DOWN buttons to adjust the temperature 3 Press S...

Page 12: ...eir premium storage temperature recommendation Rich and full bodied reds 15 18 C Light reds 12 14 C Whites and rose 7 14 C Sparkling wines 6 9 C Beer 1 5 C 0LEASE READ THE USER MANUAL CAREFULLY AND STORE IN A HANDY place for later reference The symbols you will see in this booklet have these meanings WARNING 6FGQ QWK MJ GLBGA RCQ GLDMPK RGML AMLACPLGLE WMSP NCPQML J Q DCRW CAUTION 6FGQ QWK MJ GLBG...

Page 13: ...The symbols you will see in this booklet have these meanings WARNING 6FGQ QWK MJ GLBGA RCQ GLDMPK RGML AMLACPLGLE WMSP NCPQML J Q DCRW CAUTION 6FGQ QWK MJ GLBGA RCQ GLDMPK RGML ML FMU RM TMGB B K EGLE RFC NNJG LAC TIPS INFORMATION 6FGQ QWK MJ GLBGA RCQ RGNQ LB GLDMPK RGML MSR SQC MD RFC NNJG LAC ENVIRONMENTAL TIPS 6FGQ QWK MJ GLBGA RCQ RGNQ LB GLDMPK RGML MSR CAMLMKGA J LB CAMJMEGA J SQC MD RFC NN...

Page 14: ... door openings The light does not work Not plugged in or the light button is OFF Light itself faulty Check and make sure the light button is ON or ask an engineer for help The Refrigerator seems to make too much noise The stand feet is not leveling vibrations lead to noise Adjust the stand feet and ensure they are level Copper pipe hits other objects and makes noise Gently adjust the position of t...

Page 15: ...www kingsbottle com au 15 ...

Page 16: ...nes Purchaser assumes all the risk of using these units including risk of spoilage humidity variations temperature variations leaks fires water damage mold mildew dryness and similar perils that may occur SPECIAL NOTE Warranty is only honored for the unit which is purchased and used in United States of America And if your product was purchased at any 3rd party retailer and not directly from KingsB...

Reviews: