www.kingsbottle.com.au (Australia)
11
OPERATION
PART V
OPERATING YOUR REFRIGERATOR
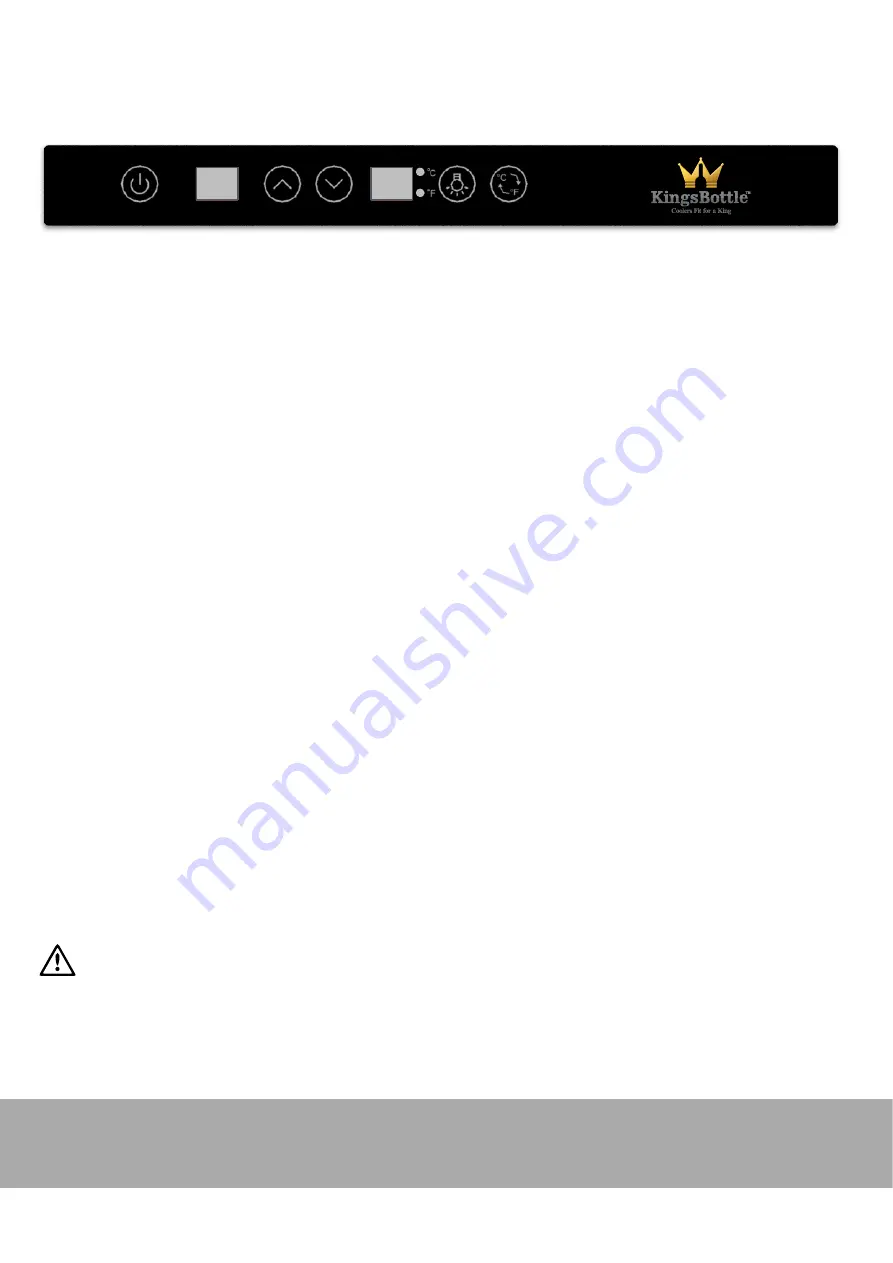
Each wine cooler includes an operating panel on the front of the unit. This operating panel includes several features to operate and control the temperature,
light color and brightness.
ON/OFF:
Turns the wine cooler power on or off.
TEMP. SET:
Displays the desired temperature.
TEMP. DISPLAY:
Displays the actual temperature.
UP / DOWN:
Adjust the temperature preset value.
LIGHT:
Turns the interior light on/off, or change the light colors.
LIGHT+UP
: Increase the light brightness;
LIGHT+DOWN
: Decrease the light brightness.
C/F SWITCH:
Switch between °C and °F
LIGHT ON/OFF, COLOR & BRIGHTNESS CONTROL
1. Press the
LIGHT
button to turn the light on/off, or change the light color. The order of change is as follows: ON, red, orange, yellow, green, blue, purple,
white, color changing, OFF.
2. While holding down the
LIGHT
button, press the
UP
button to increase the brightness, or press the
DOWN
button to decrease the light brightness.
Brightness is divided into 5 levels: 20%, 40%, 60%, 80% and 100%.
SETTING THE TEMPERATURE CONTROL
1. Make sure the power cord is connected to a properly grounded outlet.
2. Press the
ON/OFF
button to turn the power ON.
3. Press the
C/F SWITCH
button to choose and display Fahrenheit or Celsius temperature.
4. Set the temperature as you desire by pushing the
UP
or
DOWN
button.
NOTE:
The desired temperatures may fluctuate depending on whether the interior light is ON or OFF, the ambient temperature, the location of the unit and
the orientation of the bottles. The display is just a guide, be guided by how cold your drinks are at consumption. Remember units go into defrost mode, and
this will show a higher display, it’s only for short periods and doesn’t have time to affect drink temperature. In general, once the unit has settled, it will keep
products within 5°F (2°C) of the set temp easily in temperatures up to and beyond 100°F (38°C).
TEMPERATURE SETTINGS FOR WINE SERVICE
Different varietals of wine require different temperature settings. The recommended temperature ranges for long term preservation of various wines is
Red Wines: 52-64°F (11-18°C ); White Wines: 44-51°F (7-10°C); Sparkle Wines: 41-43°F (5-6°C).
1.
In the event of a power interruption, all previous temperature settings will be automatically saved and each compartment will return to the previous
temperature setting.
2.
If the unit is unplugged, loses power, or is turned off, there will be a 6 minute delay for the compressor to restart after the unit is powered ON.
3.
When you use the wine cooler. for the first time or restart the wine cooler after having been shut off for a long time, there will be a few degrees variance
between the temperature you select and the one indicated on the LED readout for the first few hours of operation. After a few hours of operation, the
temperature will normalize to the displayed temperature.
0LEASE¬READ¬THE¬USER¬MANUAL¬CAREFULLY¬AND¬STORE¬IN¬A¬HANDY¬
place for later reference.
The symbols you will see in this booklet have these meanings:
WARNING
6FGQQWK@MJGLBGA?RCQGLDMPK?RGMLAMLACPLGLEWMSPNCPQML?JQ?DCRW
CAUTION
6FGQQWK@MJGLBGA?RCQGLDMPK?RGMLMLFMURM?TMGBB?K?EGLERFC
?NNJG?LAC
TIPS & INFORMATION
6FGQQWK@MJGLBGA?RCQRGNQ?LBGLDMPK?RGML?@MSRSQCMDRFC?NNJG?LAC
ENVIRONMENTAL TIPS
6FGQQWK@MJGLBGA?RCQRGNQ?LBGLDMPK?RGML?@MSRCAMLMKGA?J?LB
CAMJMEGA?JSQCMDRFC?NNJG?LAC
Meanings of symbols used in this manual are shown below:
6FGQQWK@MJGLBGA?RCQLCTCPRMBMRFGQ
6FGQQWK@MJGLBGA?RCQ?JU?WQBMRFGQ
WARNING
s¬¬)F¬PRESSURISED¬AEROSOL¬CONTAINERS¬BEAR¬THE¬WORD¬
‘flammable’ and/or a small flame symbol,
do not store them inside any refrigerator or
freezer. If you do so you may cause an explosion.
s¬¬7HEN¬YOU¬DISPOSE¬OF¬YOUR¬OLD¬REFRIGERATORS¬AND¬FREEZERS¬
remove any doors. Children can suffocate if they get
trapped inside.
s¬¬4HIS¬APPLIANCE¬CONTAINS¬INSULATION¬FORMED¬WITH¬mAMMABLE¬
blowing gases. Avoid safety hazards by carefully
disposing of this appliance.
WARNING
The refrigerator must be plugged into its own
dedicated 220-240V, 50Hz AC electrical outlet.
The plug must be accessible when the refrigerator is
in position.
It is essential the power point is properly earthed to
ground. Consult a qualified electrician if you are unsure.
Don’t use extension cords or adapter plugs with this
refrigerator.
If the power cord is damaged, have it replaced by a
qualified service technician.
Unplug the refrigerator before cleaning it, or changing
the light bulb to avoid electric shock.
Never unplug the refrigerator by pulling the electrical
cord as this may damage it. Grip the plug firmly and
pull straight out.
Choose a location for your refrigerator that isn’t too cold.
The ambient room temperature should be above 10°C.
Stand your refrigerator in a dry place – avoid areas
of high moisture or humidity.
Don’t put the refrigerator in frosty or unprotected areas
like a garage or on the verandah.
Keep the refrigerator out of direct sunlight.
Don’t locate the refrigerator near stoves, fires or heaters.
When installed correctly, your refrigerator should:
– Have adequate space at the back and sides
for air circulation (refer to page 9).
– Be aligned to the surrounding cupboards.
– Have doors that will self-close from a partially
open position.
WARNING
4#4'(4+)'4#069#40+0)
This appliance may contain a small quantity of environmentally
friendly, but flammable, non-synthetic R600a refrigerant:
s¬¬%NSURE¬THAT¬THE¬TUBING¬OF¬THE¬REFRIGERANT¬CIRCUIT¬IS¬NOT¬
damaged during transportation and installation.
s¬4HE¬ROOM¬FOR¬INSTALLING¬APPLIANCE¬MUST¬BE¬AT¬LEAST¬M¬PER¬
8g of refrigerant. The amount of refrigerant charged in the
appliance can be found on the rating plate on the appliance.
s¬+EEP¬VENTILATION¬OPENINGS¬IN¬THE¬APPLIANCE¬ENCLOSURE¬OR¬
in the built-in structure, clear of obstruction.
s¬$O¬NOT¬USE¬MECHANICAL¬DEVICES¬OR¬OTHER¬MEANS¬TO¬
accelerate the defrosting process, other than those
recommended by the manufacturer.
s¬4HE¬ROOM¬FOR¬INSTALLING¬APPLIANCE¬MUST¬BE¬AT¬LEAST¬M
3
per 8g of refrigerant. The amount of refrigerant charged
in the appliance can be found on the rating plate on
the appliance.
+/2146#065#('6;+05647%6+105
5#('6;
ON/OFF
UP
DOWN TEMP. DISPLAY LIGHT C/F SWITCH
TEMP. SET


