background image

56

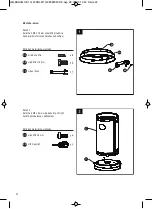
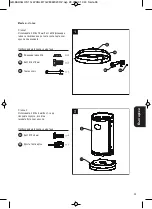
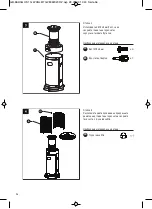
Болт M5 x 8 мм

Кръстата отвертка

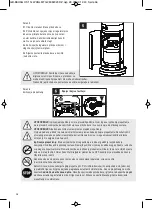
Стъпка 3

Използвайте 4 M5 x 8 мм болт, за да

свържете главата на горелката с

корпуса за газовата бутилка.

Необходими материали за монтажа

DD

Глуха гайка M6

Стъпка 4

Разположете двете половини на предпазната 

решетка над главата на горелката и свържете 

тези части с глуха гайка M6.

Необходими материали за монтажа

CC

EE

GB-BAHAG HS 11kW ANLEITG 29092020 RZ.qxp  29.09.20  14:40  Seite 56

Summary of Contents for 25679582

Page 1: ...ater setup and operating instructions Grelnik za teraso navodila za monta o in uporabo Grijalica za terase Uputa za postavljanje i upotrebu EN DE SI Art Nr 25680344 25679582 27052879 27002689 20 0063...

Page 2: ...2 GB BAHAG HS 11kW ANLEITG 29092020 RZ qxp 29 09 20 14 40 Seite 2...

Page 3: ...3 DE Bedienungsanleitung EN Operating instructions SI Navodila za uporabo HR Uputa za upotrebu Index 4 14 15 25 26 36 37 47 48 58 BG GB BAHAG HS 11kW ANLEITG 29092020 RZ qxp 29 09 20 14 40 Seite 3...

Page 4: ...enungs und Wartungsanleitung sorgf ltig bevor Sie das Ger t aufbauen und warten Bitte lesen Sie vor dem Aufbau und Gebrauch die folgenden Hinweise Der Aufbau und Gebrauch dieses Ger tes und die Lageru...

Page 5: ...eizer erst benutzen wenn alle Verbindungen nach Leckage untersucht wurden Bei Gasgeruch sofort die Gaszufuhr stoppen Den Regler an der Gasflasche auf OFF drehen Sollte sich die Leckstelle am Schlauch...

Page 6: ...ofort gestoppt werden Danach muss das Ger t untersucht werden und Sch den m ssen behoben werden bevor es wieder in Benutzung kommt Die Rohre oder die flexiblen Schl uche sollten mindestens einmal im M...

Page 7: ...zufuhr sofort wieder abgestellt werden Ziehen Sie alle undichten Verbindungen an und f hren Sie den Test erneut durch Beim Test niemals Rauchen 5 Bedienung und Aufbewahrung Anschalten des Heizers 1 De...

Page 8: ...iemals im Keller oder an anderen Orten ohne ausreichende Luftzirkulation lagern 6 S uberung und Wartung Wischen Sie den entstandenen Staub nur mit einem weichen und feuchten Tuch ab Benutzen Sie niema...

Page 9: ...kategorie I3B P 30 Verwenden Sie einen 30 mbar Regulator f r Butan bei Gaskategorie I3 28 30 37 Verwenden Sie einen 37 mbar Regulator f r Propan bei Gaskategorie I3 28 30 37 Verwenden Sie einen 50 mba...

Page 10: ...ndes Werkzeug und Schrauben A B C D E Teil Bezeichnung Menge A Flammen Schutzgitter 1 B Brenner 1 C Gasflaschen Geh use 1 D Sockel 1 E Rollen 1 AA Flanschmutter M8 2 BB Schraube M8 x 15 mm 2 CC Schrau...

Page 11: ...nd M8 Flanschmuttern um die Halterung der R der mit dem Sockel zu verbinden Ben tigtes Montagematerial CC EE Schraube M5 x 8 mm Kreuzschraubendreher Schritt 2 Benutzen Sie 4 M5 x 8 mm Schrauben um das...

Page 12: ...Gasflaschen Geh use zu verbinden Ben tigtes Montagematerial DD Hutmutter M6 Schritt 4 Positionieren Sie die beiden H lften des Flammen Schutzgitters ber dem Brennerkopf und verbinden Sie die Teile mit...

Page 13: ...ieren in Br nden oder Explosionen die Eigentum zerst ren und ernsthafte k rperliche Verletzungen oder im schlimmsten Fall den Tod verursachen k nnen Leckage Test Dieser muss vor der ersten Inbetriebna...

Page 14: ...fast leer tauschen S ubern ersetzen Sie die D se Drehen Sie den Gashahn auf Ersetzen Sie das Thermoelement Bringen Sie den Pilot Flammen Brenner in die richtige Position Positionieren Sie diesen richt...

Page 15: ...with care before setting up and servicing the device Please read the following notes before setup and use This appliance must be used and the gas cylinder stored in accordance with the regulations in...

Page 16: ...n but never with open fire Only use the heater when all connections have been examined for leaks Stop the gas supply at once if you smell gas Turn the controller at the gas cartridge to OFF If the lea...

Page 17: ...must never be used if there is a gas leak If it is already in use the gas supply must be stopped at once Then the device must be examined and damage must be removed before it is used again The tubes...

Page 18: ...test 5 Operation and storage Switching on the heater 1 Open the gas valve of the gas supply cylinder completely 2 Push in the variable control knob and turn it to the PILOT position counter clockwise...

Page 19: ...must never be stored in the basement or other locations without sufficient air circulation 6 Cleaning and maintenance Wipe off the resulting dust only with a soft and moist cloth Never use flammable o...

Page 20: ...Use 30 mbar regulator for butane under the category I3 28 30 37 Use 37 mbar regulator for propane under the category I3 28 30 37 Use 50 mbar regulator for butane propane under the category I3B P 50 A...

Page 21: ...Flange nut M8 2 BB Bolt M8 x 15 mm 2 CC Screw M5 x 8 mm 8 DD Dome Nut M6 1 EE Philips screwdriver 1 FF Wrench 1 A B C D E 9 Mounting Tools needed included Philips Screwdriver medium blade Wrench Leak...

Page 22: ...mm bolts and M8 flange nuts to connect bracket with wheel to the base Hardware used Screw M5 x 8 mm Philips screwdriver Step 2 Use 4 M5 x 8 mm screws to join the tank housing to the base Hardware used...

Page 23: ...5 x 8 mm screws to connect the burner head and tank housing body Hardware used DD Dome nut M6 Step 4 Use the M6 dome nut to connect the two half safety guards to the burner head Hardware used CC EE GB...

Page 24: ...re or explosion which may damage property and can cause serious bodily injuries or death Leak testing This must be done before initial use annually and whenever any gas components are replaced or serv...

Page 25: ...Examine all connections Gas cartridge nearly empty replace it Clean replace the nozzle Turn on the gas valve Replace the thermocouple Put the pilot flame burner in the proper position Position it prop...

Page 26: ...e do po kodbe naprave ali materialne kode Pred uporabo naprave skrbno preberite navodila Pred uporabo in monta o preberite naslednje napotke Monta a in uporaba te naprave ter skladi enje plinske jekle...

Page 27: ...z milno raztopino in ne z odprtim plamenom Grelnik uporabite ele ko se prepri ate da vsi priklju ki tesnijo in ne uhaja plin e zavohate plin pri pri i ustavite dotok plina Regulator na jeklenki obrnit...

Page 28: ...oskrbo s plinom takoj ustaviti Po tem morate napravo pregledati in popraviti morebitne po kodbe preden jo ponovno uporabite Cevi ali gibke cevi je treba pregledati vsaj enkrat mese no ali onb vsaki me...

Page 29: ...nemudoma izklopite dovod plina Zatesnite vse tesnilne povezave in ponovno preizkusite Med opravljanjem preizkusa nikoli ne kadite 5 Upravljanje in shranjevanje Vklop grelnika 1 Odvijte plinsko pipo n...

Page 30: ...anjujte v kletnih ali drugih prostorih brez ustreznega kro enja zraka 6 i enje in nega Prah obri ite z mehko vla no krpo Nikoli ne uporabljajte vnetljivih ali jedkih istilnih sredstev Ogrevalna povr i...

Page 31: ...ulator za plin butan kategorije I3 28 30 37 Uporabite 37 mbar regulator za propan s plinsko kategorijo I3 28 30 37 Uporabite 50 mbar regulator za butan propan s plinsko kategorijo I3B P 50 Potrebna je...

Page 32: ...vijaki A B C D E Del Oznaka Koli ina A Re etka za za ito pred plamenom 1 B Gorilnik 1 C Ohi je za jeklenko 1 D Podlaga 1 E Kolesca 1 AA Matica z obro em M8 2 BB Vijak M8 x 15 mm 2 CC Vijak M5 x 8 mm...

Page 33: ...in M8 matico z robom za povezavo nosilca koles s podlago Material za monta o CC EE Vijak M5 x 8 mm kri ni izvija Korak 2 Uporabite 4 M5 x 8 mm vijake da na podlago pritrdite ohi je za plinsko jeklenk...

Page 34: ...ca pritrdite na ohi je za jeklenko Material za monta o DD Matica s kapo M6 Korak 4 Obe polovici mre e za za ito plamena namestite ez glavo gorilnika in dele pove ite s pomo jo matice s kapo M6 Materia...

Page 35: ...a ognja lahko pride do po ara ali eksplozije ki lahko uni i premo enje in povzro i resne telesne po kodbe ali celo smrt Preizkus tesnjenja uhajanja plina Preizkus opravite ob prvem zagonu nato pa vsaj...

Page 36: ...ovezave Plinska jeklenka je skoraj prazna zamenjajte obo O istite zamenjajte obo Odprite plinski ventil Ponovno namestite termoelement Za etni plamen gorilnika postavite v pravilen polo aj 11 Distribu...

Page 37: ...eljito pro itajte upute za upotrebu i odr avanje prije nego postavite ili odr avate stroj Molimo pro itajte prije postavljanja i upotrebe sljede e napomene Postavljanje i upotreba ovog ure aja i sklad...

Page 38: ...se provesti sa otopinom sapuna nikada sa otvorenim plamenom Grijalicu koristite kada su svi spojevi pregledani propu taju li Osjetite li miris plina odmah zaustavite dovod plina Regulator na plinskoj...

Page 39: ...trebljava odmah se mora zaustaviti dovod plina Nakon toga se ure aj mora ispitati i moraju se otkloniti o te enja prije nego e se ponovno upotrebljavati Cijevi ili fleksibilna crijeva trebali bi se pr...

Page 40: ...na se odmah mora zatvoriti Zategnite sve propustljive spojeve i ponovno provedite ispitivanje Prilikom testiranja nikada nemojte pu iti 5 Upotreba i uvanje Paljenje grijalice 1 Plinski pipac cilindra...

Page 41: ...te u podrumu ili drugim mjestima bez dovoljne cirkulacije zraka 6 i enje i odr avanje Nastalu pra inu obri ite samo s mekanom i vla nom krpom Nikada ne koristite zapaljiva ili korozivna sredstva za i...

Page 42: ...egorije plina I3 28 30 37 upotrebljavajte 37 mbar regulator za butan propan kod kategorije plina I3 28 30 37 upotrebljavajte 50 mbar regulator za butan propan kod kategorije plina I3B P 50 Potrebno je...

Page 43: ...ovi Prolo en alat i vijci A B C D E Dio Naziv Koli ina A za titna re etka za plamen 1 B plamenik 1 C ku i te za plinsku bocu 1 D podno je 1 E kota i 1 AA prirubnica M8 2 BB vijak M8 x 15 mm 2 CC vijak...

Page 44: ...M8 prirubnice kako bi pri vrstili nosa kota a s podno jem Potreban materijal za monta u CC EE vijak M5 x 8 mm kri ni odvija Korak 2 Koristite 4 M5 x 8 mm vijke kako bi pri vrstili ku i te plinske boc...

Page 45: ...sku bocu Potreban materijal za monta u DD zaobljena slijepa matica M6 Korak 4 Pozicionirajte obje polovice za titne re etke za plamen iznad glave plamenika i spojite dijelove sa zaobljenom slijepom ma...

Page 46: ...ili eksplozije koji uni tavaju imovinu i mogu uzrokovati ozbiljna tjelesna o te enja ili u najgorem slu aju smrt Ispitivanje propu tanja Mora uslijediti prije prvog pu tanja u rad kao i godi nje i uv...

Page 47: ...ca gotovo prazna zamijeniti O istite zamijenite sapnicu Odvrnite plinski pipac Zamijenite termo element Plamenik pilot plamena dovedite u pravilan polo aj Pozicionirajte ga pravilno 11 Distribucija i...

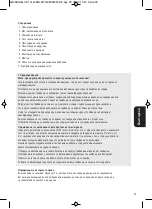
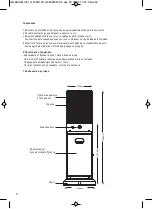
Page 48: ...48 1 2 3 4 5 1 2 25 3 31 8 c x 58 c 15 GB BAHAG HS 11kW ANLEITG 29092020 RZ qxp 29 09 20 14 40 Seite 48...

Page 49: ...49 1 2 3 4 5 6 7 8 9 10 11 1 OFF GB BAHAG HS 11kW ANLEITG 29092020 RZ qxp 29 09 20 14 40 Seite 49...

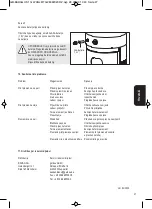
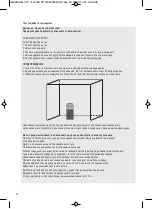
Page 50: ...50 2 100 c 100 c 100 cm 100 cm GB BAHAG HS 11kW ANLEITG 29092020 RZ qxp 29 09 20 14 40 Seite 50...

Page 51: ...51 3 4 80 OFF O N 5 1 2 90 3 60 1 3 4 HIGH 5 5 1 2 OFF 3 OFF HI LO GB BAHAG HS 11kW ANLEITG 29092020 RZ qxp 29 09 20 14 40 Seite 51...

Page 52: ...52 1 2 3 4 6 7 460 880 1360 370 GB BAHAG HS 11kW ANLEITG 29092020 RZ qxp 29 09 20 14 40 Seite 52...

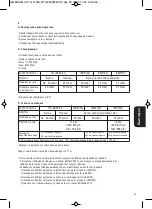
Page 53: ...P 30 I3B P 50 I3B P 37 28 30 mbar 37 mbar 30 mbar 50 mbar 37 mbar 30 mbar 37 mbar 30 mbar 50 mbar 37 mbar I3 28 30 37 I3B P 30 I3B P 50 I3B P 37 28 30 mbar 37 mbar 30 mbar 50 mbar 37 mbar 11 kW G30 80...

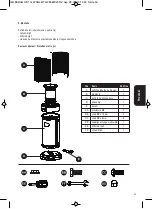
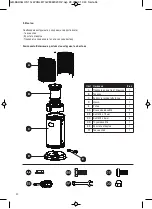
Page 54: ...54 9 A B C D E A 1 B 1 C 1 D 1 E 1 AA M8 2 BB M8 x 15 2 CC M5 x 8 8 DD M6 1 EE 1 FF 1 GB BAHAG HS 11kW ANLEITG 29092020 RZ qxp 29 09 20 14 40 Seite 54...

Page 55: ...55 AA BB FF M8 M8 x 15 1 2 M8 x 15 M8 CC EE M5 x 8 2 4 M5 x 8 GB BAHAG HS 11kW ANLEITG 29092020 RZ qxp 29 09 20 14 40 Seite 55...

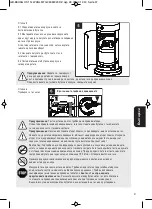
Page 56: ...56 M5 x 8 3 4 M5 x 8 DD M6 4 M6 CC EE GB BAHAG HS 11kW ANLEITG 29092020 RZ qxp 29 09 20 14 40 Seite 56...

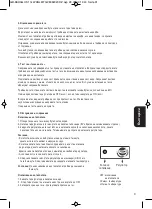
Page 57: ...57 5 5 1 5 2 5 3 5 4 6 OFF GB BAHAG HS 11kW ANLEITG 29092020 RZ qxp 29 09 20 14 40 Seite 57...

Page 58: ...tra e 18 D 42327 Wuppertal kundendienst garbou de Fax 49 2058 89725 19 Tel 49 2058 89725 0 BAHAG AG Gutenbergstr 21 D 68167 Mannheim AAA 1 5 V Ver 52 2020 7 AAA 1 5 V GB BAHAG HS 11kW ANLEITG 29092020...

Page 59: ...59 GB BAHAG HS 11kW ANLEITG 29092020 RZ qxp 29 09 20 14 40 Seite 59...

Page 60: ...GB BAHAG HS 11kW ANLEITG 29092020 RZ qxp 29 09 20 14 40 Seite 60...

Reviews: