


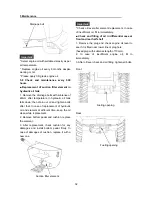
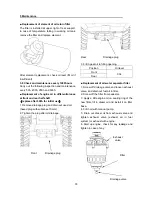


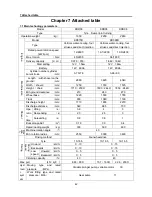

5 Maintenance
4. Close thee plug and inject long-term coolant
into radiator and spare case.
5. After injection of coolant, start up the engine
and keep it racing for about 5min, and then stop
it. Check coolant level.
■
Using method of antifreeze
(
if long-term storage coolant is used
)
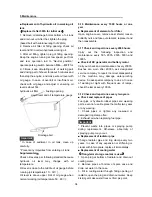
Antifreeze is used to reduce freezing temperature so
as to prevent any damages of cylinder or radiator
caused by freezing of cooling water.
Add permanent-type antifreeze (type PT) and
clean water into radiator and spare case if the
temperature is under 0
℃
. [long-term storage
coolant has been added before delivery (mixing
proportion of original fluid 50%
)
]
Important
* Use antifreeze as per temperature and its
instruction book.
* For other times without using of long-term
storage coolant, replace antifreeze every spring
and autumn.
* Antifreezes with different brands cannot be
used at same time.
5.13 Use of tyres
■
Tyres maintenance
Tyre pressure has great impact on service life of
tyre; therefore, carry out periodic inspection of
tyre pressure and adjust it properly. Check the
pressure before working. Please also check tyre
or wheel hub.
Supplementary
:
* Tyre pressure shall be subject to the regulated
pressure recorded below. In case of over-high
pressure, tyre cracking or personal injury may occur.
* Tyre cracking may occur if there’s cut on tyre;
and replace it with a new one.
* Consult your local distributor for information
about inner tube or steel hub replacement.
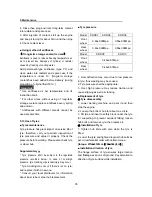
■
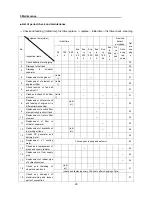
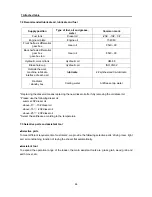
Tyre pressure
Model KDD03 KDD05
KDD06
Front
wheel
0.63±0.09Mpa 0.56±0.08Mpa
Rear
wheel
0.63±0.09Mpa 0.56±0.08Mpa
Model KDD08
KDD10
Front
wheel
0.48±0.07Mpa
Rear
wheel
0.48±0.07Mpa
1. Over deflection may occur due to low pressure
in tyre; thus wearing may be caused.
2. Tyre pressure shall be appropriate.
3. Over high pressure may reduce traction and
cause slipping as well as cracking.
■
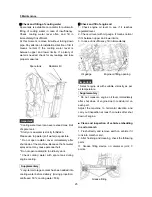
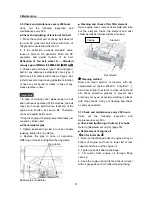
Replacement of tyre
◆
Tyre disassembly
1. Lower working machine, and park it and then
stop the engine.
2. Loosen the bolts of hub for about one circle.
3. Lift tyre and insert a safety block under the tyre
for supporting to prevent accident falling; loosen
hub bolts and remove tyre, then replace it.
◆
Installation of tyre
1. Tighten hub bolts with care while the tyre is
lifted.
2. Lower the tyre and tighten diagonal hub bolts as
per circumferential order with certain torque.
[torque: 275
~
314N·m
(
28
~
32kgf·m
)
]
■
Installation direction of tyre
The flange surface of tyre ensures large traction
and floatage even on soft ground. Pay attention to
direction of tyre surface while installation.
35
Summary of Contents for KDD03
Page 2: ......


