background image


36

5 Maintenance                                                                                                                                             
 
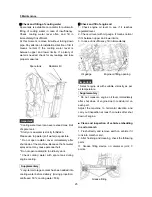
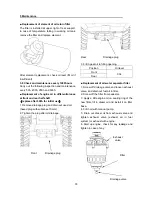
5.14 Check and use of batteries   

Stop the engine first, put starting switch on [OFF] 
position and check battery, pay attention to: 
* Short circuit may occur while removing battery 
cable; disconnect negative cable. And connect 
positive cable when installation.   
* No fire and smoke because igniting hydrogen 
produced in battery may cause explosion due to 
any smoke. 
* Keep metals or combustibles away from 
surrounding area of battery; in case of short 
circuit, explosion or fire may occur. 
* Blindness or burning may be caused by battery 
fluid (dilute sulfuric acid). Prevent the fluid 
splashing on your skin or clothes; in such case, 
wash with plenty water. If the fluid enters eyes, 
wash with clean water and accept medical care.
* Remove all wiring post of each eletrobath 
before charging.   
*  Wear eye protection glasses while working near 
battery; using booster cable and starting engine.   


Check and maintenance of battery


The life of latest battery, with high performance, 
may be shortened and additional expenditure 
may be required resulted from improper 
operation. So use the battery as per its 
instruction to make full use of it. 
1. Batteries are necessary for engine and 
illumination.  
2. The engine cannot be started or the lamp will 
become dim with insufficient power. It’s too late 
to charge at this time; so charge in advance. 
3. Moisture in electrolyte may vaporize and fluid 
may reduce during charging. Insufficient 
electrolyte may cause damage of battery and 
overfull electrolyte may also damage the 
vehicle. 
4. In case of long-term storage, remove the 
battery and charge it; and then keep it under dry 
condition without direct sunlight.   
5. Battery is discharging by itself during storage. 
so charge it once a month. 
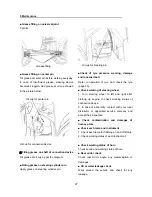
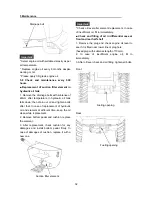
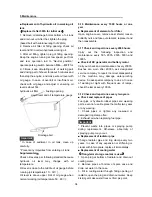
 Precaution while battery charging 

1. Replace the battery in case of insufficient 
electrolyte. Battery for this vehicle is not 
water-supplementing type. 
2. Avoid quick charge, which may shorten service 
life of battery. 
3. Do not confuse (+) and (-) terminals while 
connecting cables. In case of confusion, failure of 
battery and electrical system may occur.   
4. Remove (-) post while disconnection and 
connect the (+) post while installation. Otherwise, 
short circuit occurs once contacting with tool. 
5. Charge the battery with common approach. For 
instance: connect (+) post of battery with that of 
charger and connect (-) post of battery with that of 
charger.  
6. Quick charging is a method for supplementing 
partial power for discharging battery with large 
current. This method shall be used in case of 
emergency.  
7. In addition to check and proportion 
determination of battery fluid, if battery is needed, 
remove cables on battery before operation.   
8. Remove terminal posts of each electrobath.   

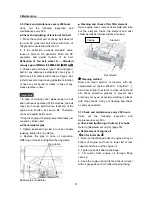
 Check of battery fluid level   

Refer to [Maintenance every 50h] for check of 
battery fluid level. 


Summary of Contents for KDD03

Page 1: ...KIPOR Machinery Co Ltd Operation Instructions Please read it carefully It contains important operation guidance for safety KDD03 05 06 08 10 Loader...

Page 2: ......

Page 3: ...t operation and periodic maintenance which benefits the performance of functions extends the duration reduces unnecessary loss and creates better economic income for you Instructions will not be alter...

Page 4: ...od ON OFF and driver s seat 15 Engine hood ON OFF 15 Adjustment of driver s seat 15 Document box 15 3 5 Operation of cab 16 Door ON OFF 16 Cab lamp 16 Buttons of windshield wiper and cleaner 16 Safety...

Page 5: ...ntenance every 250 hours 31 Check and tightening of nuts on tyre hubs 31 Replacement of engine oi 31 5 8Check and maintenance every 500 hours 32 Replacement of suction filter element in hydraulic oil...

Page 6: ...r goggles dust proof respirator sound proof device protective gloves safety belt and others However confirm functions of protective articles in advance Keep the driving seat clean around If there is a...

Page 7: ...erson in the operating area 5 Fix the bucket tightly when loader runs on the road or a long distance Unintentionally touching the operating lever will change the pose of running loader leading to inci...

Page 8: ...g traction both front and rear wheels must be fitted with anti skid chains 17 When speeding down a slope do not brake wildly If pressing down the low speed securing button speed descends and shifts ra...

Page 9: ...approved service kits will not only reduce the working efficiency but also cause injury 6 Support and fix the engine hood and other components before maintenance and check around the engine 7 Place th...

Page 10: ...at injury Rinse skin or clothes with clean water if touching the battery acid If touching the eye wash eyes then seek for physician 16 After the loader is started all mechanical components operating o...

Page 11: ...6 f Front wheel Steering wheel ting cylinder pping cylinder Bucket Bucket leveler Hinged connection Operating lever of bucket Simple cover Engine hood Intake of diesel Counterweight Rear wheel Cab Hyd...

Page 12: ...et Keep away Lower and lock the bucket to the ground and stop the engine if driver leaves Lock for maintenance Warning and transportation Read Instructions Attention Center pin Grease the center pin b...

Page 13: ...driver s seat and operate the loader 4 Lower the bucket to the ground trigger the Stop Brake stop the running engine and take away the start key before leave 5 Do not activate the Stop Brake when load...

Page 14: ...s and dry it with soft cloth 2 If loader is washed with high pressure water gun label may fall off Do not inject the water stream directly against any label 3 Order labels from your agent if damaged o...

Page 15: ...iver leaves the loader Take all required measures for stop brake Loader cannot start if stop button is not released Lock connection It is used to lock the front and rear carriages to avoid unintended...

Page 16: ...ing wheel Button of turning lamp Instrument board Start key Operating lever of forward and backward Operating lever of bucket Brake pedal High low speed shift Lock button of operating lever of bucket...

Page 17: ...perating lever to change the running direction of loader Push the lever forward and loader runs forward Pull the lever backward and loader runs backward Place the operating lever at the neutral positi...

Page 18: ...ns off when engine starts Illuminated indicator reminds the check on charging loop Indicator of jammed fuel filter It lights when start key is at ON It turns off when engine starts Check the oil water...

Page 19: ...ion of engine Press down the pedal to increase the speed Additional information z Start rpm of engine changes with conditions of ground It is 1000 1200rpm normally if loader starts on the flat ground...

Page 20: ...that it can level the bucket at left right or center position Align the surface of leveler and bottom of bucket Leveler 3 4 Engine hood ON OFF and driver s seat Engine hood ON OFF Engine hood ON Pull...

Page 21: ...er to trigger the motor when start key is at ON Operate the button of windshield cleaner to activate the spraying cleaner Even if start key is at OFF spraying cleaner can work as described above Do no...

Page 22: ...econds continuously Within 10 seconds when it fails to start switch it off and wait for more than 20 seconds and repeat the same operation 4 4 Start when it is cold 1 Fully step on the accelerator ped...

Page 23: ...r the pressure lamp of the hydraulic oil is off Any leak of oil fuel or water stop the motor directly if any of the following occurs 1 Sharp drop or rise of the motor revolution 2 Abnormal sound 3 Abn...

Page 24: ...t and cooperate with the rotation of the machine When turning around completely the sneering wheel reaches the end of the stroke then do not rotate the sneering wheel till above the stroke 3 For the s...

Page 25: ...e hydraulic pump system enters MEDIUM and the machine will be stopped with decreased speed 3 If more fully stepped the main brake status is formed to stop the machine safely Approaching the object 1 G...

Page 26: ...the lifting operation and digging forward At the same time shell of sand at a time Filling operation 1 Adjust the knifepoint of the shovel level facing the channel move the accumulated sand 2 Adjust...

Page 27: ...Fill the brake fluid cup with brake fluid Make sure the cup is half full of fluid before exhausting 2 Take off the cover of the exhaust plug of the differential brake box Plug a 1m long plastic pipe...

Page 28: ...gent or light oil for cleaning of parts Safety precautions for maintenance Prevent poisoning of exhaust gas while the motor is working indoor Pay special attention to ventilation measures Do not carry...

Page 29: ...4 Grease filling at working machine part of shovel Bottom pin of lift cylinder 2 26 5 Check grease filling on universal joint pin 3 27 6 Check grease filling on center pin 1 27 7 Check grease filling...

Page 30: ...Check cooling water with spare tank during engine cooling Supplementary Long term storage coolant has been added into cooling water before delivery mixing proportion antifreeze 50 cooling water 506 C...

Page 31: ...oil cup with arrow 1 Pin at installation position of moving arm 2 points 2 Pin at installation position of shovel 2 points Liquid level and oil temperature gauge Use the hydraulic oil regulated on app...

Page 32: ...d loosened bolt Refer to operation of tyre and check the tyre page 35 Check working of steering wheel 1 Turn steering wheel to left and right after starting up engine to check working status of connec...

Page 33: ...vehicle washer so use the washer strictly according to its instruction book In order to avoid mechanical damages adjust nozzles to divergent status and keep distance over 2m In case of direct water sp...

Page 34: ...Clean and check of air filter element initia l 31 8 Replacement oil level check and feeding of engine oil in differential mechanism initi al 32 9 Replacement of suction filter element in hydraulic oi...

Page 35: ...nd battery Drainage in fuel 1 Remove drainage bolt at bottom and drain water and sediment along with fuel in tank hexed subtense length 22mm 2 Close plug after drainage Drainage bolt Water drainage of...

Page 36: ...1 Tighten loosened ring clamp in case of water leakage tighten the ring clamp 2 Replace the pipe in case of expansion stiffening or cracks and tighten the ring clamp Ring clamp Rubber pipe on radiato...

Page 37: ...the oil clean while replacement 2 Remove bottom pedal and cushion replace the element 3 After replacement check cushion for any damages and install bottom pedal firmly In case of damages of cushion re...

Page 38: ...drain out used oil hexed plug with subtense 10mm 2 Tighten the plug after oil drainage Front Drainage plug Rear Drainage plug 3 Fill in gear oil to filling opening Position Oil level Front 3 0L Rear R...

Page 39: ...ement of air filter Open engine cover remove dust shield loosen butterfly nuts and take out element replace it and then reassemble 5 11 Check and repair once every 2000 hours Carry out the following i...

Page 40: ...ject to the regulated pressure recorded below In case of over high pressure tyre cracking or personal injury may occur Tyre cracking may occur if there s cut on tyre and replace it with a new one Cons...

Page 41: ...charge at this time so charge in advance 3 Moisture in electrolyte may vaporize and fluid may reduce during charging Insufficient electrolyte may cause damage of battery and overfull electrolyte may...

Page 42: ...do not leave them in the open air If they have to be put outside select a smooth ground and cover all seats 2 Prevent leakage while filling oil applying grease and replacing engine oil 3 Apply suffic...

Page 43: ...y enough fuel low outputting power 2 blockage in air filter 1 Clean the filter element sudden stop 1 Fuel deficiency 1 Supply enough fuel abnormally black exhaust 1 Low quality of fuel 2 Excessive mac...

Page 44: ...then replace Air fixed in the brake system Exhaust Oil leak in the main cylinder piston Inquire the company selling the product or the fixed service company Unsatisfied airproof of the brake system Se...

Page 45: ...ing of the shovel is insufficient Set pressure drop in the port safety valve Check and readjust or replace Oil leak of the interface of rubber pipe and tubing Replace Parts of the control valve do not...

Page 46: ...e in the following order if the pulling is definitely necessary 1 Loosen the high pressure safety valve cover on and below the main variable plunger pump loosen M8 nut and adjusting bolt Do not take i...

Page 47: ...Height chair mm 1710 2300 1800 2440 1850 2460 Min ground clearance mm 210 240 270 Wheel base mm 1220 1550 1780 Machine size Track mm 930 1080 1190 Discharge height mm 1710 1855 2270 Discharge distance...

Page 48: ...Min ground clearance mm 315 315 Wheel base mm 1955 1955 Machine size Track mm 1250 1250 Discharge height mm 2440 2700 Discharge distance mm 790 820 Lifting s 5 Descending s 3 Opera tion time Anteverti...

Page 49: ...e Radiator standby box Cooling water Antifreeze tap water Replacing the diesel oil means replacing the new diesel oil after fully removing the old diesel oil Please use the following diesel oil summer...

Page 50: ...Address Beside Jingyi Rd Third stage Development Section of Wangzhuang Industry Area Wuxi High New Technology Industry Development Zone Wuxi Jiangsu China Tel 0510 85205100 85203799 Fax 0510 85205026...

Reviews: