background image

PT-3300

2. Preparation

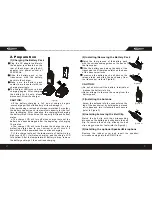
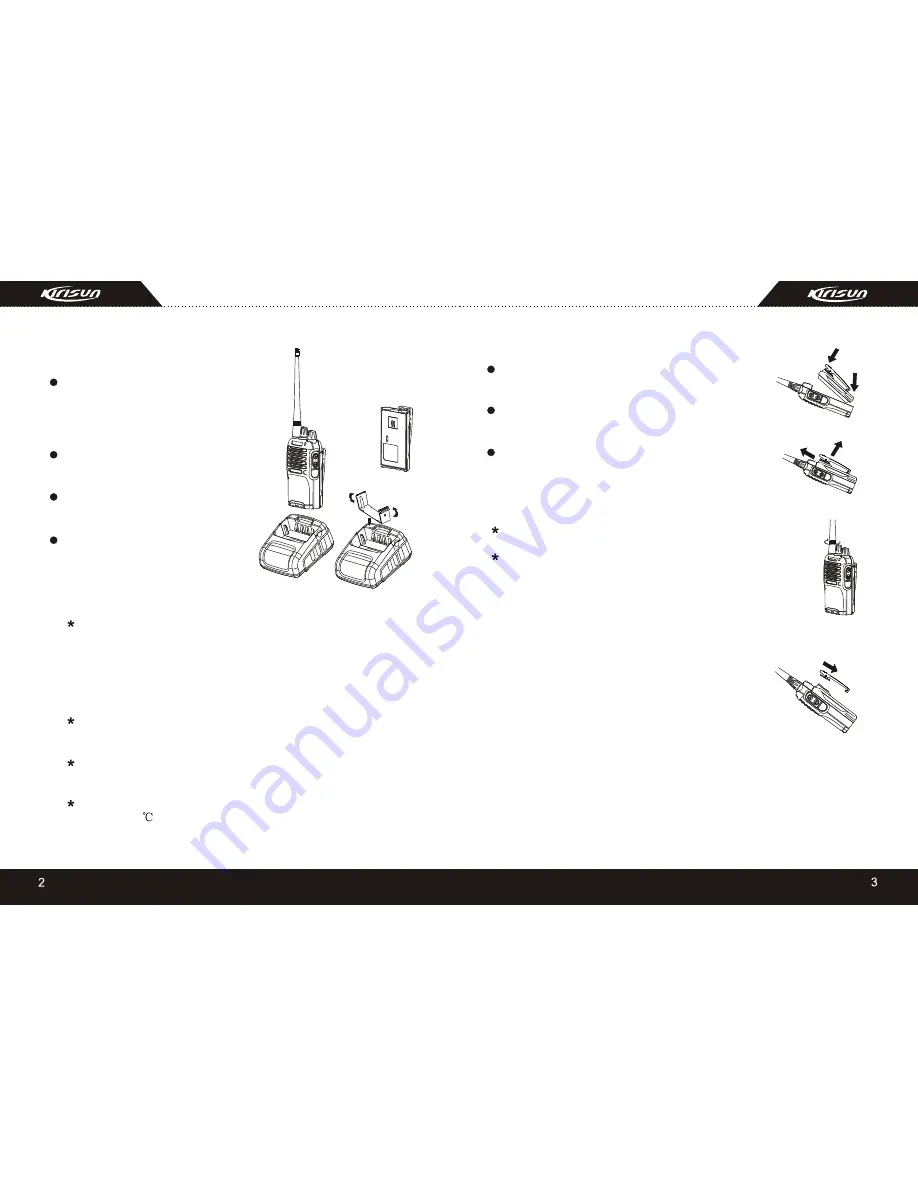
(1)Charging the Battery Pack

Plug the AC adaptor cable into 
the adaptor jack located on the 
rear of the charger; plug the AC 
adaptor into power socket of 
220V/50Hz. 
Slide the battery pack or the 
transceiver with the battery 
pack into the charger. 
Make sure the battery pack 
contacts are in contact with the 
charging terminals. 
The charger LED turns red and 
charging begins. After charging 
the battery for 8 hours, please 
disconnect it from the charger.

CAUTION:

CAUTION:

  If the battery charging is full, do not charge it again 
.overcharging will shorten battery's life or damage it.
After purchasing or extended storage (more than 2 months), 
the battery cannot reach its maximum capacity for the first 
time recharging. After repeating the charging/discharging 
the battery two or three times, the capacity will reach its best 
status. 
   The charge LCD will turn off when charge tests out the 
battery has been damaged after the beginning of charging 
10 minutes.
   The charge LCD will turn off when the charge is on the 
protecting status due to over current or short circuit. It 
should turn off the power and then continue charging.
    If the charge tests out the temperature of battery is too 
high (over 60

), it will stop charging, and the charge LCD 

turn yellow. After the temperature of battery is drop, remove 
the battery and re-put, then continue charging.

(2)Installing/Removing the Battery Pack

Match the four grooves of the battery pack 
with the corresponding guides on the back of 
the transceiver.
Slide the battery pack along the back of the 
transceiver until the release latch on the base 
of the transceiver locks. 
To remove the battery pack, pull back on the 
release latch and slide the pack away from 
the transceiver (refer to Figure 2).

Do not short-circuit the battery terminals or 
dispose the battery into fire.
Never attempt to remove the casing from the 
battery pack.

(3)Installing the Antenna

Screw the antenna into the connector on the 
top of the transceiver by holding the antenna 
at its base and turn it clockwise until secure 
(refer to Figure 3).

(4)Installing/removing the Belt Clip

Match the belt clip with the corresponding 
grooves on the battery and slide down the belt 
clip. To remove the belt clip, slide up the belt 
clip using your nail or tools (refer to Figure 4).

(5)Installing the optional Speaker/Microphone

Remove the rubber cover and insert the speaker-
microphone plugs into the SP/MIC jack.

(Figure 2)

(Figure 3)

(Figure 4)

(Figure1)

Summary of Contents for PT3300

Page 1: ...sun Electronics Shenzhen Co Ltd PT 3300 Postcode 518053 Tel 86 755 8609 6076 Fax 86 755 8609 6130 E mail export kirisun com Website http www kirsun com Town Nanshan Dist Shenzhen P R China Add 2 F Bldg H 3East Industrial Zone ofOverseas Chinese ...

Page 2: ...not use the transceiver while taking on fuel or while parking in a gasoline service station Do not use the transceiver in the area where government prohibited Do not expose the transceiver to direct sunlight for a long time or place it close to heating appliances Do not place the transceiver in excessively dusty humid and or dabbing areas nor on unstable surface If the transceiver emits smoke or s...

Page 3: ...tery Battery Belt Clip Belt Clip Charger Charger Adaptor Adaptor Wrist Loop Wrist Loop DESCRIPTION QUANTITY 1 1 1 1 1 1 1 USER S Manual 1 Unpacking and Checking Equipments 1 Supplied Accessories 1 2 Preparation 2 Charging the Battery Pack 2 Installing Removing the Battery Pack 3 Installing the Antenna 3 Installing Removing the Belt Clip 3 Installing the optional Speaker Microphone 3 3 Getting Acqu...

Page 4: ...inue charging If the charge tests out the temperature of battery is too high over 60 it will stop charging and the charge LCD turn yellow After the temperature of battery is drop remove the battery and re put then continue charging 2 Installing Removing the Battery Pack Match the four grooves of the battery pack with the corresponding guides on the back of the transceiver Slide the battery pack al...

Page 5: ...d release for open Function key press this key about 1 second the transceiver will emit alert with high decibel press again stop the alert MIC SP JACKS If desired connect a speaker microphone or ear piece here A B C D E F G 4 Basic Operation Switch on Switch on the transceiver by turning the Power Volume control clockwise till a click is heard then the transceiver will be in the state of stand by ...

Page 6: ...phonic broadcast channel which including men women and Chinese English combination Firstly switch off the transceiver and then keep pressing function key in the meantime turn on the power and continue pressing function key 2 seconds it will change to another phonic channel Noted During switching the phonic broadcast channel there is one kind in mute it means no sound phonic broadcast channel Scann...

Page 7: ...ight High 4W Low 1W 1 400 420MHz 2 450 470MHz 15 1 DC 6 0V or DC 7 2V 117mm x 56mm x 39mm 225 g with battery and antenna 7 Troubleshooting Guide 1 NO 2 3 4 Problem Solution Unable to talk with others in the same group Standby time is s h o r t a f t e r charging Can not switch on H e a r o t h e r voices not from the same group in the channel The battery power is low and please charge or change it...

Reviews: