10
Figure 5.4
1) Turn off the radio before connection.
2) When the radio is being read data, the indicator lights green and
it's prohibited to press the PTT button; when the radio is being
written data, the indicator lights red.
3) Before the first time editing, you should read data form the radio
and backup the data.
4) If the radio cannot work normally after being written in with the
editing data, open the data backup and rewrite the backup into the
radio.
5) Model information is important radio data and is prohibited to
modify.
6) After programming, you need to turn on the radio power again to
make the radio resume the normal work.
4.3 Computer Test Mode:
Connect the radio to the radio communication port with the
specified programming line (KSPL02). See Figure 4.1.
Warning: Before entering the computer test mode, connect a HF
load of 50
Ω
to the radio antenna connector or connect the radio to a
comprehensive test device.
Under the computer test mode, you can modify the following
parameters with KSP5200 programming software:
1)
TX/RX low voltage
2)
High/Medium/Low power
3)
AK2346 VR 1/ 2 / 3 / 4
4)
DCS (DQT) balance
5)
DCS (DQT) frequency deviation
6)
CTCSS (QT) frequency deviation
7)
DTMF frequency deviation
8)
Tone frequency deviation
9)
MSK frequency deviation
10)
VOX gaining
11)
Sensitivity
12)
SQL 1/9
(
OPEN/SQUELCH
)
4.4 Wired Clone (It can be prohibited by programming
software)
When the wired clone function is activated, the radio can enter the
wired clone mode. After entering the wired clone mode, the radio
will not exit it automatically and you have to turn on the radio again
to enter the user's mode. Operating steps are as follows:
1) Turn on the radio with the MONI key pressed, and 2 seconds
later the red light flashes twice and two beep tones sound, and then
the radio enters the wired clone mode.
2) Press the PTT button on the host radio to activate/inactivate the
wired clone mode on the sub radio. But the wired clone mode of the
host radio will not be changed. When pressing the PTT button, the
green light flashing twice and one beep mean to activate the clone
mode on the sub radio; the red light flashing twice and two beeps
mean to inactivate the clone mode on the sub radio.
3) Press the MONI key, red light flashes, and it starts cloning. After
cloning is finished, the red light turns dim.
Note:
You can also activate/inactivate the wired clone mode by PC
Chapter 5 Service Assemble and Disassemble
The radio is precision communication equipment. Please be careful
when assemble or disassemble the radio during service.
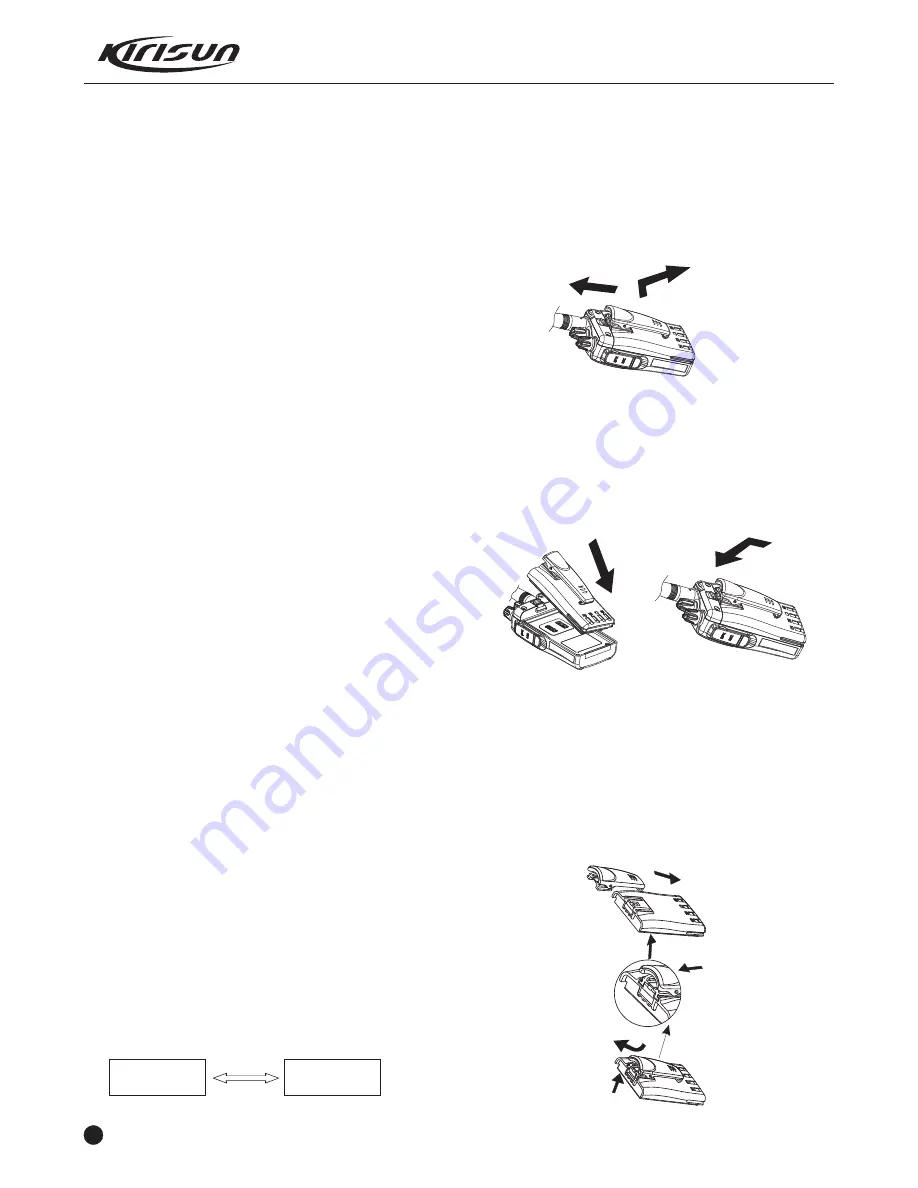
5.1 Removing and Installing the Battery
To remove the battery, push the latch upwards and remove the
battery away from the radio. (See Figure 5.1)
Figure 5.1
To install the battery, match the tow bulges at the bottom of the
battery with the corresponding grooves at the radio aluminum alloy
frame and insert it in. Then press the upper end of the battery till
the latch secure. (See Figure 5.2 and 5.3)
Figure 5.2 Figure 5.3
5.2 Removing and Installing the Belt Clip
To remove the belt clip, use your nail or a tool to lift the metal
spring piece in the belt clip from the topside, and then pull the belt
clip away from the radio.
To install the belt clip, match the upper head of the belt clip with the
glides on the rear of the battery, and then press the belt clip
downwards to lock it in place. (See Figure 5.4)
PT5200 SERVICE MANUAL
Figure 4.2
Host Radio
Sub Radio
Cloning Line


