background image

3


Charging the Battery


Plug the adapter into an applicable AC 

outlet and connect the power adapter to the 

battery  charger.  Three  LED  indicators  light 

up for 1s and then green LED lights up. 


Plug  the  battery  or  radio  into  the 

charger  slot,  and  make  sure  the  radio  has 

been turned off.

Make  sure  the  battery  is  well  connected 

with  the  charger.  Then  red  LED  lights  up, 

which indicates that the charging starts. 

After  about  5  hours  of  charging,  red  LED 

lights  off,  and  green  LED  lights  up.  This 

indicates that the battery is fully charged.

Preparation

Note:

*  The  radio  battery  is  not  fully  charged  in  the  factory.  Before  the 

initial use, please charge the new battery.

* KB-78B Li-poly battery of Kirisun is applicable to this radio. 

* When charging the battery for the first time after purchase or long-

time storage (over 2 months), please repeat charging several times 

for the battery to achieve normal capacity. Meanwhile, please make 

sure the battery is charged at least once every three months. 

* Do not recharge the battery if it has been fully charged or the radio 

is  not  in  the  low  battery  alarm  state;  otherwise,  it  will  have  bad 

effects  on  the  battery’s  service  life  and  performance.  Remove  the 

battery from the charger after charging. 

* When the radio is in the low battery alarm state, please recharge 

the  battery  before  use.  Do  not  turn  the  radio  power  on  by  force; 

otherwise,  it  will  have  bad  effects  on  its  service  life  and 

performance. 

* KB-78B has built-in protection circuit. When the battery voltage is 

too  low,  the  battery  stops  supplying  power  automatically.  Plug  the 

battery  into  the  charger,  red  LED  lights  up  after  1~5  minutes,  and 

the charging begins.  

Before taking out the battery, keep it in this state for 1~2 hours to 

achieve  its  best  performance.  Then  plug  off  the  adapter  from AC 

outlet.    

If the temperature or the circuit is abnormal, and the LED flashes 

yellow, the charger enters protection mode. At this moment, do not 

charge the battery by force. Please remove the battery and cut off 

the power supply of the charger.  

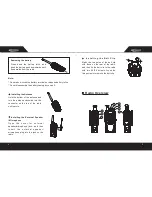
Installing/Removing the Battery

 Installing the Battery:

Press and hold the top of the belt clip; 

match the battery with the two slots on 

the radio and push forward until a click 

is heard. Then the battery is fixed. 

2

Summary of Contents for PT6700

Page 1: ...INSTRUCTION MANUAL PT6700 FM TRANSCEIVER http en kirisun com Kirisun Communications Co Ltd ...

Page 2: ...ing brand two way radios produced by We believe two way radio which always incorporates the latest technology can bring great convenience to your life and work We also believe that the quality and function of two way radio can meet your demands for reliable communi cation Kirisun Communica tions Co Ltd ...

Page 3: ...l the parts of this product include accessories Any design and materials may not be modified copied extracted or translated without the authorization of Kirisun or its authorized parities Due to the update or modification of the product Kirisun owns the right to change the specifications of software and hardware described in this manual without further notice Specifications and information contain...

Page 4: ...best performance of the battery change the battery once a year Battery technicians Do not disassemble the radio by yourself To avoid of the problems caused by electromagnetic interference or electromagnetic compatibility turn off the radio in any facilities where posted notices instruct you to do so such as hospital and other health care facilities And when on board an aircraft turn off the radio ...

Page 5: ...Item Antenna Battery Belt Clip Charger Power Adapter Hand Strap Instruction Manual 1 Unpacking and Checking 1 Preparation 2 Charging the Battery 2 Installing Removing the Battery 3 Installing the Antenna 4 Installing the External Speaker Microphone 4 Installing the Belt Clip 5 Radio Overview 5 Basic Operation 7 Functions of Programmable Buttons 8 Auxiliary Functions 10 Wired Clone Mode 16 Troubles...

Page 6: ...t has been fully charged or the radio is not in the low battery alarm state otherwise it will have bad effects on the battery s service life and performance Remove the battery from the charger after charging When the radio is in the low battery alarm state please recharge the battery before use Do not turn the radio power on by force otherwise it will have bad effects on its service life and perfo...

Page 7: ...e jack on the radio I n s t a l l i n g t h e B e l t C l i p Match the two holes of the belt clip with those on the rear of the radio and then fix the belt clip to the radio with two 2 5 8 0 screws Loose the fixing screws to remove the belt clip Note Do not short circuit the battery terminals or dispose battery in fire Do not disassemble the battery casing by yourself Removing the battery Press d...

Page 8: ...ogrammable button Top Button programmable button External Speaker Microphone Jack External speaker microphone can be connected to the radio through this jack 1 2 3 4 5 6 Basic Operation Switch On Switch on the radio by turning the On Off Volume control knob clockwise until a click is heard If programmed a beep tone will be heard Adjust Volume Press the programmed Squelch Off button to hear backgro...

Page 9: ...m Emergency Alarm Off Scan Nuisance Delete temporary High Low Power Switch Momentary Monitor Monitor Momentary Squelch Off Squelch Off Lone Worker Reset Press the preprogrammed Emergency Alarm Off button to quit the Emergency Alarm Mode Press the preprogrammed Scan button to start stop scanning If the radio stays at a noise channel while scanning press the preprogrammed Nuisance Delete button to d...

Page 10: ...b The countdown will go on if the time after releasing the PTT key is shorter than the reset time Auxiliary Functions Battery Saving The dealer can set the power saving mode by programming If this function is enabled and the radio hasn t receive any signal or no operation is being acted for 10 seconds the radio will enter Battery Saving Mode When a signal is received or any operation occurs it wil...

Page 11: ...ignal disappearing and continuing scanning has been preset the radio will remain on that channel b Priority Scan One channel in the scan list can be set as the priority channel which enables it to have the highest priority during scanning The radio will scan a non priority channel firstly then the priority channel and then the next non priority channel and then the priority channel again and the s...

Page 12: ...list again Lone Worker If lone worker function is enabled by PC software you can press the button set as lone worker to start lone working This mode is to ensure the safety of the user while using the radio separately The lone worker timer starts upon pressing the preprogrammed Lone Worker button If the preset lone worker time expires the radio will make an alert tone If the preset remind time exp...

Page 13: ...isabled by the PC programming software Once the wired clone function is disabled the radio cannot enter Wired Clone Mode Troubleshooting The radio cannot be switched on or no display after being switched on Phase lock loop unlocked Beeping Cannot transmit A The battery and the radio are not reliably connected Please reinstall the battery B The fuse of the power supply is burnt out Please change it...

Page 14: ...wer module is broken so there is no power output Please change it B The microphone is broken please change it A The speaker is broken please change it B The audio amplifier is broken please change it No Problem Causes and Solutions Specifications PT6700 General Specification Frequency Number of channels Channel spacing Dimension H W D Weight Operating temperature Receiving sensitivity Frequency st...

Page 15: ...nstruction specified may result in RF exposure levels exceeding the FCC requirements for wireless RF exposure To ensure that your expose to RF electromagnetic energy is within the FCC allowable limits for occupational use always adhere to the following guidelines DO NOT operate the radio without a proper antenna attached as this may damaged the radio and may also cause you to exceed FCC RF exposur...

Page 16: ...mouth Keep the antenna at least 2 5 cm 1 inch from your head and body If you wear a portable two way radio on your body ensure that the antenna is at least 2 5 centimeters 1 inch from your body when transmitting PRECAUTIONS WARNING NEVER hold the transceiver so that the antenna is very close to or touching exposed parts of the body especially the face or eyes while transmitting The transceiver wil...

Page 17: ...tenna and battery pack are dry before attachment Exposing the inside of the transceiver to water will result in serious damage to the transceiver FCC CAUTION Changes or modifications to this device not expressly approved by KIRISUN could void your authority to operate this transceiver under FCC regulations NOTE ...

Reviews: