background image

Summary of Contents for ST14CKXSQ01

Page 1: ...TOP MOUNT REFRIGERATOR Table of Contents 2 2262175 ...

Page 2: ... 8 Normal Sounds 9 REFRIGERATOR USE 9 Ensuring Proper Air Circulation 9 Using the Control s 9 Ice Maker Operation 10 REFRIGERATOR FEATURES 10 Refrigerator Shelves 10 Meat Drawer and Cover 11 Crisper and Crisper Cover 11 Utility or Egg Bin 11 FREEZER FEATURES 12 Freezer Shelf 12 DOOR FEATURES 12 Drop in Door Rails 12 REFRIGERATOR CARE 12 Cleaning 12 Changing the Light Bulb 13 Power Interruptions 13...

Page 3: ...nto a grounded 3 prong outlet Do not remove ground prong Do not use an adapter Do not use an extension cord Disconnect power before servicing Replace all panels before operating Remove doors from your old refrigerator Use nonflammable cleaner Keep flammable materials and vapors such as gasoline away from refrigerator Use two or more people to move and install refrigerator Disconnect power before i...

Page 4: ...oor Always pull the refrigerator straight out when moving it Do not wiggle or walk the refrigerator when trying to move it as floor damage could occur Cleaning before use After you remove all of the package materials clean the inside of your refrigerator before using it See the cleaning instructions in the Refrigerator Care section Important information to know about glass shelves and covers Do no...

Page 5: ...household temperatures will remain above freezing Tools Required Flat blade screwdriver 7_ein and V2in open end wrenches or two adjustable wrenches V4in nut driver and drill bit hand drill or electric drill properly grounded NOTE Your refrigerator dealer has a kit available with a V4in 6 35 mm saddle type shutoff valve a union and copper tubing Before purchasing make sure a saddle type valve compl...

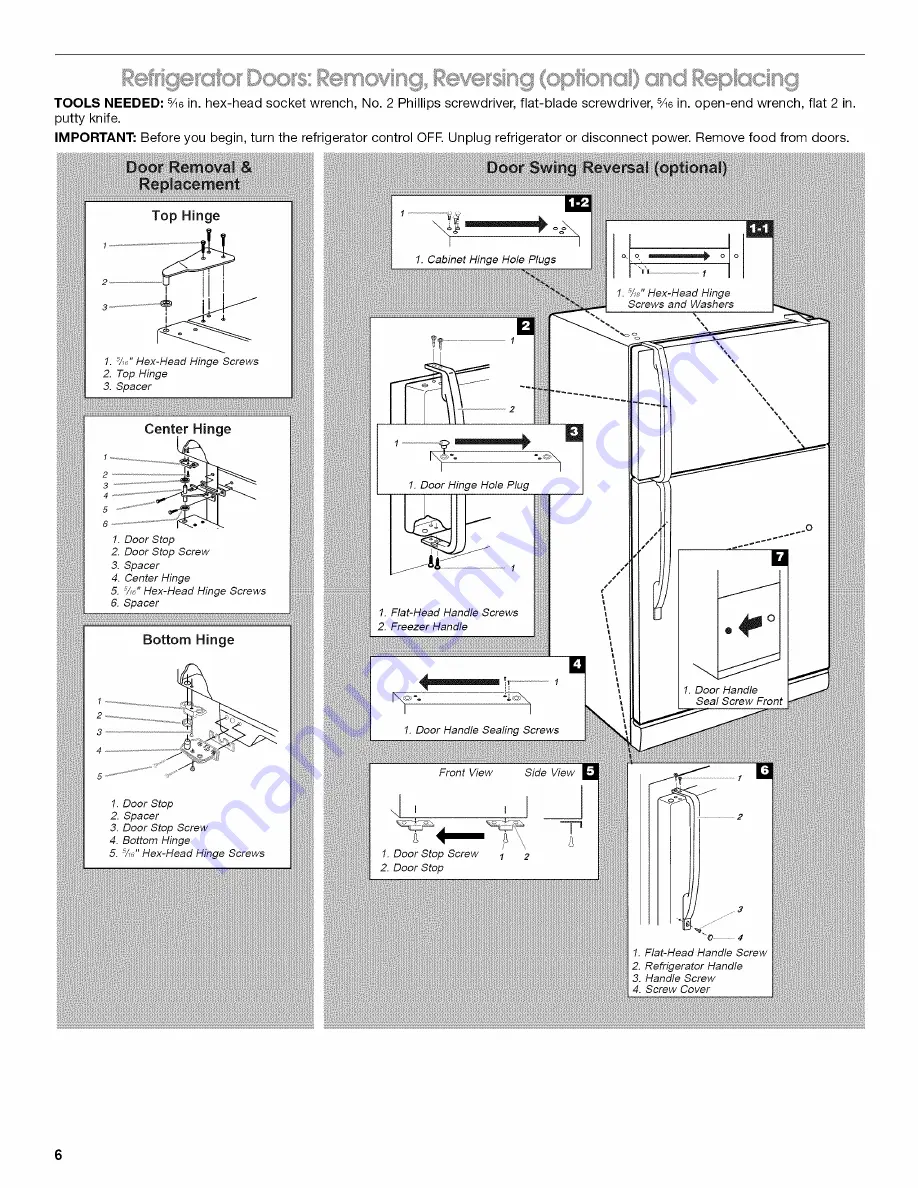
Page 6: ...1 5 _ Hex Head Hinge Screws 2 Top Hinge 3 Spacer Center Hinge 1 2 3 5 6 1 Door Stop 2 Door Stop Screw 3 Spacer 4 Center Hinge 5 5A_ Hex Head Hinge Screws 6 Spacer _ _ I 1 Cabinet Hinge Hole Plugs li 1 Door Hinge Hole Plug 1 Flat Head Handle Screws 2 Freezer Handle 1 Door Handle Sealing Screws Front View Side View 1 Door Stop Screw 2 Door Stop 1 1 2 i I o o 1 _ _ Hex Head Hinge Screws and Washers J...

Page 7: ...ator door as shown see Graphic 4 5 Remove door handle seal screw front Move to opposite side of refrigerator door as shown see Graphic 7 6 Remove door stop Move to opposite side of refrigerator door as shown see Graphic 5 7 Position refrigerator handle on opposite side of the refrigerator door as shown see Graphic 6 Drive top two screws in handle first Align lower portion of handle and drive botto...

Page 8: ...ff valve to cold water pipe with pipe clamp Be sure outlet end is solidly in the 1 4in 6 35 mm drilled hole in the water pipe and that washer is under the pipe clamp Tighten packing nut Tighten the pipe clamp screws carefully and evenly so washer makes a watertight seal Do not overtighten or you may crush the copper tubing especially if soft coiled copper tubing is used Now you are ready to connec...

Page 9: ...f the refrigerator Water dripping on the defrost heater during a defrost cycle may cause a sizzling sound As each cycle ends you may hear a gurgling sound due to the refrigerant flowing in your refrigerator Contraction and expansion of the inside walls may cause a popping noise You may hear air being forced over the condenser by the condenser fan You may hear water running into the drain pan durin...

Page 10: ...ift the wire shutoff arm to the OFF arm up position and listen for the click to make sure the ice maker will not continue to operate To increase ice production rate The ice maker should produce approximately 7 to 9 batches of ice in a 24 hour period If ice is not being made fast enough turn the Temperature Control toward a higher colder number in half number steps For example if the control is at ...

Page 11: ... Leftovers Cover leftovers with plastic wrap aluminum foil or plastic containers with tight lids To remove and replace the crisper s 1 Slide crisper s straight out to the stop Lift the front and slide the crisper s out the rest of the way 2 Replace the crisper s by sliding the crisper s in fully past the stop Style 1 To remove and replace the plastic cover 1 Remove the crisper s 2 Lift the front o...

Page 12: ... all models See the Assistance or Service section if you are interested in purchasing one of the accessories The door rails may be removed for easier cleaning To remove and replace the rails 1 Remove all items from the shelf and pull straight up on each end of the rails REFRIGERATOR CARE Explosion Hazard Use nonflammable cleaner Failure to do so can result in death explosion or fire Both the refri...

Page 13: ...s an automatic ice maker Raise wire shutoff arm to OFF up position or move the switch to the OFF right setting Shut off water supply to the ice maker 3 Empty the ice bin If you choose to turn the refrigerator off before you leave 1 Remove all food from the refrigerator 2 If your refrigerator has an automatic ice maker Turn off the water supply to the ice maker at least one day ahead of time When t...

Page 14: ...his section Are the condenser coils dirty This prevents air transfer and makes the motor work harder Clean the condenser coils Refer to the Cleaning section NOTE Your new refrigerator will run longer than your old one due to its high efficiency motor The refrigerator seems to make too much noise The sounds may be normal for your refrigerator Refer to the Normal Sounds section The ice maker is not ...

Page 15: ...efrigerator self defrosts The doors are difficult to open Are the gaskets dirty or sticky Clean gaskets and the surface that they touch Rub a thin coat of paraffin wax on the gaskets following cleaning The doors will not close completely Are food packages blocking the door open Rearrange containers so that they fit more tightly and take up less space Is the ice bin out of position Push the ice bin...

Page 16: ... use of products not approved by Whirlpool Corporation 5 Any food loss due to product failure 6 Repairs to parts or systems resulting from unauthorized modifications made to the appliance 7 Replacement parts or repair labor costs for units operated outside the United States 8 Any labor costs for replacement of the water filter during the limited warranty period WHIRLPOOL CORPORATION SHALL NOT BE L...

Reviews: