6.9.1 Direct Coupling:
1. Remove the lock nuts and washers from the tractor PTO studs.
2. Align the tractor PTO with the connecting flange of the attachment. Always bring the
weeder to the attachment. If necessary use props to level the attachment.
3. Slide the PTO studs into the attachment flange and secure with the washers and lock
nuts.
6.9.2 Quick Hitch:
1. The hitch consists of two parts held together by a captive T-handled pin. Pull and turn pin
sideways to separate the parts.
2. Remove the two nuts from the tractor PTO studs and the two bolts and nuts from the
quick hitch.
3. Attach the female part, pin-side-up, to the tractor PTO. Attach the male part, hole-side-
up, to the attachment-connecting flange. Install and tighten the four nuts.
4. Fit the attachment part into the PTO part. Twist the pin so it drops down into locking
position, securing the two parts together.
5. To uncouple, pull the pin.
6.10 Use and Care Of Rear-Tine Tiller Attachment
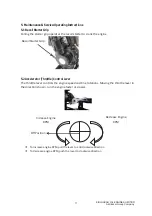
6.10.1 Tilling Width
Important
When changing sets of tines, it is important to keep the tines in place on one side for use as a
model while changing tines on the other.
Do not mount the tines backwards on the flange.
.,5/26.$52,/(1*,1(6/,0,7('
$.LUORVNDU*URXS&RPSDQ\
Summary of Contents for KMW MIN T 8 DLX
Page 1: ...Dt D E d y...
Page 3: ...5 26 5 2 1 1 6 0 7 LUORVNDU URXS RPSDQ...
Page 7: ......
Page 25: ...5 26 5 2 1 1 6 0 7 LUORVNDU URXS RPSDQ...
Page 27: ...ENGINE BLOCK CRANK CASE 5 26 5 2 1 1 6 0 7 LUORVNDU URXS RPSDQ...
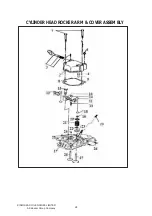
Page 29: ...CYLINDER HEAD ROCKER ARM COVER ASSEMBLY 5 26 5 2 1 1 6 0 7 LUORVNDU URXS RPSDQ...
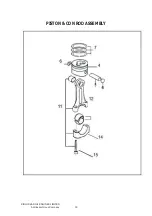
Page 31: ...PISTON CON ROD ASSEMBLY 5 26 5 2 1 1 6 0 7 LUORVNDU URXS RPSDQ...
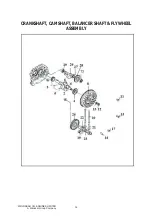
Page 33: ...CRANKSHAFT CAMSHAFT BALANCER SHAFT FLYWHEEL ASSEMBLY 5 26 5 2 1 1 6 0 7 LUORVNDU URXS RPSDQ...
Page 35: ...LUBRICATION AND SPEED CONTROL SYSTEM 5 26 5 2 1 1 6 0 7 LUORVNDU URXS RPSDQ...
Page 45: ...WIND LEADING CASE ASSEMBLY COWLING ASSEMBLY 5 26 5 2 1 1 6 0 7 LUORVNDU URXS RPSDQ...
Page 55: ...REAR COVER ASSEMBLY 5 26 5 2 1 1 6 0 7 LUORVNDU URXS RPSDQ...
Page 57: ...HANDLE BAR MOUNTING ASSEMBLY 5 26 5 2 1 1 6 0 7 LUORVNDU URXS RPSDQ...


