3
INSTALLATION
INSTALLATION
STEP 1 — Install the Brackets
■
■
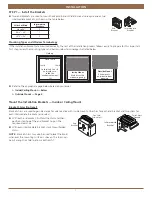
Two end brackets are used to mount horizontal blinds. Wider blinds also require one or two
intermediate brackets, as shown in the table below.
Mounting Types and Window Terminology
If the installation brackets are mounted correctly, the rest of the installation process follows easily. To prepare for this important
first step, review the mounting types and basic window terminology illustrated below.
■
■
Refer to the appropriate page below based on your order:
■
➤
Inside/Ceiling Mount — Below
■
➤
Outside Mount — Page 4
Mount the Installation Brackets — Inside or Ceiling Mount
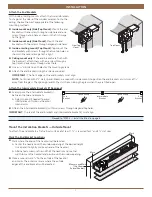
Bracket Shims (Optional)
Bracket shims are used to gain clearance for valance clips with inside mounts. One shim for each end bracket and two shims for
each intermediate bracket are included:
■
■
With each end bracket, first fold the shim and then
position it on top of the end bracket to gain the
required clearance.
■
■
With each intermediate bracket, stack two unfolded
shims.
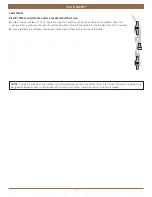
NOTE:
Bracket shims may also be used to level the blind
whenever the mounting surface is uneven. The shims can
be cut along their fold line to make them fit.
Intermediate
Bracket
End
Bracket
Width of Blind
Intermediate
Brackets
Up to 48"
0
48
1
⁄
8
" – 60"
1
60
1
⁄
8
" – 96"
2
Outside Mount
Blind mounts
outside window
opening.
Inside Mount
Blind fits within
window opening.
Collectively, the sill
and jambs are
called the
“window casement.”
Molding
Head Jamb
Sill
Jamb
Jamb
One Shim
Folded Over
Two Shims
Stacked
End
Bracket
Intermediate
Bracket
One Shim
Folded Over
Two Shims
Stacked
End
Bracket
Intermediate
Bracket


