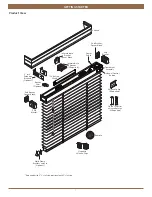
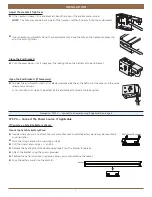
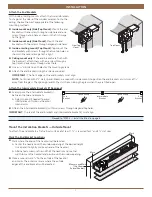
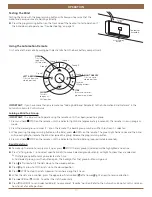
background image

13

INSTALLATION

OPERATION

Troubleshooting

First review the guide that came with your control device. 

Refer to the following troubleshooting procedures for specific solutions for your blind. 

If questions remain, please contract Kirsch

®

 at 

844-KIRSCH2 (844-547-7242)

.

Problem

The blind will not fit into the installation brackets.

Solution

Check that the installation brackets are level and aligned. Adjust and/or shim to level, if necessary.
Be sure the heads of the screws are flush against the installation brackets.
Check that the headrail is completely inserted into the installation brackets. See “Mount the Headrail” on page 7.

Problem

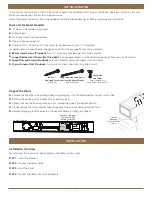
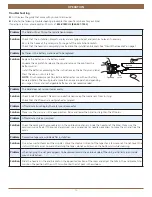
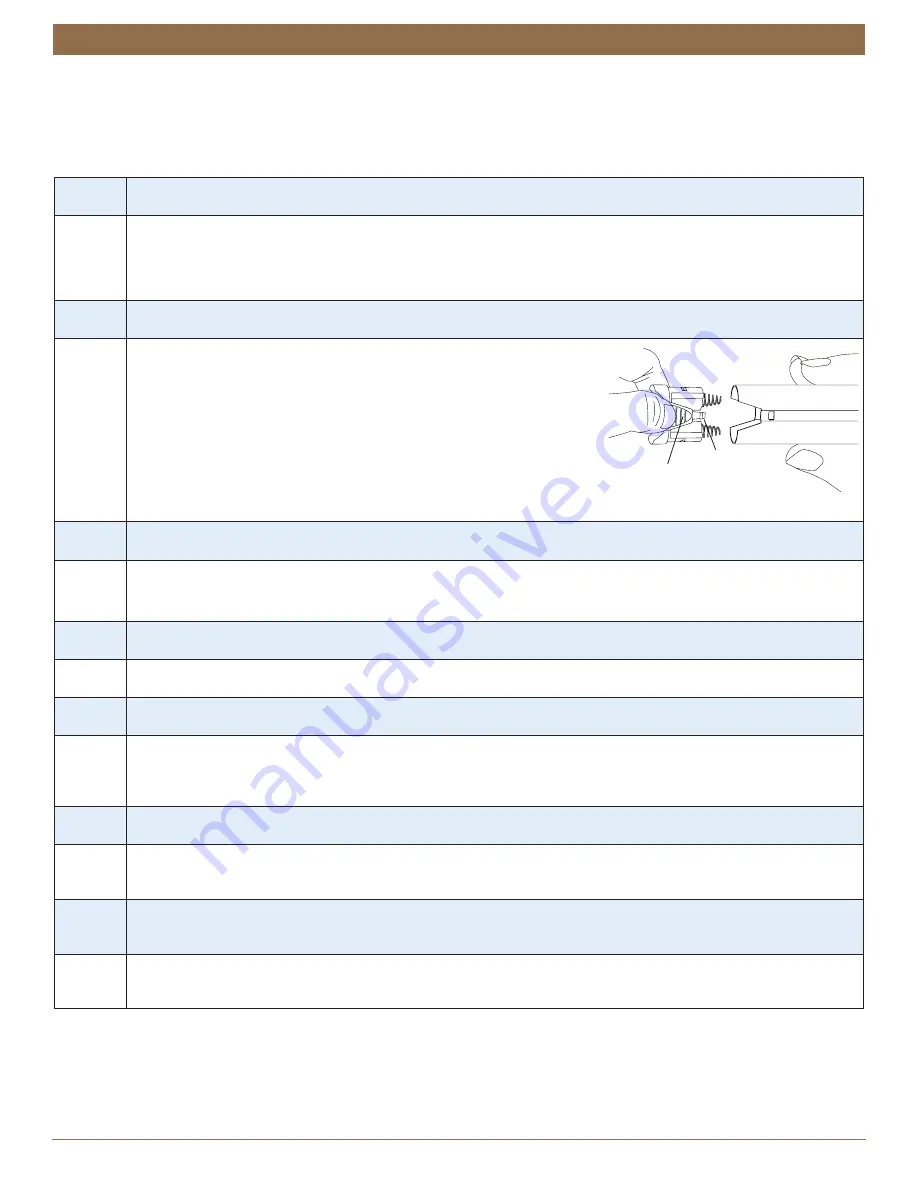
Batteries in the battery wand need to be replaced. 

Solution

Replace the batteries in the battery wand.
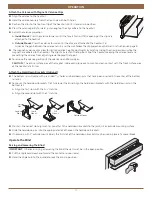
Squeeze the cap latch to release the cap and remove the cap from the 
battery wand. 
Install the batteries according to the instructions on the battery wand label. 
Press the cap on until it latches. 

NOTE:  

Kirsch recommends AA alkaline batteries for use with our battery-

powered blinds. These will provide more than one year operation, depending 
on usage. Lithium and rechargeable batteries are not recommended. 
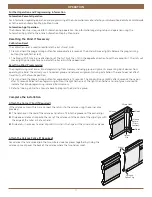
Problem

The blind does not raise or lower evenly.

Solution

Check inside the headrail. Make sure no obstructions keep the mechanism from turning.
Check that the lift cords are not pinched or tangled. 

Problem

Lift cords are bunching by the safety cord connector. 

Solution

Make sure the slats are in the open position. Raise and lower the blind to straighten the lift cords. 

Problem

Lift cords are stuck or jammed.

Solution

Check the cords and the moveable pin in the cordlock mechanism inside the headrail of the blind. Make sure the 
cords can move freely. If the cords are jammed, use a screwdriver or needle-nose pliers to move the pin and free the 
cords.  

Problem

Decorative tapes are wrinkled after installation.

Solution

Use a steamer to steam out the wrinkles. Wave the steamer in front of the tapes for a few seconds. Do not touch the 
slats with the steamer. To avoid stretching the tapes, do not pull down on the bottom rail while steaming.
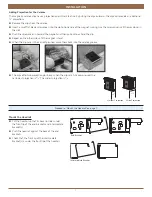
Problem

When hanging, the slat pack appears to be skewed toward the cordlock side of the unit, particularly in an inside 
mount installation.

Solution

Slide the headrail in the end brackets in the opposite direction of the skew and adjust the tabs in the end brackets to 
maintain the position of the unit, This will center the slat pack in the window.  

Cap

Latch

Battery

Wand

Squeeze

Summary of Contents for Alternative Wood Blinds Series

Page 1: ...6 STEP 3 Install the Blind 6 STEP 4 Connect the Power Source If Applicable 8 OPERATION Testing the Blind 10 Using the Automation Remote 10 Resetting the Blind If Necessary 1 Complete the Installation...

Page 2: ...ket If Required Valance Splice If Required Valance Corner Clips for Valance Returns If Required End Bracket Spacer Block1 Intermediate Bracket Spacer Block1 Bracket Shim Optional 2 or 4 Extension Brac...

Page 3: ...Extension brackets come with speed nuts and screws Drywall Anchor Not Provided Use drywall anchors when mounting into drywall Unpack the Blind Remove the blind from the package Keep the packaging unt...

Page 4: ...ce clips with inside mounts One shim for each end bracket and two shims for each intermediate bracket are included With each end bracket first fold the shim and then position it on top of the end brac...

Page 5: ...8 away from the glass The spacing prevents the slats from rubbing the glass when they are tilted open Attach the Intermediate Brackets If Required Evenly space the intermediate bracket s between the t...

Page 6: ...ORTANT The tops of the end brackets and intermediate bracket s must align Extension Brackets Optional Attach 2 or 4 extension brackets to the mounting surface in the same locations where the end brack...

Page 7: ...a location where it will not interfere with the operation of the blind Position its smooth curved side toward the tiltrod Carefully tuck excess wire into the headrail Be sure to avoid interference wit...

Page 8: ...t on the other side until the magnet is level When the clips are in the correct position place them back into the valance groove The clips offer two projection positions When the clips are fully compr...

Page 9: ...of the cover and the quick release tab and twist You can also push up on the bottom of the end bracket to release the locking tab Proceed to STEP 4 Connect the Power Source If Applicable on page 8 STE...

Page 10: ...small parts in their mouths and CHOKE WARNING Electric shock and or a fire hazard may occur if not properly installed Proceed to Testing the Blind on page 10 If You Have an 18V DC Power Supply with D...

Page 11: ...tton 4 Press and hold STOP on the remote until the indicator lights stop blinking approximately 6 seconds Basic Operation To wake up the remote simply pick it up or press STOP The last group s selecte...

Page 12: ...the blind The primary use is to correct group and network assignments during installation The reset does not affect travel limits or the favorite position 1 Press and hold the programming button for a...

Page 13: ...y pull the valance up and toward you CAUTION The entire surface area of the magnet inside each clip needs to maintain clean contact with the front surface area of the headrail at all times Attach the...

Page 14: ...ecommended Problem The blind does not raise or lower evenly Solution Check inside the headrail Make sure no obstructions keep the mechanism from turning Check that the lift cords are not pinched or ta...

Page 15: ...satellite battery wand C size satellite battery wand or 18V DC Power Supply is securely connected to the power cable and the cables are not pinched or caught in the headrail or installation brackets...

Page 16: ...ind Cord Can STRANGLE Your Child Children can climb furniture to reach cords Move crib and furniture away Keep all cords out of children s reach Cord Connector This component acts a s a stopper to pre...

Page 17: ...at a child may stand on furniture attempting to reach the cords Be sure the cleats are firmly secured Once the cleats are attached wrap excess cords around them after each use of the blind NOTE The wa...

Page 18: ...this equipment does cause harmful interference to radio or television reception which can be determined by turning the equipment off and on the user is encouraged to try to correct the interference b...

Page 19: ...se or alterations to the product Exposure to the elements sun damage wind water moisture salt air and discoloration or fading over time Normal maintenance associated with motors and related accessorie...

Reviews: