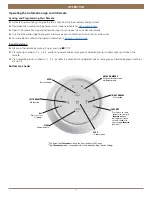
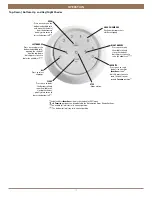
background image

16

INSTALLATION

OPERATION

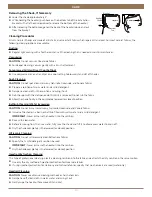
Electronic Limit Adjustments

Electronic limits are set at the factory and normally do not require readjustment. For window treatments that may need additional 
adjustment or to set custom limit positions, go to Shade Settings in the Automation App to adjust limits. 

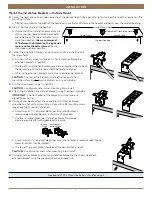
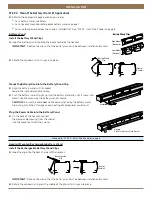
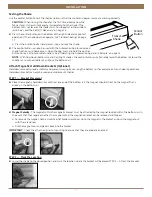
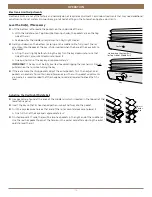
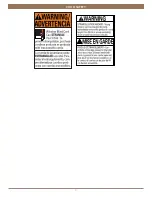
Level the Rail(s), If Necessary


Lift the bottom rail to locate the pockets on the underside of the rail.


With the middle rail on Top-Down/Bottom-Up shades, the pockets are on the top 
side of the rail.


See below for the middle rail adjustment on Day/Night shades.


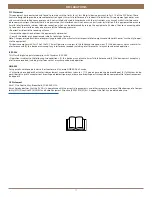
Gently pull down on the bottom rail (or up on the middle rail) to fully insert the rail 
adjust key into the pocket. The key is fully inserted when the base of the key abuts to 
the pocket.


Lift up the rail slightly before turning the key. Turn the key clockwise to raise that 
side of the rail, or counter-clockwise to lower it.


One quarter turn of the key equals approximately 

1

4

".

IMPORTANT:  

The key must be fully inserted to avoid stripping the mechanism. Do not 

pull down on the rail while turning the key.


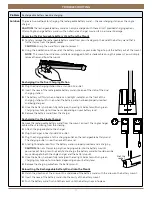
If there are more than two pockets, adjust the outer pockets first. Then adjust inner 
pockets as necessary, to maintain equal tension across the rail. As pocket adjustments 
are made, it is recommended that the shade be raised and lowered to check that it is 
level.

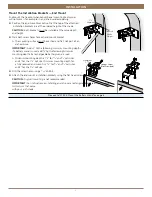
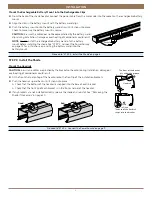
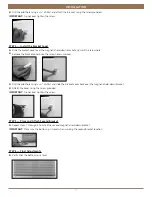
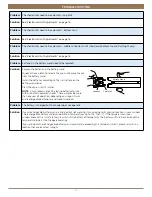
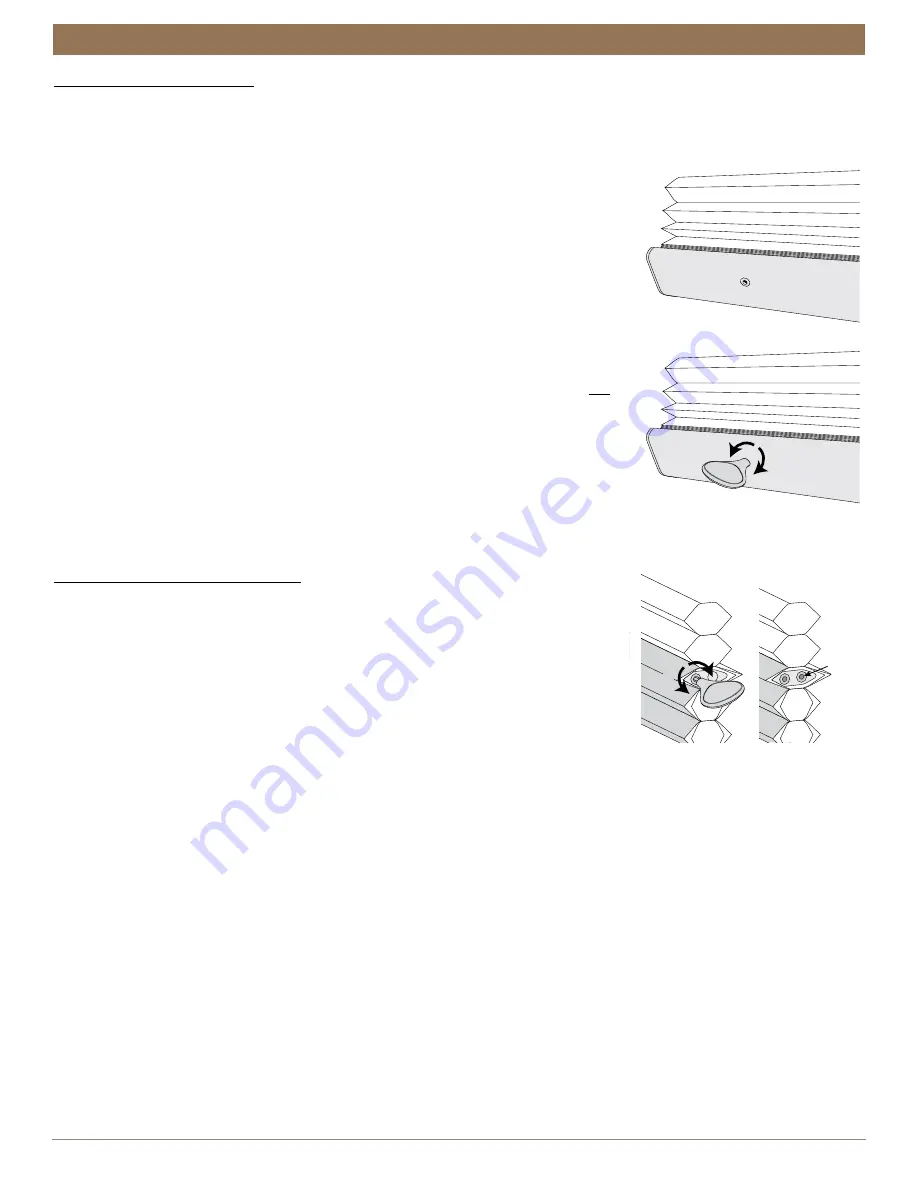
Adjusting the Day/Night Middle Rail


Hex pockets are found at the ends of the middle rail, which is located in the top cell of the 
lower fabric panel.


Insert the key so that its hex-shaped portion is about halfway into the pocket.


Turn the key clockwise to raise that end of the rail or counter-clockwise to lower it.


One full turn of the key equals approximately 

1

8

".


On shades over 60" wide, there will be two hex pockets in the right end of the middle rail. 
Use the rear hex pocket to adjust the tension in the center cord after adjusting the outer 
cords to level the rail.

Pocket

Underside of Bottom Rail

(or Top Side of Middle Rail)

Raise

Key

Lower

Raise

Adjusts

Center

Cord

Lower

Summary of Contents for Cellular Shade Automation III

Page 1: ...5 Mount the Installation Brackets End Mount 6 STEP 2 Mount the Battery Wand If Applicable 7 STEP 3 Install the Shade 8 STEP 4 Connect the Power Source 9 Testing the Shade 11 Attach Magnetic Hold Down...

Page 2: ...1 GETTING STARTED Product View Automation Standard Control Button Installation Brackets with Spacer Blocks Day Night Top Down and Top Down Bottom Up...

Page 3: ...rs designed to work with your specific mounting surface s 6 Hex Head Screws Provided Two 11 2 screws are provided per installation bracket Longer 6 Hex Head Screws Not Provided If using spacer blocks...

Page 4: ...ached reattach it Insert the legs of the installation bracket into the tabs on the spacer block Rotate the installation bracket back as shown to snap it in place Mounting Types and Window Terminology...

Page 5: ...tery Wand High Mount Bracket Standard Battery Wand Low Mount Bracket Optional Satellite Battery Pack C Size Battery Wand 18V DC Power Supply 16 Shade Power Supply 3 8 3 4 11 4 3 8 3 4 11 4 3 8 3 4 11...

Page 6: ...inst a flat mounting surface Do not mount brackets on curved molding Drill the screw holes using a 3 32 drill bit CAUTION Use drywall anchors when mounting into drywall Attach the installation or exte...

Page 7: ...epths if a battery wand is used add 3 4 to the following minimum mounting depths if a rechargeable battery wand is used Minimum mounting depth is 11 4 for 3 8 and 3 4 cell sizes and 2 for the 11 4 cel...

Page 8: ...e battery wand clip until it snaps into place Check to make sure the battery wand is secure CAUTION Be sure the cable does not become pinched by the battery wand clip during installation Damage or ove...

Page 9: ...ructions on inserting the battery wand into the battery mount Proceed to STEP 3 Install the Shade on page 8 STEP 3 Install the Shade Mount the Headrail CAUTION Be sure no cables are pinched by the bra...

Page 10: ...ted in any orientation Make sure the provided cable is long enough to connect the satellite battery pack and the shade Mark the screw holes Drill the screw holes using a 3 32 drill bit Remove the back...

Page 11: ...section if you have an 18V Power Supply with daisy chain connections The daisy chain feature allows up to three Automation III automated shades to be powered by a single 18V DC Power Supply However ea...

Page 12: ...bottom rail lower the middle rail raise the middle rail and raise the bottom rail Attach Magnetic Hold Down Brackets Optional Hold down brackets provide stability and prevent swaying by securing the b...

Page 13: ...et cover once the screw hole is marked Drill the pilot hole using a 3 32 drill bit and slide the bracket cover back over the magnetic hold down bracket Attach the cover using the screw provided IMPORT...

Page 14: ...up or pressing STOP Press group number s 1 2 3 4 5 and or 6 to select one or more groups Selected group numbers light up white on the remote Press selected group number s 1 2 3 4 5 and or 6 a second t...

Page 15: ...closing the shades Quickly press twice to lower the bottom rail Press once to lower the bottom and middle rails opening the shade s from the top down Quickly press twice to lower the middle rail Press...

Page 16: ...erformed in the Automation App Select Calibrate Shade in the Advanced Options section of the Shade Settings menu in the Automation App The shade will touch off on end limits then finish in the closed...

Page 17: ...key equals approximately 1 4 IMPORTANT The key must be fully inserted to avoid stripping the mechanism Do not pull down on the rail while turning the key If there are more than two pockets adjust the...

Page 18: ...se right arrow left arrow stop light up RED In either case the batteries need to be replaced The remote takes two CR2032 batteries Problem The shade does not operate using the control button Solution...

Page 19: ...el Press the cap on until it latches NOTE Kirsch recommends AA alkaline batteries for use with our battery powered shades These will provide more than one year of operation depending on usage Lithium...

Page 20: ...properly inserted and being charged Once the battery has been fully recharged the red light indicator will turn green Charging may take up to three hours depending on your battery level Remove the bat...

Page 21: ...he fabric Allow the shade to dry in the completely lowered or closed position Bathtub Cleaning Water Immersion CAUTION Do not immerse Harmony Naturelle Oceanside and Sonora fabrics Immerse the shade i...

Page 22: ...21 INSTALLATION CHILD SAFETY...

Page 23: ...ate the equipment This device complies with Part 15 of the FCC Rules Operation is subject to the following two conditions 1 this device may not cause harmful interference and 2 this device must accept...

Page 24: ...idents misuse or alterations to the product Exposure to the elements sun damage wind water moisture salt air and discoloration or fading over time Normal maintenance associated with motors and related...

Reviews: