background image

D I R E C T H E A L T H C A R E G R O U P. C O M

1 4

F L O R I E N   I I

6.5.1. Manual Operation 

(Manual Models Only)

Back recline operating lever is located on the left hand side of push handle at the rear of the chair.
 •  To adjust the back recline position, untwist the safety spigot on the lever on the left hand side of the 

push handle, labelled “

recline

” so the lever can be squeezed. 

 •  Gently squeeze the lever and apply firm downward pressure with both hands on the push handle to 

recline the chair backwards, alternatively lift the push handle upwards to raise the back to an upright 

position.

 •  At any point during the upward or downward recline motion the lever can be released and the chair 

will lock in the selected position.

 •  It is important that an occupant’s recline position is in line with postural capabilities. Once the correct 

seat and back recline angle has been established for the occupant it can be locked in place by 

twisting the spigot on the recline lever so it can no longer be squeezed.

6.5.1. Electric Operation 

(Electric Models Only)

Simply press and hold the

 ‘Lower Back Recline’ 

button to recline the backrest until the desired 

position is reached. Release the button.
To bring the backrest up towards an upright position, press and hold the 

‘Raise Back Recline’

 button 

until the desired position is reached. Release the button.

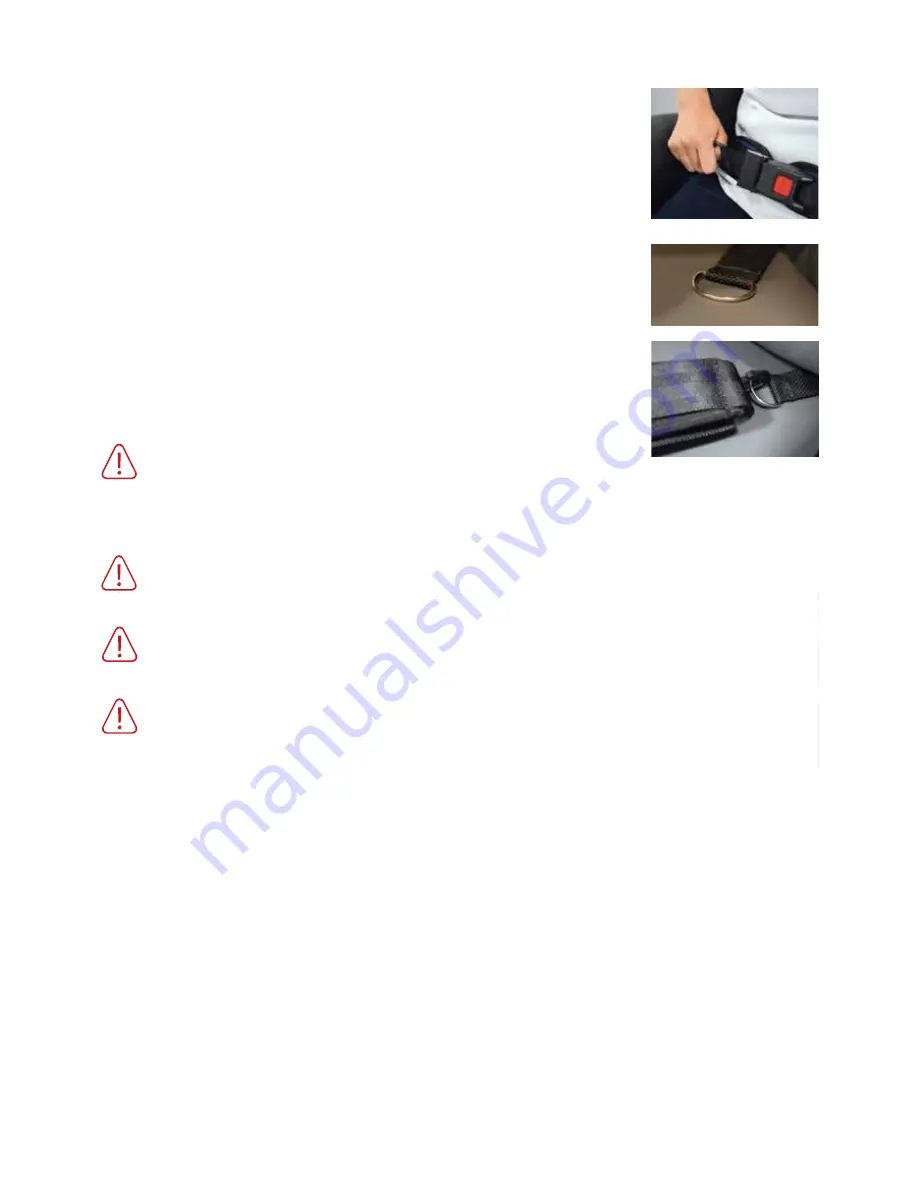
To adjust the Lap-Belt, pull on the plastic loop to give firm control but take care not to restrict the 

occupant’s movement. The Lap-Belt is designed to pull back over the hips at an angle between  

45° and 60°. 
This angle helps to maintain a vertical pelvis by simultaneously positioning the hip joint down and back.

D-Ring Fixing

The chair may come pre-fitted with D-Ring straps if ordered at the time of manufacture.  

If so, these will normally be visible near the interface between the seat module and the back cushion. 
In this case, the Lap-Belt can be fixed to the D-Rings by simply snapping the spring clip on the end of 

the Lap-Belt onto the visible D-Ring.
If the chair is not already fitted with D-Rings, these should be attached to a rigid part of the chair’s 

metal framework on either side of the seat module in order they can feed through between the seat 

and arm modules. 


WARNING 


 If the Lap-Belt is too loose there is a risk of the occupant sliding underneath or into an 

inappropriate position. The Lap-Belt should be checked for correct tightness, regularly. 

Care should be taken not to over tighten the Lap-Belt in order to reduce the risk of harm  

to the occupant.


WARNING 


 The webbing and plastic fittings should be checked at least weekly for any signs  

of damage. If damaged, the Lap-Belt should not be used.


WARNING 


 The occupant is at risk if the Lap-Belt is not properly specified and adjusted to 

their particular requirements.


WARNING 


 Thrusts, spasms and strong movements, for example, as well as partial loosening  

of the Lap-Belt could cause injury to the occupant.

Summary of Contents for Florien II

Page 1: ...D I R E C T H E A L T H C A R E G R O U P C O M Florien II User Manual D I R E C T H E A L T H C A R E G R O U P C O M...

Page 2: ...I I Important Read carefully before use and retain for future reference It is the carer user s responsibility to ensure they are fully aware of and have understood all the safety and other instruction...

Page 3: ...Wheel Option 9 6 4 Tilt in Space 10 6 5 Seat Depth Adjustment 10 6 6 Legrest Elevation 11 6 7 Articulating Headrest 11 6 8 Removable Arms 11 7 Accessories 12 7 1 Lateral Supports 12 7 2 Height Adjusta...

Page 4: ...of Chair The ability of a seated person to function efficiently and perform activities is dependent on their ability to adopt the appropriate posture All activity is posture dependent if a person can...

Page 5: ...Approved uses Sitting on the arms of a chair Sitting on the legrest or footrest of a chair Hitting the chair against people and objects such as walls doors beds tables chairs etc Spilling food urine e...

Page 6: ...3 Who is the Florien II not Suitable for The Florien II is not suitable for the following users Fully ambulant users unless fully supervised by a healthcare professional in a treatment setting and fol...

Page 7: ...orien Universal Headrest in Dartex NG403 Florien Universal Headrest in Chair Upholstery Fabric NG582 Arm Modules for 400 Seat Width Replacement Pair NG583 Arm Modules for 450 Seat Width Replacement Pa...

Page 8: ...y doubt as to the suitability of the product for the user professional advice should be sought from a qualified healthcare professional such as an Occupational Therapist Physiotherapist Tissue Viabili...

Page 9: ...locked in the straight ahead position making it easier to push the chair in a straight line Press down on the green front edge of the ridged pad Then push the chair forwards to activate the directiona...

Page 10: ...osition It is always advisable to adjust the positioning of the legrest once the tilt in space positioning has been chosen to ensure a correct and comfortable posture WARNING Never leave a user with p...

Page 11: ...or returning the chair from a tilted to upright position it is advisable to adjust the optional footrest to the shortest position or remove it entirely to prevent damage to the footrest or floor If l...

Page 12: ...ne position Lateral Supports are generally used as a pair with one fitted to either side of the Florien II chair They adjust independently but operate in the same way The lateral supports attach to th...

Page 13: ...does not fit loosely around the occupant and is not allowed to work loose over time as this will allow the pelvis to tilt backwards encouraging the occupant to slide down and forward in the chair par...

Page 14: ...D Ring If the chair is not already fitted with D Rings these should be attached to a rigid part of the chair s metal framework on either side of the seat module in order they can feed through between...

Page 15: ...ck in the seat and their buttocks on the back edge of the Pelvic Positioner Place the Pelvic Positioner in the seat of the chair with the buckles pointing towards the chair front and the clips on the...

Page 16: ...those at low to medium risk of pressure injuries Intelli Gel seat cushion for those at high risk or with up to a Grade II pressure injury Dyna Tek Intelligent Air seat cushion for those at very high r...

Page 17: ...time it is used for signs of damage or excessive wear and tear to ensure safe and reliable operation Monthly checks should include but are not limited to Any damage to the cables or adjustment levers...

Page 18: ...ns Use warm soapy water and or Haz tab or Clor clean solution and a household cloth Rub evenly in the direction of the grain of the material Rinse with clean water afterwards Can also be steam cleaned...

Page 19: ...be compromised should the weight limit be exceeded 10 3 Weight and Dimensions of the Chair Item Weight kg Dimensions mm Florien II 53 880 x 700 x1330 Florien II Box Pallet 70 1000 x 800 x1450 Cardboa...

Page 20: ...contact our Customer Care Team on Freephone 0800 043 0881 or your local retailer 10 4 2 Strength Stability Durability Risk and Safety BS EN 1022 2005 Domestic furniture Seating Determination of stabil...

Page 21: ...D I R E C T H E A L T H C A R E G R O U P C O M U S E R M A N U A L 2 1...

Page 22: ...D I R E C T H E A L T H C A R E G R O U P C O M 2 2 F L O R I E N I I...

Page 23: ...D I R E C T H E A L T H C A R E G R O U P C O M U S E R M A N U A L 2 3...

Page 24: ...32 E info directhealthcaregroup com D I R E C T H E A L T H C A R E G R O U P C O M LIT 00037 Issue 1 Date June 2018 Asia Pacific Direct Healthcare Group PTY Ltd PO Box 562 Wembley Western Australia 6...

Reviews: