background image

English

15

USING THE BLENDER

PREPARING THE BLENDER FOR USE

USING THE BLENDER

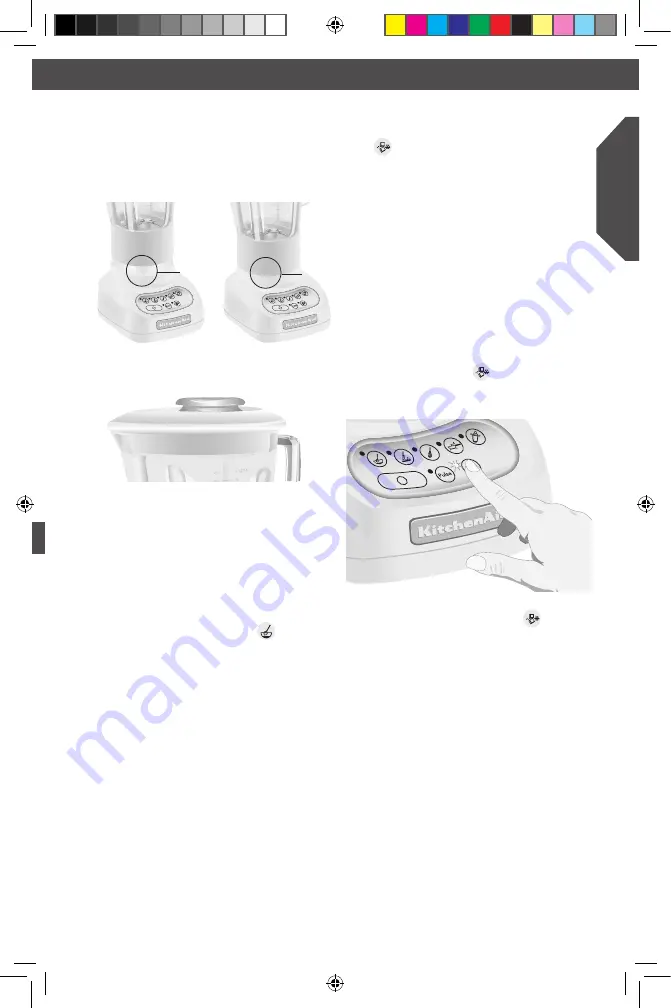
NOTE: If a gap exists between the locking 

collar and the base, the pitcher (or culinary 

jar) might not be locked into the locking 

collar or the assembly is not positioned 

properly on the Blender base. See “Blender 

Assembly” for further instructions. 

Gap

No  

Gap

3.  Put ingredients in pitcher (or culinary jar)

and firmly attach lid.

4.  Press the desired speed button for 

continuous operation at that speed.  

The green indicator light by the  

selected speed will stay lit. You may 

change settings without stopping the  

unit by pressing a new speed button.

IMPORTANT: If blending hot foods or 
liquids, remove the centre ingredient 
cup. Operate only on STIR (

) speed. 

5.  To turn off the Blender, press “O”. The 

“O” (OFF) button will stop any speed 

and deactivate the Blender at the same 

time. 

6.  Before removing the pitcher (or culinary 

jar) assembly, unplug the power cord.

CRUSH ICE
Your KitchenAid Blender offers a CRUSH 

ICE (

) feature. When selected, the 

Blender will automatically pulse at staggered 

intervals at the optimal speed for crushing 

ice or other ingredients.

1.  Before operating the Blender, make 

sure the pitcher assembly is properly 

positioned on the Blender base. 

NOTE: If a gap exists between the locking 

collar and the base, the pitcher (or culinary 

jar) might not be locked into the locking 

collar or the collar is not positioned 

properly on the Blender base. See “Blender 

Assembly” for further instructions.

2.  Put ingredients into the pitcher  

and firmly attach lid.

3.  Press CRUSH ICE (

). The indicator 

light will stay lit. The Blender will 

automatically pulse at staggered intervals.

4.  To turn off the CRUSH ICE (

) feature, 

press “O”. The Blender is now ready for 

continuous operation. 

5.  Before removing the pitcher assembly, 

unplug the power cord.

W10482505B_01_EN_v10.indd   15

3/26/18   4:23 PM

Summary of Contents for 5KSB5553

Page 1: ...5KSB5553 W10482505B_01_EN_v10 indd 1 3 26 18 4 23 PM ...

Page 2: ...W10482505B_01_EN_v10 indd 2 3 26 18 4 23 PM ...

Page 3: ...Français 45 Italiano 65 Nederlands 85 Español 105 Português 125 Ελληνικά 145 Svenska 165 Norsk 185 Suomi 205 Dansk 225 Íslenska 245 Русский 265 Polski 285 Český 305 Türkçe 325 345 W10482505B_01_EN_v10 indd 3 3 26 18 4 23 PM ...

Page 4: ...W10482505B_01_EN_v10 indd 4 3 26 18 4 23 PM ...

Page 5: ... Use 14 Operating the Blender 14 CRUSH ICE 15 PULSE Mode 16 Ingredient Cup 16 Soft Start Blending Feature 16 SPEED CONTROL GUIDE 17 CARE AND CLEANING 18 TROUBLESHOOTING 19 BLENDER TIPS 20 CULINARY BLENDER JAR TIPS 22 WARRANTY AND SERVICE 23 NOTE DUE TO THE UNIQUE CONTAINER AND BLADE DESIGN READ THESE INSTRUCTIONS AND RECIPES BEFORE USING YOUR NEW KITCHENAID BLENDER TO ACHIEVE MAXIMUM PERFORMANCE R...

Page 6: ...se of appliance may result in personal injury 2 This appliance is not intended for use by persons including children with reduced physical sensory or mental capabilities or lack of experience and knowledge unless they have been given supervision or instruction concerning use of the appliance by a person responsible for their safety W10482505B_01_EN_v10 indd 6 3 26 18 4 23 PM ...

Page 7: ...o protect against risk of electrical shock do not put appliance in water or other liquid 8 Never leave the appliance unattended while it is in operation 9 Unplug from outlet when not in use before putting on or taking off parts and before cleaning 10 Avoid contacting moving parts Keep hands hair and clothing as well as spatulas and other utensils away from blade during operation to reduce the risk...

Page 8: ...p hands and utensils out of jar while blending to reduce the risk of severe injury to persons or damage to the appliance A scraper may be used but must be used only when appliance is not running 20 Refer to the Care and Cleaning section for instructions on cleaning the surfaces in contact with food 21 This appliance is intended to be used in household and similar applications such as staff kitchen...

Page 9: ...e packing must therefore be disposed of responsibly and in full compliance with local authority regulations governing waste disposal Scrapping the product This appliance is marked in compliance with European Directive 2012 19 EU Waste Electrical and Electronic Equipment WEEE By ensuring this product is disposed of correctly you will help prevent potential negative consequences for the environment ...

Page 10: ... blades Stainless Steel Blade Locking Collar and Blade Assembly Speed Selection Buttons Clean Touch Control Pad Stay Put Lid with Clear 60 mL Ingredient Cup Die Cast Metal Base Easy Pour 1 5 L Glass Pitcher Durable Steel Reinforced Couplers W10482505B_01_EN_v10 indd 10 3 26 18 4 23 PM ...

Page 11: ...Steel Reinforced Couplers Commercial quality couplers with 12 interlocking teeth provide direct transfer of motor power to the blade Pitcher coupler is coated for quiet operation Speed Selection Buttons Create frozen drinks and puree sauces or soups in seconds Blend with confidence control and consistency at all speed settings STIR CHOP MIX PURÉE and LIQUEFY The PULSE mode works with all five spee...

Page 12: ... useful for small capacity recipes and individual servings Culinary Blender Jar Lid with Drizzle Cap The twist lock lid includes a removable drizzle cap that fits both the Culinary Blender Jar and pitcher lids This versatile cap can be used to drizzle oils or other ingredients while the Blender is in operation On the lid the following caution is written CAUTION DO NOT OPERATE WITHOUT THIS COVER IN...

Page 13: ...pe dry Blender Assembly 1 Put locking collar with blade assembly pointing up on a sturdy surface 2 Put sealing ring flat side down around the blades and into the groove within the locking collar 3 Align the pitcher or culinary jar tabs with the slots of the locking collar 4 Press down and rotate pitcher or culinary jar clockwise approximately 1 4 turn until two clicks are heard 5 Adjust the length...

Page 14: ... cord Failure to follow these instructions can result in death fire or electrical shock USING THE BLENDER Before Use NOTE While the Blender is on or the PULSE mode indicator light is blinking Do not interfere with blade movement Do not remove pitcher or culinary jar lid Operating the Blender The KitchenAid Blender has five speeds STIR CHOP MIX PUREE and LIQUEFY In addition it also features CRUSH I...

Page 15: ...6 Before removing the pitcher or culinary jar assembly unplug the power cord CRUSH ICE Your KitchenAid Blender offers a CRUSH ICE feature When selected the Blender will automatically pulse at staggered intervals at the optimal speed for crushing ice or other ingredients 1 Before operating the Blender make sure the pitcher assembly is properly positioned on the Blender base NOTE If a gap exists bet...

Page 16: ...stop but the Blender will remain in PULSE mode and the PULSE mode indicator will return to blinking To pulse again or at another speed simply press and hold the button of the desired speed 5 To turn off the PULSE mode feature press O The Blender is now ready for continuous operation 6 Before removing the pitcher or culinary jar assembly unplug the power cord Ingredient Cup The 60 mL ingredient cup...

Page 17: ...avy Ice milk based drink Meat salad for sandwich filling Mousse Oatmeal Pancake batter Pesto Puréed fruit Baby food Puréed meat Baby food meat Puréed vegetables Baby food vegetables Salad dressing Savoury crumb topping Sherbet based drink Smooth ricotta or cottage cheese Streusel topping Sweet crumb topping Sweet crunch topping Vegetable based main dish sauce Waffle batter White sauce TIP Process ...

Page 18: ...cup locking collar and sealing ring these items may be damaged in the dishwasher Pitcher can be placed in the bottom rack of an automatic dishwasher 2 Wipe the Blender base and cord with a warm sudsy cloth wipe clean with a damp cloth and dry with a soft cloth To Clean Without Disassembly 1 Put the pitcher or culinary jar on the Blender base fill half full with warm not hot water and add 1 or 2 dr...

Page 19: ...will not rotate All indicator lights are flashing at the same time The Blender may be overloaded If the Blender becomes overloaded when blending heavy ingredients it will automatically shut off to prevent damage to the motor Press O OFF to reset the Blender and unplug the power cord Remove the pitcher assembly from the base and divide contents into smaller batches Adding liquid to the pitcher may ...

Page 20: ...over processing How To Reconstitute frozen juice For a 175 mL can of orange juice concentrate combine the juice and correct amount of water in the pitcher Cover and blend at MIX until thoroughly combined about 10 to 15 seconds For a 355 mL can combine the juice and 1 can of water in the pitcher Cover and blend at MIX until thoroughly combined about 20 to 30 seconds Stir in remaining 2 cans of wate...

Page 21: ...auce or gravy becomes lumpy place in the pitcher Cover and blend at MIX until smooth about 5 to 10 seconds Combine flour and liquid for thickening Place flour and liquid in pitcher Cover and blend at STIR until smooth about 5 to 10 seconds Prepare white sauce Place milk flour and salt if desired in pitcher Cover and blend at STIR until well mixed about 5 to 10 seconds Pour into saucepan and cook a...

Page 22: ...o obtain the following results bread crumbs 100 g brown or 50 g white very fine result processing carrots evenly fine chopped result hummus using 130 g drained chickpeas very good result mayonnaise 2 large eggs and 150 200 mL olive oil very consistent thick result best result by adding vinegar salt and pepper once mixture has thickened herbs such as 25 g of parsley coarsely chopped result peanut b...

Page 23: ...nstallation operation not in accordance with local electrical codes KITCHENAID DOES NOT ASSUME ANY RESPONSIBILITY FOR INDIRECT DAMAGES 2018 All rights reserved Specifications subject to change without notice In U K and Ireland For any questions or to find the nearest KitchenAid Authorised Service Centre please find our contact details below NOTE All service should be handled locally by an Authoris...

Page 24: ...W10482505B_01_EN_v10 indd 24 3 26 18 4 23 PM ...

Reviews: