background image

2

PARTS AND FEATURES

*These parts are sold separately as model 5KSMFGA.

1. 


Removable Tray

*

2. 


Main Housing

*

3. 


Long Grind Screw

4. 


Strainer Cone

5. 


Collar

*

6. 


Strainer Shield

7. 


Splash Lid

8. 


Food Pusher

*

9. 

  Shaft Assembly

1

2

3

4

5

6

7

9

8

PRODUCT SAFETY

Summary of Contents for 5KSMFVSP

Page 1: ...37 PT Manual de utilização e manutenção 44 EL Εγχειρίδιο Χρήσης και Φροντίδας 51 SV Handbok för skötsel och användning 58 NO Håndbok for bruk og vedlikehold 65 FI Käyttö ja huolto opas 72 DA Vejledning til anvendelse og vedligehold 79 IS Notenda Meðhöndlunar handbók 86 RU Руководство по эксплуатации и уходу 93 PL Instrukcja obsługi i konserwacji 100 CS Návod k použití a údržbě 107 TR Kullanım ve B...

Page 2: ...S These parts are sold separately as model 5KSMFGA 1 Removable Tray 2 Main Housing 3 Long Grind Screw 4 Strainer Cone 5 Collar 6 Strainer Shield 7 Splash Lid 8 Food Pusher 9 Shaft Assembly 1 2 3 4 5 6 7 9 8 PRODUCT SAFETY ...

Page 3: ...e and knowledge unless they have been given supervision or instruction concerning use of the appliance by a person responsible for their safety 6 Children should be supervised to ensure that they do not play with the appliance 7 Do not use the appliance outdoors 8 Check the Main Housing for the presence of foreign objects before using 9 Avoid contacting moving parts Keep fingers out of discharge o...

Page 4: ...he parts and accessories of the KitchenAid Metal Food Grinder Attachment model 5KSMMGA or previous KitchenAid Food Grinder Attachment model 5FGA and vice versa USE THESE PARTS WITH THESE PARTS SUGGESTED USES SPEED Strainer Cone Strainer Shield and Splash Lid Long Grind Screw and Collar Sauces Chutneys Hummus Jams and Fruit Butters 4 PRODUCT USAGE To strain fruits and vegetables Cut into pieces tha...

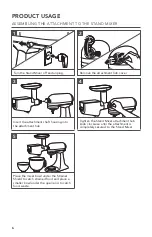
Page 5: ...ATTACHMENT Secure the smaller spring end of the Shaft Assembly into the Large Grind Screw Insert the Long Grind Screw into the Main Housing Before first use clean all parts and accessories see Care and Cleaning section 2 Insert the Collar over the Strainer Cone and rotate clockwise to secure Slide the Strainer Shield over the cone and latch on the top of ring 3 Place Splash Lid on the Strainer Shi...

Page 6: ... the attachment shaft housing into the attachment hub 3 Tighten the Stand Mixer attachment hub knob clockwise until the attachment is completely secured to the Stand Mixer 4 PRODUCT USAGE Place the mixer bowl under the Strainer Shield to catch strained food and place a smaller bowl under the open end to catch food waste 5 1 ...

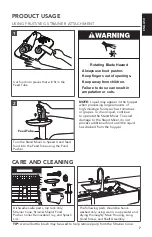
Page 7: ...s out of openings Keep away from children Failure to do so can result in amputation or cuts Cut food into pieces that will fit in the Feed Tube 1 Turn the Stand Mixer to Speed 4 and feed food into the Feed Tube using the Food Pusher 2 Feed Tube CARE AND CLEANING Dishwasher safe parts top rack only Strainer Cone Strainer Shield Food Pusher Collar Removable Tray and Splash Lid The following parts sh...

Page 8: ...od preparation B Damage resulting from accident alterations misuse abuse or installation operation not in accordance with local electrical codes KITCHENAID DOES NOT ASSUME ANY RESPONSIBILITY FOR INDIRECT DAMAGES For any questions or to find the nearest Authorised KitchenAid Service Centre in your country please find our contact details below Number for general questions For more information visit ...

Reviews: