background image

Instructions for use

Summary of Contents for KDSDM 82130

Page 1: ...Instructions for use ...

Page 2: ......

Page 3: ... and general recommendations 4 Dishwasher description 6 Control panel description 7 First time use 7 Programming 14 Program table 16 Feature and options 17 Menu Settings 18 Maintenance and care 19 What to do if 20 ...

Page 4: ...n be used by children aged from 8 years and above and persons with reduced physical sensory or mental capabilities or lack of experience and knowledge if they have been given supervision or instruction concerning use of the appliance in a safe way and understand the hazards involved Children shall not play with the appliance Cleaning and user maintenance shall not be made by children without super...

Page 5: ...ectrical and electronic appliances Disposal must be carried out in accordance with local environmental regulations for waste disposal For further information on the treatment recovery and recycling of this appliance contact your competent local authority the collection service for household waste or the shop where you purchased the appliance EC Declaration of conformity This appliance has been des...

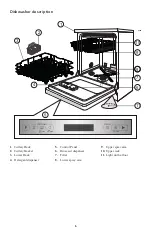
Page 6: ...7 6 11 4 1 Cutlery Rack 2 Cutlery Basket 3 Lower Rack 4 Detergent dispenser 5 Control Panel 6 Rinse aid dispenser 7 Filter 8 Lower spray arm 9 Upper spray arm 10 Upper rack 11 Light on the floor Dishwasher description ...

Page 7: ...ection To select preferred language please press button Confirm pressing button After language confirmation the appliance will go through the settings ENGLISH P NO YES 1 Ask your water supply company what the water hardness is 2 enter this value on your dishwasher SALT required German degrees dH French degrees fH English degrees eH Water hardness level Insert value is shown in the display 0 5 0 9 ...

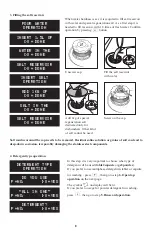
Page 8: ...Unscrew cap Fill the salt reservoir with water Add 1kg of special regeneration salt dedicated only for dishwashers Other kind of salt cannot be used Salt residue around the cap needs to be removed Residual saline solution or grains of salt can lead to deep down corrosion irreparably damaging the stainless steel components In this step it is very important to choose what type of detergent will be u...

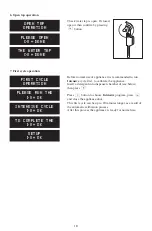
Page 9: ...e the situation Detergents with rinse aid incorporated may be effective only with longer programs In the case of shorter programs detergent residue may be a problem if necessary use powder detergent Detergents with rinse aid incorporated tend to form excess suds 9 5 Rinse aid operation INSERT RINSE AID DONE IN THE DISPENSER DONE RINSE AID OPERATION Press right button to open the cover of rinse aid...

Page 10: ...E CYCLE OK FIRST CYCLE OPERATION Before normal use of appliance it is recommended to run Intensive cycle first to calibrate the appliance Insert a detergent into dispenser chamber A see below then press Press button to choose Intensive program press and close the appliance door This first cycle can be up to 20 minutes longer as a result of the automatic calibration process After this process the a...

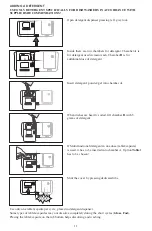
Page 11: ...gent If Multifunctional detergent in one dose tablet capsule is used it has to be inserted into chamber A Option Tablet has to be chosen Shut the cover by pressing dedicated ribs ADDING A DETERGENT USE ONLY DETERGENT SPECIFICALLY FOR DISHWASHERS IN ACCORDANCE WITH SUPPLIERS RECOMMENDATIONS Use only one tablet capsule per cycle placed in detergent dispenser Some types of tablets capsules may not di...

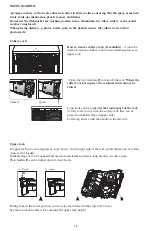
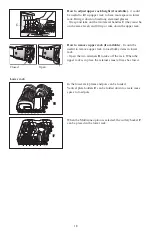
Page 12: ...n be opened and used to load stemmed glasses long utensils or coffee cups Plate holders B can be folded down to load bowls Putting rack in the lower position you can also load dessert dishes up to Ø 20 cm See the instructions below for adjusting the upper rack height A Closed A Open How to remove cutlery rack if available it could be useful to remove cutlery rack to load stemmed glasses in upper r...

Page 13: ... How to remove upper rack if available It could be useful to remove upper rack to load bulky items in lower rack Open the two retainers D to take off the rack When the upper rack is in place the retainers must always be closed C D Closed Open In the lower rack plates and pots can be loaded Vertical plate holders E can be folded down to create more space to load pots When the Multizone option is se...

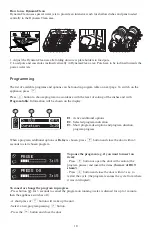
Page 14: ...lay When a program additional options or Delay is chosen press button and close the door within 3 seconds to start chosen program E1 Active additional options E2 Selected program indication E3 Short program description and program duration program progress To cancel or change the program in progress Press button for 3 seconds to cancel the program on running water is drained for up to 1 minute the...

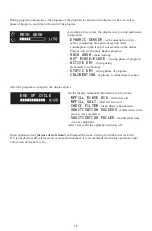
Page 15: ...TATIC DRY drying phase of program CALIBRATING appliance is calibrating its sensor MAIN WASH After the program is complete the display shows Open appliance door beware of hot steam and unload the racks starting from the lower rack first If it is needed to refill salt reservoir or rinse aid dispenser it is recommended to do this operations right before start of the next cycle On the display addition...

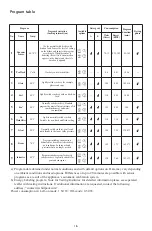
Page 16: ...o normally soiled crockery Suitable for non dried and fresh soiling 11 0 1 30 60 7 Silent 50 C Normally soiled crockery gentle and quiet thanks to the lower spray pressure 14 0 1 20 290 299 8 14 5 1 75 165 175 9 65 C Recommended program for heavily soiled crockery especially suitable for pans and saucepans 15 0 1 60 145 155 a Program data obtained under normal conditions and with default options o...

Page 17: ... is pressed KEY LOCK Enable will be shown on the display Delay press button repeatedly to delay the start of the program Adjustable from 0 30 to 24 hours With each press of the button the delay start increases by every 0 30 if selection below 4 hours every 1 00 if selection is below 12 hours every 4 hours if selection is above 12 hours Then press button The dishwasher will start after the set time...

Page 18: ...s If this option is enabled the symbol is lit Menu Settings 2 Sound P SOUND Turned On To enable or disable the sound press To go to the next setting press 3 Water hardness P WATER HARD LEVEL 4 To change water hardness press To setup correct level according to water hardness see table To confirm press 5 Language P LANGUAGE English To choose language press To go to the next step press 4 Screen brigh...

Page 19: ...mmended to run a high temperature cycle e g Intensive at least once per month It will help to keep the appliance clean fully functional and avoid odours Cleaning the filters Check filters and clean if necessary Unscrew microfilter 1 remove it 2 and remove fine sieve 3 Rinse under running water Insert Screw on microfilter NOTE MARK Unscrew and remove upper arm Unscrew and remove lower arm Clean spr...

Page 20: ...E INSTRUCTIONS CODE F6 E1 Water tap closed The water tap must be open Water pressure is too low The water tap must be fully open during water inlet minimum capacity 0 5 litres per minute Kinked water inlet hose or closed inlet filters The water inlet hose must not be kinked and the relative inlet filter in the water tap connector must not be dirty or clogged Display shows CYCLE STOPPED CHECK DRAIN...

Page 21: ...ose the door Display shows CLOSE WATER NOW CALL THE SERVICE MORE INFORMATION IS AVAILABLE IN THE INSTRUCTIONS CODE F8 E1 or display shows other fault display Fx Ey Appliance has technical defect Call factor customer service state fault displayed Close the water tap After taking the above action the fault message must be reset In the majority of cases the fault is thus eliminated RESET Press the bu...

Page 22: ...tenance and care Spray arms stuck impeded by crockery or cutlery The spray arms must be able to turn freely and must not be impeded by crockery or cutlery have deposits regeneration salt residue Water too hard In areas with very hard water regeneration salt needs to be added more often Salt reservoir cap open Close the salt reservoir cap properly Not enough rinse aid If you use a combined action d...

Page 23: ...ea In case of tea stains to enhance bleaching add one teaspoon of baking soda together with detergent into the detergent dispenser rust marks Pre Wash program not used Salty or acidic food residues can cause rust marks even on stainless steel cutlery To avoid this always use the Pre Wash program if the dishes are to be washed later other marks Rinse aid dosage too low In the presence of marks incr...

Page 24: ...04 20 ...

Reviews: