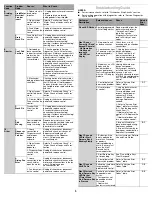
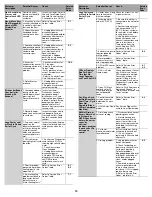
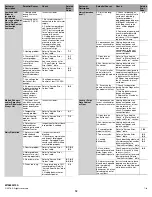
background image

1

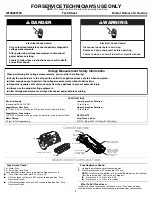
FOR SERVICE TECHNICIAN’S USE ONLY


NOTE: 

This sheet contains important Technical Service Data.

 W10880570A                                                     Tech Sheet                                              Do Not Remove Or Destroy
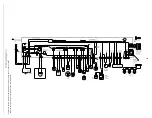
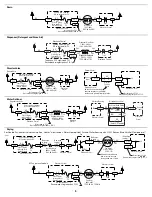
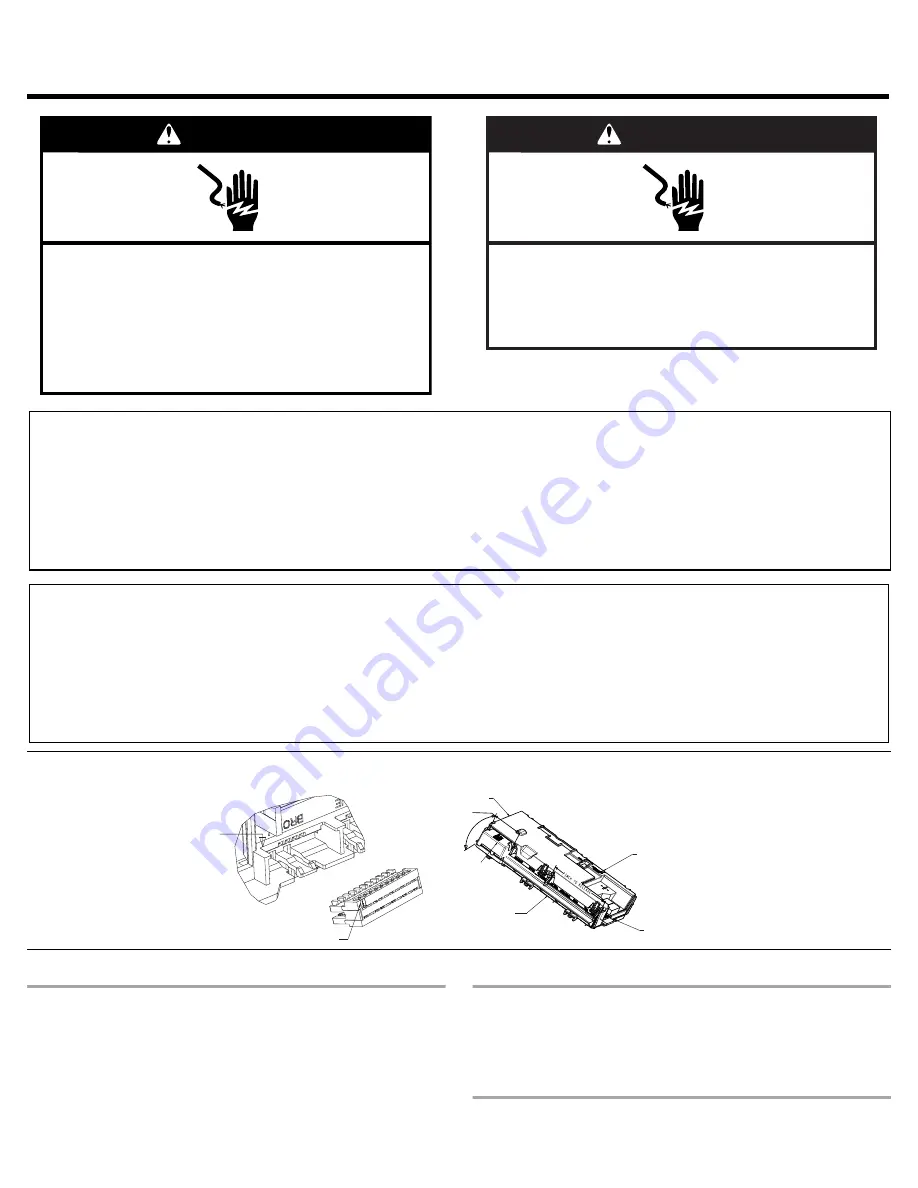
Control Assembly

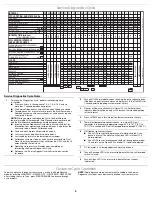
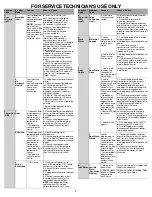
Meter Check of Loads and Fuses

Fuse Service Check:

F8 = Motor Fuse

F9 = Small-triac Load Fuse

Check operation of loads during the Service Diagnostics cycle.

If any of the triac loads work, F9 Fuse is OK.

If all triac loads fail to work, F9 Fuse could be open. See “Fuse 

Resistance Check.”

If Wash Motor does not work, F8 Fuse could be open. See “Fuse 

Resistance Check.”

Fuse Resistance Check:

1.

Unplug the dishwasher or disconnect power.

2.

Measure resistance of F8 Fuse and/or F9 Fuse. 

NOTE: 

Fuses are on the bottom of the Control Board but can be checked 

from the top side. See “Control Pinout” diagram.

If resistance is <3 

?

) then fuse is OK.

If resistance is >3 

?

) then fuse is open.

 What To Do If Fuse Open:

Inspect and check resistance of all loads on fuse. If any loads are open, 

shorted, or have evidence of overheating or pinched wires, replace them.

DANGER

Electrical Shock Hazard

Only authorized technicians should perform diagnostic 

voltage measurements.
After performing voltage measurements, disconnect 

power before servicing.
Failure to follow these instructions can result in death 

or electrical shock.

WARNING

Electrical Shock Hazard

Disconnect power before servicing.
Replace all parts and panels before operating.
Failure to do so can result in death or electrical shock.
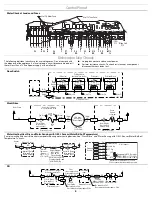
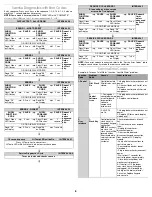
SPECIFICATIONS

Electrical Supply:

(Under load) 60 Hz, 120 VAC

Lower Spray Arm Rotation:

12 to 40 rpm

Supply Water Flow Rate:

To fill 2 qt (1.9 L) in 27 seconds, 120 psi maximum, 20 psi minimum.

Upper Spray Arm Rotation:

12 to 30 rpm

Supply Water Temperature:

120°F (49°C) (Before starting a cycle, run water from sink faucet until hot.)

REPAIR KITS

Water Charge:

0.9 gal. (3.5 L) Approximate

Vinyl Touch-up Kits:

675576 (Blue), 676453 (White), 676455 (Gray)

Voltage Measurement Safety Information

When performing live voltage measurements, you must do the following:


Verify the controls are in the off position so that the appliance does not start when energized.


Allow enough space to perform the voltage measurements without obstructions.


Keep other people a safe distance away from the appliance to prevent potential injury.


Always use the proper testing equipment.


After voltage measurements, always disconnect power before servicing.
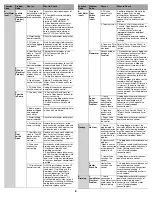


Pin 1 

Rast Connector Pinout

Pin 1 

Control

Assembly

Pinch to

release

Rotate

Connector Box

Connector Brace

(To remove, pinch

arms and rotate)

Control panel snap

locks control in place

Buttons on bottom

of control housing 

slide into keyhole 

slots on control 

panel to support

the control

Summary of Contents for KDTE104ESS3

Page 1: ...an result in death or electrical shock WARNING Electrical Shock Hazard Disconnect power before servicing Replace all parts and panels before operating Failure to do so can result in death or electrical shock SPECIFICATIONS Electrical Supply Under load 60 Hz 120 VAC Lower Spray Arm Rotation 12 to 40 rpm Supply Water Flow Rate To fill 2 qt 1 9 L in 27 seconds 120 psi maximum 20 psi minimum Upper Spr...

Page 2: ...ive 13V VCC Wide Data 13V Beeper REF VCC Wide Data P1A P1B LED Displays 14 pin Mechanical Push Button Boards 20 pin Active Overlays 19 pin ZIF 1 3 2 4 5 6 7 Black Stripe On Connector Red Stripe On Connector P6 1 P6 3 P6 4 P6 6 P6 7 P6 9 P7 1 P7 3 P7 4 P7 6 P8 1 P8 3 P8 4 P8 6 P9 1 P9 3 P9 5 P9 6 P10 1 P10 3 P10 5 P10 4 Micro Pin Micro Pin Micro Pin K2 F8 Fuse Or 5 1 Dispenser Wax Motor P13 1 P13 2...

Page 3: ... 0 01 HIT 7 Seg 7 Seg 7 Seg 7 Seg 7 Seg AC FAN MOTOR IF PRESENT 1 To invoke the Diagnostics cycle perform the following while in standby Press any 3 keys in the sequence 1 2 3 1 2 3 1 2 3 with no more than 1 second between key presses The Service Diagnostics Cycle will start when the door is closed To rapid advance 1 interval at a time press the Start Resume key Rapid advance may skip sensor check...

Page 4: ...1 P4 1 N WH K4 Motor N Relay Also see Door Switch Circuit N O 1 PH Sync Wash Motor Power Supply Electronic Control Electronic Control Pin 3 Pin 2 120V 60 Hz 5 15Ω 60W Fuse F8 K2 Pilot L1 Relay Also see Door Switch Circuit Use holes of jumper W2 as test points for F8 Top Hole Bottom Hole N O W2 LB TURQ TURQ LB L1 BK Electronic Control N O K3 Heater L1 Relay Also see Door Switch Circuit Hi Limit The...

Page 5: ...ch Circuit Fuse F9 Electronic Control No test pad on P7 4 Recommend using test pad on P10 1 Electronic Control Triac Diverter Motor 1 100Ω 1 400Ω 120V 60 Hz 3W L1 Regeneration Valve BK P4 2 P7 3 P10 1 P7 1 P4 1 N WH V V Use top hole of jumper W2 as test point for F9 K2 Pilot L1 Relay Also see Door Switch Circuit Fuse F9 Pin 1 Pin 3 N O Electronic Control Electronic Control Triac No test pad on P7 ...

Page 6: ...n loads and checks sensors SERVICE CYCLE ERROR 1 INTERVAL 2 A tone will play when service error code 1 is displayed SHOW FUNCTION CODE PAUSE SHOW PROBLEM CODE PAUSE Repeat 3 times unless advanced by Start key Count Clean LED flashes 2 sec Count Clean LED flashes 5 sec OR ON DISPLAY MODELS Read F on Display 0 5 sec Read E on Display 1 sec SERVICE CYCLE ERROR 2 INTERVAL 1 SHOW FUNCTION CODE PAUSE SH...

Page 7: ...un diagnostics after replacing new OWI to force calibration on next wash cycle Function Code Problem Code Causes What to Check 3 Thermistor OWI cont 3 Failed Calibration cont 2 Drain hose check valve not sealing Dirty water backs into dishwasher after draining 1 Disconnect drain hose at plumbing connection 2 Elevate hose above dishwasher and fill with water If water flows into dishwasher replace e...

Page 8: ...or disconnect power and replace control Function Code Problem Code Causes What to Check 6 Inlet Water cont 4 Float Switch Open cont 4 Fill valve mechanically stuck open Confirm dishwasher fills while the door is open If yes unplug dishwasher or disconnect power turn off water to dishwasher replace fill valve and turn water back on 5 Too many suds 1 Allow unit to fill and wash for 1 minute Open doo...

Page 9: ...er Drive circuit on the control Unplug dishwasher or disconnect power and replace control 3 Drying Fan Error 1 Loose connection in fan circuit and or open fan motor Unplug dishwasher or disconnect power and check resistances of fan motor and all connections in the fan circuit Fix replace open connections or fan 2 Fan drive circuit on the control Unplug dishwasher or disconnect power and replace co...

Page 10: ... cause long cycles but will typically cause a water heating fault Refer to Service Error Codes table 7 1 Customer Description Potential Causes Check Related Error Code Long Cycles and or Stuck in Certain Part of Cycle cont 5 Heater takes a long time to heat water with low voltage Check for at least 100 VAC at power source 6 Incoming water under 84ºF 29ºC 1 Be sure dishwasher is connected to the ho...

Page 11: ...rror Codes table 6 8 Customer Description Potential Causes Check Related Error Code Film or Spots on Glasses and or Dishes 1 Customer not using rinse aid and or heated dry Check rinse aid gauge level on dispenser Instruct customer how to fill and monitor add or use rinse aid 2 RInse aid dispenser problem Refer to Service Error Codes table 10 1 3 Hard water leaving film on dishes Check water hardne...

Page 12: ...y Operation cont 5 Drains too long cont 3 Check for blockages from sump check valve to customer s plumbing Potential problems plugged garbage disposer or plug not knocked out drain loop check valve stuck and or plugged hoses 4 Remove drain pump and check impeller normally there is some uneven resistance If it is stripped replace drain pump 3 3 6 Loose connection in vent circuit and or open vent wa...

Reviews: