background image

8

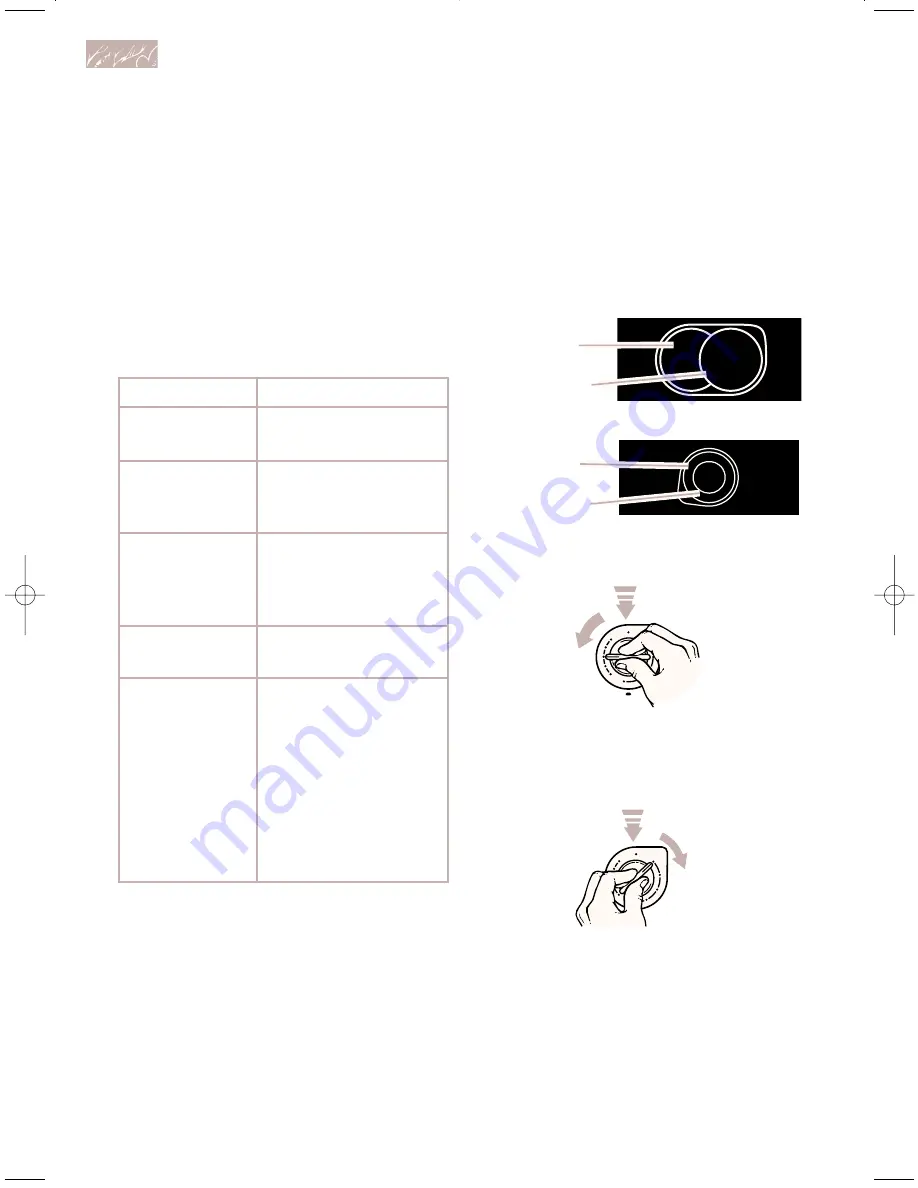
Using the dual-size surface unit

(Models KECC502G, YKECC502G,
KECC507G, YKECC507G, KECC562G,
KECC567G, and YKECC567G)

You can use the right rear and left front 
surface units as either small diameter, lower
wattage elements or large diameter, full
wattage elements.

Right rear surface unit:

Left front surface unit:

Use both elements
for larger pans

Use small element
for smaller pans

Use both elements 
for larger pans

Use inner element 
for smaller pans

OFF

H

I

S

IN

G

L

E

LO

LO

D

U

A

L

H

I

REAR

OFF

H

I

S

IN

G

L

E

LO

LO

D

U

A

L

H

I

REAR

HOT

Until you get used to the settings, use the 
following as a guide. 
For best results, start 
cooking at the high setting; then turn the 
control knob down to continue cooking. 

SETTING

HI 

MED-HI or 6-8

MED or 5 

MED-LO or 2-4 

LO

RECOMMENDED USE 

To start food cooking.

To bring liquid to a boil.

To hold a rapid boil.

To quickly brown or 
sear meat.

To maintain a slow boil.

To fry poultry or meat.

To make pudding, 
sauce, or gravy.

To stew or steam food.

To simmer food.

To keep food warm. 
Set the heat higher or 
lower within the LO 
(or 1) band to keep 
food at the 
temperature you want.

To maintain liquid just 
below simmer.

To melt chocolate or 
butter.

U

sing Your Cooktop

To use the small or inner element 
(for smaller pans):

Push in and turn the control knob to the
left (counterclockwise) to the desired 
setting in the area marked “SINGLE”.

To use both elements (for larger pans):

Push in and turn the control knob to the
right (clockwise) to the desired setting in
the area marked “DUAL”.

NOTE: You can turn the control knob in 
either direction to reach “OFF”.

Hot surface indicator lights

The Hot Surface Indicator Lights in the lobe
at each control will glow when the surface
units get hot. The Indicator Lights will 
continue to glow as long as the surface
units are too hot to touch, even after they
are turned off.

3191524ENv10c32  7/6/98 4:36 PM  Page 8

Summary of Contents for KECC501G

Page 1: ...istance or Service 15 Warranty 18 For assistance or service in the U S A call the Consumer Assistance Center For assistance or service in Canada see page 14 KITCHENAID Electric Built In Ceramic Cooktop Models KECC501G KECC502G YKECC502G KECC507G YKECC507G KECC508G YKECC508G KECC562G KECC567G YKECC567G KECC568G YKECC568G Use and Care Guide www kitchenaid com 1 800 422 1230 ...

Page 2: ...tain your new appliance properly and safely Please read it carefully Also please complete and mail the enclosed Product Registration Card Please record your model s information Whenever you call our Consumer Assistance Center at 1 800 422 1230 in Canada 1 800 461 5681 or request service for your appliance you need to know your complete model number and serial number You can find this information o...

Page 3: ...w instructions wDANGER wWARNING All safety messages will identify the hazard tell you how to reduce the chance of injury and tell you what can happen if the instructions are not followed Your safety and the safety of others is very important We have provided many important safety messages in this manual and on your appliance Always read and obey all safety messages This is the safety alert symbol ...

Page 4: ...zed Cooking Utensils Only certain types of glass glass ceramic ceramic earthenware or other glazed utensils are suitable for cooktop service without breaking due to the sudden change in temperature SAVE THESE INSTRUCTIONS Utensil Handles Should Be Turned Inward and Not Extend Over Adjacent Surface Units To reduce the risk of burns ignition of flammable materials and spillage due to unintentional c...

Page 5: ...D M E D H I M E D L O HOT POWER ON Left front control knob Left rear control knob Right rear control knob Power on light Control panel pp 5 7 12 Ceramic cooktop pp 7 9 10 Control panel pp 5 7 12 Model and serial number plate on bottom of burner box Model and serial number plate on bottom of burner box Models KECC507G and YKECC507G Right front and left rear surface units are halogen Model KECC501G ...

Page 6: ...t rear touch control Dual size surface unit p 9 Ceramic cooktop pp 7 9 10 HOT LO HI 2 3 4 6 7 8 MED ON OFF LO HI 2 3 4 6 7 8 MED ON OFF LO HI 2 3 4 6 7 8 MED ON OFF LO HI 2 3 4 6 7 8 MED ON OFF ON OFF DUAL SINGLE HOT HOT HOT ALL OFF CONTROL LOCK Left front touch control Left rear touch control Right rear touch control ALL OFF Control Lock Control panel pp 6 7 12 Ceramic cooktop pp 7 9 10 Control p...

Page 7: ... the power level To turn heating elements off individually touch ON OFF To turn all elements off at once touch ALL OFF NOTE Heating elements will be visible glow only at or above power levels 7 or 8 To lock controls touch CONTROL LOCK and hold for 5 seconds A tone will sound and the lock light will go on To unlock repeat above and lock light will go off Models KECC508G YKECC508G KECC568G and YKECC...

Page 8: ...iquid to a boil To hold a rapid boil To quickly brown or sear meat To maintain a slow boil To fry poultry or meat To make pudding sauce or gravy To stew or steam food To simmer food To keep food warm Set the heat higher or lower within the LO or 1 band to keep food at the temperature you want To maintain liquid just below simmer To melt chocolate or butter Using Your Cooktop To use the small or in...

Page 9: ...and large pots Do not store jars or cans above the cooktop Do not use the cooktop as a cutting board Do not allow anything that could melt such as plastic to come in contact with the cook top while it is hot Halogen element Models KECC507G KECC567G YKECC507G and YKECC567G Using the dual size surface unit Models KECC508G YKECC508G KECC568G YKECC568G You can use the left front surface unit as either...

Page 10: ... Aluminum Heats quickly and evenly Use for all types of cooking Medium or heavy thickness is best for most cooking Used as a core or base in cookware to provide even heating Cast iron Heats slowly and evenly Good for browning and frying Maintains heat for slow cooking Can be coated with porcelain enamel Ceramic or ceramic glass Heats slowly and unevenly Use on low to medium settings Follow manufac...

Page 11: ...ooking area Home canning information Use the entire surface DUAL setting of the left front surface cooking area for best results Models KECC502G YKECC502G KECC507G YKECC507G KECC508G YKECC508G KECC562G KECC567G YKECC567G KECC568G YKECC568G Use flat bottomed canners on all types of cooktops especially ceramic glass Canners with rippled or ridged bottoms do not allow good contact with the surface Ce...

Page 12: ...ean your cooktop For proper cleaning methods please review the How to keep your cooktop looking like new chart Follow this chart after each use to ensure top performance and to preserve that uniquely elegant look NOTE Let cooktop cool before cleaning Activate control lock on electronic touch control models see page 7 Cleaning the control knobs 1 Make sure all control knobs are turned to OFF 2 Pull...

Page 13: ... heating cooktop again rub into area using damp paper towel Rinse and dry To prevent scratches and abrasions use the Cooktop Polishing Creme regularly Scratches and abrasions do not affect cooking performance After many cleanings they will become less visible PART Ceramic glass cooktop Light to moderate soil Heavy soil dark streaks specks and discoloration Burned on soils Sugary spills jellies can...

Page 14: ...sh control knobs in before turning to a setting Push control knob s in before turning to a setting Level cooktop See Installation Instructions Refer to a reliable cookbook for recommended pan type and size Pan should be the same size or slightly larger than surface cooking area being used PROBLEM Nothing will operate The surface cooking areas will not operate Control knob s will not turn Cooking r...

Page 15: ...ce anywhere in the United States To locate the authorized KitchenAid service company in your area you can also look in your telephone directory Yellow Pages If you need replacement parts If you need to order replacement parts we recommend that you only use factory authorized parts These parts will fit right and work right because they are made with the same precision used to build every new KITCHE...

Page 16: ...tory Yellow Pages KitchenAid Canada Appliance Service Consumer Services Direct service branches BRITISH COLUMBIA 1 800 665 6788 ALBERTA 1 800 661 6291 ONTARIO Ottawa area 1 800 267 3456 except 807 area code Outside the Ottawa area 1 800 807 6777 MANITOBA SASKATCHEWAN 1 800 665 1683 and 807 area code in ONTARIO QUEBEC Montreal except South Shore 1 800 361 3032 South Shore Montreal 1 800 361 0950 Qu...

Page 17: ...aterials or workmanship Service must be provided by an authorized KitchenAid servicing outlet Replacement parts for any electric element to correct defects in materials or workmanship Replacement ceramic glass if breakage is due to defects in materials or workmanship Replacement parts for solid state touch control system to correct defects in materials or workmanship KITCHENAID AND KITCHENAID CANA...

Page 18: ...iagnostic 15 Demande d assistance ou de service 16 Garantie 18 Pour assistance ou service aux É U téléphoner au Centre d assistance aux consommateurs 1 800 422 1230 Pour assistance ou service au Canada voir page 17 Table de cuisson électrique encastrée en céramique KITCHENAID 3191524 Guide d utilisation et d entretien Modèles KECC501G KECC502G YKECC502G KECC507G YKECC507G KECC508G YKECC508G KECC56...

Page 19: ...entretien de votre appareil convenablement et en sécurité Veuillez lire ces renseignements attentivement Veuillez aussi remplir et poster la carte ci incluse d enregistrement du produit Veuillez noter ici l information concernant votre appareil Chaque fois que vous contactez notre Centre d assistance aux consommateurs au 1 800 422 1230 aux É U ou 1 800 461 5681 au Canada pour des services de répar...

Page 20: ...e si vous ne suivez pas les instrucions IMPORTANTES INSTRUCTIONS DE SÉCURITÉ AVERTISSEMENT Pour réduire le risque d incendie de choc électrique de blessures ou de dommages lors de l utilisation de la table de cuisson observer les précautions élémentaires suivantes y compris ce qui suit Installation appropriée S assurer que la table de cuisson est correctement installée et reliée à la terre par un ...

Page 21: ... peuvent devenir assez chauds pour causer des brûlures Pendant et après l utilisation ne pas toucher les éléments chauffants et ne pas laisser les vêtements ou autres matériaux inflam mables entrer en contact avec ces élé ments de surface ou les surfaces près des éléments avant qu ils ne soient suffisamment refroidis Ces endroits comprennent la table de cuisson et les surfaces au dessus de la tabl...

Page 22: ...et toyage et les renversements peuvent pénétrer dans la table brisée et créer le risque d un choc électrique Contacter immédiatement un technicien qualifié Nettoyer la table de cuisson avec pru dence Si une éponge ou un chiffon mouillé est utilisé pour essuyer les ren versements sur une surface de cuisson chaude éviter les brûlures causées par la vapeur chaude Certains nettoyants peuvent produire ...

Page 23: ... gauche Bouton de commande arrière droit Témoin lumineux Tableau de commande p 6 8 13 Table de cuisson en céramique p 8 10 11 Tableau de commande p 6 8 13 Plaque signalétique numéros de modèle et de série sous la boîte externe Plaque signalétique numéros de modèle et de série sous la boîte externe Modèles KECC507G and YKECC507G Les éléments de surface avant à droite et arrière gauche sont à halogè...

Page 24: ...Table de cuisson en céramique p 8 10 11 HOT LO HI 2 3 4 6 7 8 MED ON OFF LO HI 2 3 4 6 7 8 MED ON OFF LO HI 2 3 4 6 7 8 MED ON OFF LO HI 2 3 4 6 7 8 MED ON OFF ON OFF DUAL SINGLE HOT HOT HOT ALL OFF CONTROL LOCK Touche de commande avant gauche Touche de commande arrière gauche Touche de commande arrière droite Commande de verrouillage ARRÊT COMPLET Tableau de commande p 7 8 13 Table de cuisson en ...

Page 25: ...lages de verrouillage appuyer sur CONTROL LOCK VERROUILLAGE et tenir pendant 5 secondes Un signal sonore sera entendu et l indicateur lumineux de verrouillage s allumera Pour déverrouiller répéter ce qui précède et l indicateur lumineux de verrouillage s éteindra Les modèles KECC508G YKECC508G KECC568G et YKECC568G sont munis d une commande de ventilateur de refroidissement Le ventilateur fonction...

Page 26: ...chaque commande s allumeront lorsque les éléments de surface deviennent chauds Ils resteront allumés jusqu à ce que les éléments chauffants aient pu suffisamment refroidir même si tous les boutons de commande sont à la position d arrêt Jusqu au moment d être habitué aux réglages utiliser ce qui suit comme guide Pour l obtention des meilleurs résultats com mencer la cuisson au réglage de la puissan...

Page 27: ...out simplement en appuyant sur SINGLE ou DUAL LO HI 2 3 4 6 7 8 MED ON OFF ON OFF DUAL SINGLE HOT Utilisation de la table de cuisson en vitrocéramique Les éléments de surface avant droit et arrière gauche sont des éléments à halogène Ces éléments s illuminent aussitôt qu ils sont allumés et sont plus brillants que les éléments ordinaires en spirale La cuisson sur une table de cuisson en vitrocéram...

Page 28: ...stensiles de cuisson pour un chauffage uniforme Chauffage lent et inégal Bon pour faire brunir et frire Maintient la chaleur pour une cuisson lente Peut être émaillée Chauffe lentement et inégalement S utilise pour les réglages de bas à moyen Suivre les instructions du fabricant Chauffe très rapidement et également Utilisér comme base dans les ustensiles de cuisson pour fournir un chauffage égal P...

Page 29: ...sur l élément chauffant Ustensile Élément chauffant Renseignements pour les conserves à la maison Ne pas placer votre marmite sur deux éléments de cuisson de surface à la fois Le type de matériau employé pour la fabrication de la marmite détermine la durée de chauffage Se référer plus loin dans cette section au tableau Caractéristiques des matériaux d ustensiles de cuisson dans cette section pour ...

Page 30: ...niveau de performance supérieur et préserver cette apparence élégante unique REMARQUE Laisser refroidir la table de cuisson avant le nettoyage Activer la commande de verrouillage sur les modèles avec touche de commande électronique voir page 7 Vérifier que tous les boutons de commande sont à la position OFF FERMÉS Tirer chaque bouton en ligne droite pour l extraire Ne pas retirer les joints d étan...

Page 31: ...aletés en utilisant un essuie tout en papier Appliquer de nouveau la crème aux taches tenaces Tenir le grattoir avec lame de rasoir à plat sur la surface autant que possible et gratter les taches Polir toute la table de cuisson avec la crème et un essuie tout en papier Rincer et sécher Garder les lames de rasoir hors de portée des enfants Essuyer pendant que la surface en vitrocéramique est tiède ...

Page 32: ...nsile de cuisson utilisé n est pas du type ou de la dimension correct L ustensile de cuisson ne convient pas à la surface de l élément chauffant utilisé SOLUTION Relier l appareil à un circuit actif avec voltage approprié Voir Instructions d installation Remplacer le fusible ou remettre le disjoncteur en fonction Remplacer le fusible ou remettre le disjoncteur en fonction Enfoncer les boutons de c...

Page 33: ... des pièces de rechange autorisées par l usine dans votre région composer le numéro de téléphone de notre Centre d assistance aux consommateurs ou votre Centre de service autorisé le plus proche Téléphoner au Centre d assistance aux consommateurs KitchenAid sans frais d interurbain 1 800 422 1230 Nos consul tants sont prêts à vous aider Lors de l appel Veuillez connaître la date d achat et le numé...

Page 34: ...ales de service direct COLOMBIE BRITANNIQUE 1 800 665 6788 ALBERTA 1 800 661 6291 ONTARIO Région d Ottawa 1 800 267 3456 à l exception de l indicatif régional 807 À l extérieur de la région d Ottawa 1 800 807 6777 MANITOBA SASKATCHEWAN 1 800 665 1683 et indicatif régional 807 en ONTARIO QUÉBEC Montréal sauf la rive Sud 1 800 361 3032 Rive Sud de Montréal 1 800 361 0950 Québec 1 800 463 1523 Sherbr...

Page 35: ... pour aller chercher et livrer l appareil Ce produit est conçu pour être réparé sur place G Réparations de la table de cuisson en vitrocéramique si elle n a pas fait l objet de l entretien recommandé dans ce Guide d utilisation et d entretien H Réparations de pièces ou systèmes imputables à des modifications exécutées sans autorisation sur l appareil Garantie 2 98 KITCHENAID ET KITCHENAID CANADA D...

Reviews: