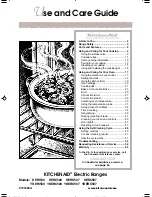
background image

9753308A

KITCHENAID

®

 Electric Ranges

Models: `KERI500

KERC500

KERS507

KERC507

YKERI500 YKERC500 YKERS507 YKERC507

U

se and Care Guide

A Note to You .............................................. 2
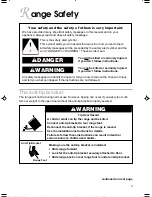
Range Safety ............................................... 3
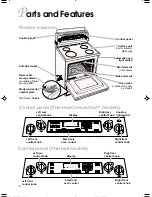
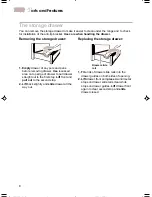
Parts and Features .................................... 6
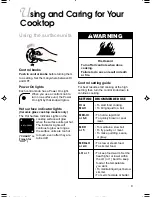
Using and Caring for Your Cooktop .......... 9

Using the surface units .............................. 9
Cookware tips ......................................... 11
Home canning information ....................... 12
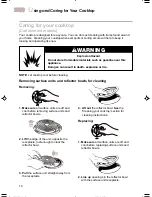
Caring for your cooktop ........................... 12
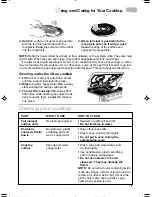
Cleaning your cooktop ............................. 15
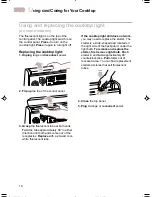
Using and replacing the cooktop light ...... 16

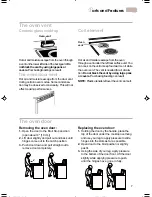
Using and Caring for Your Oven .............. 17

Using the electronic oven control ............. 17
Setting the clock ...................................... 18
Using the kitchen timer ............................ 19
Oven settings .......................................... 20
Cooking tips ........................................... 21
Bake or Convection Bake ...................... 23
Broil ........................................................ 25
Convection Broil ..................................... 27
Convection Roast ................................... 28
Adjusting oven temperature ................... 30
Using the temperature probe ................. 31
Using Convect Full Meal ......................... 34
Timed cooking ........................................ 36
Dehydrating ............................................ 39
Raising (proofing) bread ........................ 41
Cleaning your oven and controls ........... 45
Oven lights ............................................. 47
Resetting circuit breakers ...................... 47

Using the Self-Cleaning Cycle .................. 48

Setting controls ...................................... 49
For best cleaning results ........................ 51
How the cycle works .............................. 51

Troubleshooting ....................................... 52
Requesting Assistance or Service ........... 54
Warranty ................................................... 56

In the U.S.A. for assistance or service, call

the Consumer Assistance center:

1-800-422-1230

In Canada for assistance or service,

see page 56.

®

®

www.kitchenaid.com

9753308Av12(c63)

9/3/98, 4:24 PM

1

Summary of Contents for KERC507

Page 1: ...he kitchen timer 19 Oven settings 20 Cooking tips 21 Bake or Convection Bake 23 Broil 25 Convection Broil 27 Convection Roast 28 Adjusting oven temperature 30 Using the temperature probe 31 Using Convect Full Meal 34 Timed cooking 36 Dehydrating 39 Raising proofing bread 41 Cleaning your oven and controls 45 Oven lights 47 Resetting circuit breakers 47 Using the Self Cleaning Cycle 48 Setting cont...

Page 2: ...230 in Canada 1 800 461 5681 or request service for your appliance you need to know your complete model number and serial number You can find this information on the model and serial number plate see diagram on page 6 for location of plate Please also record the purchase information NOTE You must provide proof of purchase or installation date for in warranty service Keep this book and the sales sl...

Page 3: ... how to reduce the chance of injury and tell you what can happen if the instructions are not followed wDANGER wWARNING The anti tip bracket The range will not tip during normal use However tipping can occur if you apply too much force or weight to the open door without the anti tip bracket properly secured wWARNING Tip Over Hazard A child or adult can tip the range and be killed Connect anti tip b...

Page 4: ...NS SAVE THESE INSTRUCTIONS Do Not Use Water on Grease Fires Smother fire or flame or use dry chemi cal or foam type extinguisher Use Only Dry Potholders Moist or damp potholders on hot surfaces may result in burns from steam Do not let potholder touch hot heating elements Do not use a towel or other bulky cloth DO NOT TOUCH SURFACE UNITS OR AREAS NEAR UNITS Surface units may be hot even though the...

Page 5: ...y cause container to burst and result in injury Keep Oven Vent Ducts Unobstructed Placement of Oven Racks Always place oven racks in desired location while oven is cool If rack must be moved while oven is hot do not let potholder contact hot heating element in oven DO NOT TOUCH HEATING ELEMENTS OR INTERIOR SURFACES OF OVEN Heating elements may be hot even though they are dark in color Interior sur...

Page 6: ...l element not shown Bake element Oven racks number may vary by model Cooktop light Anti tip bracket Removable storage drawer containing broiler pan and grid Model and serial number plate On Some Models Parts and Features Feature locations 1 2 3 4 5 6 7 8 9 O START CANCEL ENTER OFF START TIME CLOCK SET STOP TIME OVEN LIGHT CANCEL MIN HRS SET DELAY TIMED KITCHEN TIMER KITCHEN TIMER DELAY CLEAN DEHYD...

Page 7: ...ing the oven door 1 Holding the door by the handle place the top of the door under the cooktop overhang and use your leg to apply pressure to slide hinges into the slots as far as possible 2 Open door to the broil position or slightly past it 3 Using the side of your leg apply pressure to the bottom of the door front Lift the door slightly while applying pressure to push until the hinges have gone...

Page 8: ...t Replacing the storage drawer 1 Fit ends of drawer slide rails into the drawer guides on both sides of opening 2 Lift drawer front and press in until metal stops on drawer slide rails clear white stops on drawer guides Lift drawer front again to clear second stop and slide drawer closed Drawer slide rail You can remove the storage drawer to make it easier to clean under the range and to check for...

Page 9: ...e turned off HOT CHAUD CHAUD is French for HOT wWARNING Fire Hazard Turn off all controls when done cooking Failure to do so can result in death or fire Control setting guide For best results start cooking at the high setting then turn the control knob down to continue cooking OFF H I L O MED M E D H I M E D L O FRONT SETTING HI or MAX To start food cooking To bring liquid to a boil MED HI or 6 8 ...

Page 10: ...rticles left on the bottoms can leave deposits on the cooktop when it is heated Wiping off the cooktop before and after each use will help keep the surface free from stains and give you the most even heating See the Cleaning tips section Do not cook foods directly on the cooktop Lift pots and pans onto and off of the cooktop Sliding pots and pans on the cooktop could leave marks that are difficult...

Page 11: ...eating Can be coated with porcelain enamel Select a pan that is about the same size as the surface cooking area Cookware should not extend more than 1 inch 2 5 cm outside the area For best results and greater energy efficiency use only flat bottomed cookware that makes good contact with the surface cooking area Cookware with rounded warped ribbed such as some porcelain enamelware or dented bottoms...

Page 12: ...d electric coil elements Foods spilled directly on the cooktop will not burn off as on coil elements Because of this the surface should be dust free and soil free before heating Your cooktop has been prepolished at the factory for improved protection and cleanability The Cooktop Polishing Creme a paper towel or a sponge is all you need to clean your cooktop For proper cleaning methods please revie...

Page 13: ...er towel To order Cooktop Polishing Creme Part No 3184477 or razor scraper Part No 3183488 call 1 800 422 1230 in Canada 1 800 461 5681 and follow the instructions and telephone prompts you hear How to keep your cooktop looking like new IF THERE ARE Sugary spills and soils such as jellies and candy syrups Burned on soils Dark streaks specks and discoloration Metal marks from copper or aluminum pan...

Page 14: ...OFF H I L O MED M E D H I M E D L O FRONT OFF H I L O MED M E D H I M E D L O FRONT 4 Lift out the reflector bowl See the Cleaning your cooktop section for cleaning instructions 3 Pull the surface unit straight away from the receptacle Removing 1 Make sure all surface units are off and cool before removing surface units and reflector bowls 2 Lift the edge of the unit opposite the receptacle just e...

Page 15: ...ng your cooktop HOW TO CLEAN Spatters or spills will burn off Do not immerse in water Wipe off excess spills Wash rinse and dry thoroughly Do not put in oven during the self cleaning cycle Wash wipe with clean water and dry thoroughly Use nonabrasive plastic scrubbing pad on heavily soiled areas Do not use abrasive or harsh cleansers They may damage the finish NOTE Do not allow foods containing ac...

Page 16: ... ends Turn the tube approximately 90 in either direction until both ends come out of the receptacles Replace with a 20 watt cool white fluorescent tube If the cooktop light still does not work you may need to replace the starter The starter is a knob shaped part located on the right side of the backguard under the light bulb To remove and replace the starter first remove light bulb Push starter in...

Page 17: ...START CANCEL ENTER OFF START TIME CLOCK SET STOP TIME OVEN LIGHT CANCEL MIN HRS SET DELAY TIMED KITCHEN TIMER DELAY CLEAN DEHYD TIMED LOCKED ROTIS START MIN START STOP TIMER SEC MIN HR CLEAN ON BAKE BROIL CLEAN 1 2 3 4 5 6 7 8 9 O START CANCEL ENTER OFF MAXI ECONO BAKE BROIL CLEAN BAKE BROIL ROAST CONVECT FULL MEAL TEMP PROBE CONVECTION START TIME CLOCK SET STOP TIME OVEN LIGHT CANCEL MIN HRS SET ...

Page 18: ...RT ENTER Display clock When you first plug in the range a tone will sound and the display will show 88 88 If after you set the clock see the Setting the clock section the display again shows 88 88 your electricity was off for a while Reset the clock The time display will show Err and three short tones will sound if a time or tempera ture is incorrectly entered Canceling an operation CANCEL OFF wil...

Page 19: ... once to count down minutes and seconds PRESS twice to count down hours and minutes 2 Set time Example PRESS YOU SEE YOU SEE Example YOU SEE 3 Start Kitchen Timer PRESS The Kitchen Timer will begin counting down immediately after you press START ENTER When time is up you will hear a single tone that sounds every 5 seconds PRESS to turn off tone NOTE To change the end of timer tone to a 4 second to...

Page 20: ...p elements heat up For even heating the fan at the back of the oven circulates air in the oven cavity The bottom element and outer top element heat up For even heating and faster cook ing the fan at the back of the oven circulates air in the oven cavity The bottom element and outer top element heat up SETTING BAKE Use this setting for baking and heating casseroles BROIL MAXI ECONO Use this setting...

Page 21: ...ntered in the oven When using two racks place one rack in position 1 and the other rack in position 3 Use only one cookie sheet in the oven at a time when using the BAKE setting Bakeware tips When baking with insulated cookie sheets or baking pans place them in the bottom third of the oven You may need to increase the recommended baking times so test for doneness before removing from the oven When...

Page 22: ...aption chart in your convec tion oven cookbook for recommended temperatures For most recipes you can reduce con vection baking time compared to standard baking times See convection baking chart in your convection oven cookbook for recommended baking times NOTE Cooking time may be longer when you use more than one rack When baking on two or three racks use the convection bake setting for more even ...

Page 23: ...times and temperatures for most standard recipes when using the convection roast setting See convection roasting chart in your convection oven cookbook for recommended roasting times and temperatures Use the convection roasting rack on the broiler pan both included with your range The convection roasting rack rests on the broiler pan not inside it The long side of the rack should be parallel with ...

Page 24: ...LOCKED ROTIS START ON DELAY CLEAN DEHYD TIMED LOCKED ROTIS START ON 7 3 5 YOU SEE YOU SEE START ENTER DELAY CLEAN DEHYD TIMED LOCKED ROTIS START ON 4 Preheat oven PRESS NOTE After the temperature reaches 170 F 77 C the red display will show the actual oven temperature at each 5 F 3 C increase and stop at the set temperature To see the set temperature before it is reached press the command pad you ...

Page 25: ... removing food After broiling remove the pan from the oven when removing the food Drippings will bake on the pan if left in the heated oven making cleaning more difficult 4 3 2 1 5 Broiling rack positions Broil NOTE Preheating is not necessary when broiling 1 Position rack See Broiling chart for recommended rack positions 2 Put food in oven Place food on grid in broiler pan and place in center of ...

Page 26: ... broil 5 Set temperature optional Do this step if you want to use variable temperature broiling see that section Example PRESS Example YOU SEE Example YOU SEE 6 Start oven PRESS NOTE Leave the door partly open whenever using the oven to broil This allows the oven to maintain proper temperatures If you want to change the broiling temperature after broiling has begun repeat Steps 4 5 and 6 Example Y...

Page 27: ... lower broiling temperatures See the Broiling chart for temperature recommendations Example YOU SEE time of day Convection Broil Convection broiling is actually high tempera ture convection roasting Use this setting when broiling thick cuts of meat Results are similar to those you get when using a rotisserie 1 Position rack See the Broiling chart for recommended rack positions 2 Put food in oven P...

Page 28: ... the convection broiling temperature after broiling has begun repeat Steps 4 5 and 6 7 When broiling is over turn off oven PRESS Example YOU SEE Example YOU SEE time of day START ENTER MIN START STOP SEC MIN HR CLEAN DELAY CLEAN DEHYD TIMED LOCKED ROTIS START ON CANCEL OFF Convection Roast 1 Prepare oven Position the rack properly For correct rack placement see Rack positions Place food in the ove...

Page 29: ...change the roasting temperature after roasting has begun repeat Steps 2 3 and 4 CANCEL OFF MIN START STOP SEC MIN HR CLEAN START ENTER DELAY CLEAN DEHYD TIMED LOCKED ROTIS START ON 2 3 5 CONVECTION ROAST 2 Choose setting PRESS 3 Set temperature optional Do this step if you want to set a temperature other than 300 F 149 C Example PRESS See convection oven cookbook for temperature recommendations Us...

Page 30: ... temperature reading will change as your oven cycles DELAY CLEAN DEHYD TIMED LOCKED ROTIS START MIN START STOP TIMER SEC MIN HR CLEAN ON Example YOU SEE 0 the setting shown is set at the factory BAKE Using and Caring for Your Oven DELAY CLEAN DEHYD TIMED LOCKED ROTIS START MIN START STOP TIME SEC MIN HR CLEAN ON Adjustment 5 F cooler BAKE START ENTER MIN START STOP SEC MIN HR CLEAN Example YOU SEE...

Page 31: ...Open the Temperature Probe cover located on the left side of the oven wall Insert plug into jack Keep the top of the probe as far as possible from the heat source 4 Close oven door Using and Caring for Your Oven How to determine the amount of adjustment needed The following chart tells you how much to adjust the offset temperature to get the desired cooking results You can determine cooking result...

Page 32: ... optional Do this step if you want to set an internal food temperature from 100 F 200 F 38 93 C other than 160 F 71 C Example PRESS See a reliable cookbook or your convection oven cookbook for internal food temperature recommendations 7 Choose cook setting PRESS 8 Set temperature optional Do this step if you want to set an oven temperature other than the one displayed Example PRESS See a reliable ...

Page 33: ...probe temperature after cooking has begun repeat Steps 5 6 and 9 10 After cooking unplug probe One short tone will sound every minute to remind you cooking is done until you unplug the Temperature Probe 11 Remove food from oven This prevents overcooking 12 Clean probe Wash with a soapy sponge and dry thoroughly Use a plastic scouring pad to remove cooked on foods You can also clean the probe in a ...

Page 34: ...re pressing START ENTER by repeating Step 2 3 Start oven PRESS NOTE Cycles 1 4 9 0 To see the time when the CONVECT FULL MEAL cycle will end press STOP TIME When the Convect Full Meal cycle is done End and the time of day will show in the display Four tones will sound followed by one short tone every minute until you open the door remove the probe or press CANCEL OFF CONVECT FULL MEAL 1 START ENTE...

Page 35: ...325 F 163 C 400 F 204 C Using and Caring for Your Oven Bakeware choices Baking performance is affected by the type of bakeware used Use the bakeware size recommended in the recipe BAKEWARE TYPE Light colored aluminum Light golden crusts Even browning Use temperature and time recommended in recipe Dark aluminum and other bakeware with dark dull and or non stick finish Brown crisp crusts May reduce ...

Page 36: ...operly and place the food in the oven For correct rack placement see the Rack positions section and Rack placement chart wWARNING Food Poisoning Hazard Do not let food sit in oven more than one hour before or after cooking Doing so can result in food poisoning or sickness 2 Choose setting PRESS BAKE ROAST CONVECTION BAKE CONVECTION OR OR Example For Convection Roast YOU SEE DELAY CLEAN DEHYD TIMED...

Page 37: ... STOP TIME SEC MIN HR CLEAN ON START ENTER 5 Start oven PRESS When baking roasting is done End and the time of day will show in the display Four tones will sound followed by one short tone every minute until you open the door or press CANCEL OFF Example YOU SEE time of day STOP TIME 4 Set STOP TIME PRESS Example YOU SEE time of day To delay start and stop automatically 1 Prepare oven Position the ...

Page 38: ...TIME PRESS Example PRESS STOP TIME 0 3 0 DELAY CLEAN DEHYD TIMED LOCKED ROTIS START MIN START STOP TIME SEC MIN HR CLEAN ON DELAY CLEAN DEHYD TIMED LOCKED ROTIS START MIN START STOP TIME SEC MIN HR CLEAN ON Example YOU SEE time of day Example YOU SEE Using and Caring for Your Oven 3 Set temperature optional Do this step if you want to set a tempera ture other than the one displayed Example PRESS S...

Page 39: ...pacer or contact a local store handling specialty cookware NOTE To learn detailed information about dehydration refer to a book written specifically about dehydrating and or preserving foods continued on next page Dehydration spacer Oven light plunger 4 Position door Attach the dehydration spacer which is specially designed to depress the oven light plunger and maintain the operation of the fan du...

Page 40: ...START ON Example YOU SEE CONVECTION BAKE 2 1 5 DELAY CLEAN DEHYD TIMED LOCKED ROTIS START ON START ENTER DELAY CLEAN DEHYD TIMED LOCKED ROTIS START ON Example YOU SEE Example YOU SEE Example YOU SEE time of day CANCEL OFF MIN START STOP SEC MIN HR CLEAN 8 When dehydrating is done turn off oven PRESS Raising proofing bread You can use your convection oven to proof bread First proofing Place the dou...

Page 41: ...y with plastic wrap sprayed with cooking spray Put the pans on Rack 2 Place the broiler pan on Rack 1 and fill with 2 cups of boiling water Close the oven door Follow Steps 2 through 4 outlined in the First proofing When proofing is done remove bread dough and broiler pan containing water from the oven Reset oven to preheat for baking bread Before baking remove plastic wrap from the bread dough DE...

Page 42: ...0 F 204 C 350 F 177 C 450 F 232 C 400 F 232 C 400 F 232 C 350 F 177 C 30 40 12 15 10 15 20 25 20 25 60 75 25 30 30 40 20 30 35 45 34 45 2 21 2 hrs 25 35 10 15 12 18 10 15 20 30 12 15 50 60 5 6 hrs 35 40 75 45 60 30 40 40 60 60 90 50 60 35 40 30 40 10 12 25 30 40 50 10 15 FOOD Breads yeast loaf rolls pan Breads quick biscuits muffins popovers nut bread gingerbread Cakes angel food layer cake loaf s...

Page 43: ...4 1 8 kg 10 16 lbs 4 5 7 3 kg 18 25 lbs 8 2 11 3 kg 3 4 lbs 1 4 1 8 kg 5 6 lbs 2 3 2 7 kg MEAT THERMOMETER TEMPERATURE 140 F 60 C 160 F 71 C 170 F 77 C 140 F 60 C 160 F 71 C 170 F 77 C 160 F 71 C 170 F 77 C 140 F 60 C 150 155 F 66 68 C 180 F 82 C 170 F 77 C 170 F 77 C 185 F 85 C 130 F 54 C 130 F 54 C 185 F 85 C 170 180 F 77 82 C 170 180 F 77 82 C 170 F 77 C 170 F 77 C MEAT Beef rolled rib rare med...

Page 44: ...ferences APPROXIMATE TOTAL TIME MINUTES 16 21 25 23 28 8 12 18 20 10 12 20 22 25 28 8 32 20 20 22 10 12 TEMPERATURE 500 F 260 C 500 F 260 C 500 F 260 C 400 F 204 C 500 F 260 C 500 F 260 C 450 F 232 C 500 F 260 C 500 F 260 C 350 F 177 C 350 F 177 C 350 F 177 C RACK POSITION 4 4 5 4 4 4 4 4 3 3 3 4 MEAT Steak 1 2 54 cm thick rare medium well done Steak 11 2 3 815 cm thick rare medium Hamburger patti...

Page 45: ...nsers They may damage the finish of the knobs Replace knobs Make sure all knobs point to OFF Wash wipe with clean water and dry thoroughly Do not use steel wool or abrasive cleansers They may damage the finish Do not spray cleaner directly on panel Apply cleaner to paper towel NOTE Make sure you have not turned the oven on when cleaning panel If you have press the Cancel Off pad Wash wipe with cle...

Page 46: ... scrubbing pad Self Cleaning cycle Cleaning Stainless Steel Surfaces door and drawer front Do not use steel wool or soap filled scouring pads Rub in the direction of the grain line to avoid marring the surface Always wipe dry to avoid water marks If commercial cleaners are used follow label directions If product contains chlorine bleach rinse thoroughly and dry with a soft lint free cloth Chlorine...

Page 47: ...cket Replace light bulb with a 40 watt appliance bulb 4 Replace bulb cover by screwing it in clockwise 5 Plug in range or reconnect power Replacing halogen oven lights located on each side of oven 1 Unplug range or disconnect power 2 Remove glass light cover by grasping front edge of cover and pulling it away from side wall of oven 3 Remove light bulb from socket Replace with 12 volt 5 watt maximu...

Page 48: ... want them to remain shiny You can clean racks in the Self Cleaning cycle but they will discolor and become harder to slide If you clean racks in the Self Cleaning cycle place them on the rack guides Heat and odors are normal during the Self Cleaning cycle Keep the kitchen well ventilated by opening a window or by turning on a vent hood or other kitchen vent during the cycle IMPORTANT The health o...

Page 49: ...ou want to change the clean ing time after cleaning has begun repeat Steps 1 3 Press CLEAN to see cleaning time remaining To delay clean using start time 1 Choose CLEAN setting PRESS A 3 hour Self Cleaning cycle will be set NOTE You cannot open the door when LOCKED is on CLEAN DELAY CLEAN DEHYD TIMED ROTIS START MIN START STOP TIME SEC MIN HR CLEAN ON YOU SEE Example YOU SEE 0 4 0 START ENTER CLEA...

Page 50: ...ted When the oven cools to normal baking roasting temperatures Example YOU SEE Example YOU SEE time of day Example YOU SEE time of day Example YOU SEE time of day 0 4 0 DELAY CLEAN DEHYD TIMED ROTIS START MIN START STOP TIME SEC MIN HR CLEAN CLEAN MIN START STOP TIME SEC MIN HR DELAY CLEAN DEHYD TIMED LOCKED ROTIS START MIN START STOP TIME SEC MIN HR CLEAN ON START ENTER START TIME 0 3 0 DELAY CLE...

Page 51: ... hour Self Cleaning cycle However the cycle time can be adjusted to the amount of soil in your oven The cycle can be set anywhere between 2 and 4 hours See the Setting the controls section The graph at the right is representative of a normal 3 hour Self Cleaning cycle Note that the heating stops when the 3 hour setting is up but it takes longer for the oven to cool enough to unlock DELAY CLEAN DEH...

Page 52: ... knobs correctly You are not pushing in before turning You have programmed a delayed start time WHAT TO DO Wire the unit into a live circuit with proper voltage See Installation Instructions Replace household fuse or reset circuit breaker Refer to the section in this manual describing the function you are operating Wait for the start time to be reached or cancel and reset the controls Replace hous...

Page 53: ...rect size Oven rack is set too low Oven temperature set too high Range is not level Food improperly placed in oven Batter not level in pan Filling requires more baking time than crust Increase baking or roasting time Increase oven temperature 25 F 14 C Preheat oven to selected tempera ture before placing food in when preheating is recommended Choose bakeware that will allow 2 inches 5cm of air spa...

Page 54: ...where in the United States To locate the authorized KitchenAid service company in your area you can also look in your telephone directory Yellow Pages If you need replacement parts If you need to order replacement parts we recommend that you only use factory authorized parts These parts will fit right and work right because they are made with the same precision used to build every new KITCHENAID a...

Page 55: ...itchenAid CanadaAppliance Service Consumer Services Direct service branches BRITISH COLUMBIA 1 800 665 6788 ALBERTA 1 800 661 6291 ONTARIO Ottawa area 1 800 267 3456 except 807 area code Outside the Ottawa area 1 800 807 6777 MANITOBA SASKATCHEWAN 1 800 665 1683 and 807 area code in ONTARIO QUEBEC Montreal except South Shore 1 800 361 3032 South Shore Montreal 1 800 361 0950 Quebec City 1 800 463 ...

Page 56: ...h local electrical codes D Any labor costs during the limited warranties E Replacement parts or repair labor costs for units operated outside the United States and Canada F Pickup and delivery This product is designed to be repaired in the home G Repairs to ceramic glass cooktop if it has not been cared for as recom mended in this Use and Care Guide H Repairs to parts or systems resulting from una...

Page 57: ...oge 21 Utilisation de la minuterie 21 Réglages du four 23 Conseils pour la cuisson 24 Cuisson au four avec ou sans convection 26 Cuisson au gril 28 Cuisson au gril par convection 30 Rôtissage par convection 31 Réglage de la température du four 33 Utilisation de la sonde thermométrique 34 Préparation d un repas complet par convection 37 Cuisson commandée par la minuterie 41 Déshydratation 44 Montée...

Page 58: ...eurs au 1 800 422 1230 aux É U ou 1 800 461 5681 au Canada pour des services de réparation concernant votre appareil électroménager vous devez nous communiquer le numéro de modèle et le numéro de série de l appareil Cette infor mation est indiquée sur la plaque signalétique voir l emplacement sur le schéma de la page 7 Veuillez aussi inscrire les renseignements concernant l achat REMARQUE Pour le ...

Page 59: ... produire en cas de non respect des instructions wDANGER wAVERTISSEMENT La bride antibasculement Dans les conditions de service normales la cuisinière ne bascule pas Elle peut cependant basculer si une force ou un poids excessif est appliqué sur la porte ouverte alors que la bride antibasculement n est pas convenablement fixée wAVERTISSEMENT Risque de basculement Un enfant ou une personne adulte p...

Page 60: ... Porter des vêtements appropriés Des vêtements amples ou détachés ne doivent jamais être portés pendant l utilisation de la cuisinière Entretien par l utilisateur Ne pas réparer ou remplacer toute pièce de la cuisinière si ce n est pas spécifiquement recommandé dans le manuel Toute autre opération d entretien ou de réparation doit être confiée à un technicien qualifié Remisage dans la cuisinière o...

Page 61: ...ment des poignées des ustensiles Pour réduire les risques de brûlures d inflammation de produits com bustibles et de renversement dus à l entrechoquement non intentionnel des ustensiles la poignée d un ustensile doit être positionnée de sorte qu elle est tournée vers l intérieur et non au dessus des éléments de surface adjacents Ne pas tremper les éléments de chauffage amovibles les éléments de ch...

Page 62: ... hublots des portes du four Pour les cuisinières avec programme d autonettoyage Ne pas nettoyer le joint de la porte Le joint de la porte est essentiel pour l étanchéité Veiller à ne pas frotter endommager ou déplacer le joint Ne pas utiliser des produits commerciaux de nettoyage de four On ne doit pas utiliser un produit commercial de nettoyage de four ou un enduit de protection des surfaces inte...

Page 63: ...éro de modèle et numéro de série Sur certains modèles 1 2 3 4 5 6 7 8 9 O START CANCEL ENTER OFF START TIME CLOCK SET STOP TIME OVEN LIGHT CANCEL MIN HRS SET DELAY TIMED KITCHEN TIMER DELAY CLEAN DEHYD DEHYD TIMED TIMED LOCKED LOCKED ROTIS ROTIS START MIN MIN START STOP TIMER SEC MIN MIN HR CLEAN ON BAKE BROIL CLEAN OFF H I L O MED M E D H I M E D L O FRONT REAR OFF H I L O MED M E D H I M E D L O...

Page 64: ...t situé sous l élément arrière gauche à la surface On ne peut pas cuire sur cet élément ou garder des aliments chauds sur cet élément lorsque le four fonctionne L évent est requis pour la circulation de l air Ne pas obstruer l évent en utilisant des marmites ou des couvercles de grande taille Ceci susciterait une médiocre performance de cuisson au four ou de rôtissage REMARQUE Les ustensiles en pl...

Page 65: ...r faciliter les opérations de nettoyage sous la cuisinière et pour contrôler l installation de la bride antibasculement Manipuler le tiroir avec soin Le tiroir de remisage Pièces et caractéristiques La porte du four 4 Réinstallation de la porte du four 1 En tenant la porte par la poignée placer le sommet de la porte sous le rebord de la table de cuisson et utiliser votre jambe pour appuyer afin de...

Page 66: ...T CHAUD HOT est CHAUD en anglais Guide de réglage des boutons de commande Pour l obtention des meilleurs résultats commencer la cuisson au réglage de la puissance de chauffage maximale ensuite réduire la puissance de chauffage pour continuer la cuisson OFF H I L O MED M E D H I M E D L O FRONT RÉGLAGE HI ou MAX Pour commencer la cuisson d aliments Pour porter un liquide à ébullition MED HI ou 6 8 ...

Page 67: ...r la table de cuisson lorsqu elle est chauffée L essuyage de la table de cuisson avant et après chaque utilisation aidera à garder la surface exempte de taches et vous donnera le chauffage le plus uniforme Voir la section Conseils pour le nettoyage Ne pas faire cuire des aliments directement sur la table de cuisson Soulever les ustensiles et les casseroles pour les placer et les enlever de la tabl...

Page 68: ...petites rainures de dilatation peuvent être utilisés Les ustensiles de cuisson avec fini non adhésif comportent les caractéristiques de chauffage du matériau de base Vérifier s il existe des endroits rugueux sur la base de votre récipient en métal ou en verre qui pourraient égratigner la surface en vitrocéramique Utiliser des ustensiles de cuisson avec fond plat pour la meilleure transmission de c...

Page 69: ...pour une cuisson lente Peut être émaillé en porcelaine Céramique ou vitrocéramique Chauffe lentement et inégalement S utilise pour les réglages bas à moyen Suivre les instructions du fabricant Cuivre Chauffe très rapidement et également Utilisé comme base dans les ustensiles de cuisson pour fournir un chauffage égal Marmite en terre cuite Peut être utilisée pour la cuisson sur une table de cuisson...

Page 70: ... installation d une trousse pour la préparation des conserves Commandez la trousse n de pièce 242905 de votre marchand ou composer 1 800 422 1230 aux É U 1 800 461 5681 au Canada et suivre les instructions et les explications que vous entendrez au téléphone Alterner l emploi des éléments de la surface de cuisson entre les quantités ou préparer de petites quantités à la fois Commencer avec de l eau...

Page 71: ...ARQUE Pour éviter des marques ou des taches on doit toujours essuyer et faire sécher parfaitement la table de cuisson complètement après l utilisation d un produit de nettoyage Comment garder la surface de cuisson comme neuve S IL Y A Renversement de matières et souillures sucrées comme confitures et sirops à confiserie Souillures cuites Taches et rayures sombres et changement de couleur Marques m...

Page 72: ... les instructions de nettoyage 3 Retirer l élément de surface directement hors du connecteur Enlèvement 1 S assurer que tous les éléments de surface sont éteints et refroidis avant d enlever les éléments de surface et les cuvettes réfléchissantes 2 Soulever le bord de l élément opposé au connecteur juste assez pour éviter la cuvette réfléchissante Utilisation et entretien de la table de cuisson En...

Page 73: ...sante Cette chaleur supplémentaire peut la décolorer Nettoyage de la table de cuisson MODE DE NETTOYAGE Les taches ou renversements s élimineront en brûlant Ne pas immerger dans l eau Essuyer l excès des renversements Laver rincer et sécher à fond Ne pas mettre dans le four durant le programme d auto nettoyage Laver et essuyer avec de l eau propre et sécher à fond Utiliser un tampon à récurer en p...

Page 74: ...n sens ou dans l autre pour libérer les deux extrémités de leurs connecteurs Remplacer avec un tube fluorescent de type Cool White de 20 watts Si le luminaire de la table de cuisson ne fonctionne toujours pas il peut être nécessaire de remplacer le dispositif d allumage Il s agit d une pièce en forme de bouton située au côté droit de la plaque de protection sous le tube fluorescent Pour enlever et...

Page 75: ...les pour cuisson thermique 1 2 3 4 5 6 7 8 9 O START CANCEL ENTER OFF START TIME CLOCK SET STOP TIME OVEN LIGHT CANCEL MIN HRS SET DELAY TIMED KITCHEN TIMER DELAY CLEAN DEHYD TIMED LOCKED ROTIS START MIN START STOP TIMER SEC MIN HR CLEAN ON BAKE BROIL CLEAN 1 2 3 4 5 6 7 8 9 O START CANCEL ENTER OFF MAXI ECONO BAKE BROIL CLEAN BAKE BROIL ROAST CONVECT FULL MEAL TEMP PROBE CONVECTION START TIME CLO...

Page 76: ...puyer sur la touche START ENTER pour commander la mise en marche Si on n appuie pas sur START ENTER dans l intervalle de 5 secondes après la programmation START apparaîtra sur l afficheur à titre de rappel START ENTER Afficheur horloge Lors du branchement initial de la cuisinière l appareil émettra un signal sonore et l afficheur indiquera 88 88 Si après le réglage de l horloge voir la section Rég...

Page 77: ...et secondes APPUYER SUR deux fois pour le compte à rebours des heures et minutes 2 Réglage de l heure Exemple APPUYER SUR Exemple AFFICHAGE Exemple AFFICHAGE Si l heure n a pas été entrée correctement l appareil émettra trois brefs signaux sonores et l afficheur indiquera Err pen dant 1 seconde L afficheur précédent réapparaîtra ensuite Répéter les étapes 1 2 et 3 pour entrer de nouveau l heure co...

Page 78: ...our supprimer le signal sonore REMARQUE Pour changer le signal sonore de la fin de la durée de la minuterie à un signal de 4 secondes appuyer et tenir la touche de réglage de la minuterie pendant 4 secondes Un court signal sera entendu pour vous dire que le signal a été changé Annulation du minutage de la minuterie APPUYER SUR AFFICHAGE MIN START STOP TIMER HR CLEAN START ENTER TIMER CANCEL KITCHE...

Page 79: ... de viande épais Lors de l utilisation de la fonction Maxi Broil les deux éléments supérieurs chauffent effet de brunissage maxi mum Lors de l utilisation de la fonction Econo Broil seul l élément interne chauffe effet de brunissage dans la zone centrale seulement Pour accélérer le préchauffage l élément inférieur et l élément supérieur externe chauffent jusqu à ce que la température du four attei...

Page 80: ...cuisson appropriée suivre les directives suivantes Lors de l utilisation d une seule grille placer la grille de telle manière que le sommet du mets soit centré dans le four Lors de l utilisation de deux grilles placer une grille à la position 1 et l autre grille à la position 3 Utiliser une seule tôle à biscuits lors de l emploi de la fonction de cuisson au four BAKE Conseils pour le choix des ust...

Page 81: ...ion pour les températures recommandées Pour la plupart des recettes on peut réduire la durée de cuisson au four par convection par comparaison aux temps de cuisson standard Voir tableau de cuisson par convection dans votre livre de recettes pour cuisson au four par convection pour les durées de cuisson recommandées REMARQUE Lorsqu on utilise plus d une grille la durée de cuisson peut être augmenté...

Page 82: ...ecettes ordinaires lors de l utilisation du réglage de rôtissage par convection Voir le tableau de rôtissage par convection dans votre livre de recettes de cuisson au four par convection pour les durées et les températures de rôtissage recommandées Utiliser la grille de rôtissage par convec tion sur la lèchefrite ces deux articles sont fournis avec la cuisinière La grille de rôtissage par convecti...

Page 83: ...ELAY CLEAN DEHYD TIMED LOCKED ROTIS START ON DELAY CLEAN DEHYD TIMED LOCKED ROTIS START ON 7 3 5 4 Préchauffer le four APPUYER SUR REMARQUE Lorsque la température atteint 77 C 170 F l afficheur rouge indique la température réelle du four à chaque augmentation de 3 C 5 F et s arrêtera à la température réglée Pour voir la température réglée avant qu elle soit atteinte appuyer sur la touche de comman...

Page 84: ...Positions de la grille pour la cuisson au gril Cuisson au gril REMARQUE Un préchauffage n est pas nécessaire pour la cuisson au gril 1 Positionner la grille Voir Tableau de cuisson au gril pour les positions recommandées des grilles 2 Placer l aliment dans le four Déposer la nourriture sur la grille de la lèchefrite puis mettre la grille dans la lèchefrite pour la cuisson au gril Grille de la lèch...

Page 85: ... Cuisson au gril APPUYER SUR une fois pour MAXI BROIL APPUYER SUR deux fois pour ECONO BROIL Exemple AFFICHAGE Exemple AFFICHAGE AFFICHAGE AFFICHAGE BROIL MAXI ECONO DELAY CLEAN DEHYD TIMED LOCKED ROTIS START ON MAXI BROIL OU BROIL MAXI ECONO BROIL MAXI ECONO DELAY CLEAN DEHYD TIMED LOCKED ROTIS START ON ECONO BROIL DELAY CLEAN DEHYD TIMED LOCKED ROTIS START ON DELAY CLEAN DEHYD TIMED LOCKED ROTIS...

Page 86: ...ture Exemple AFFICHAGE heure du jour Utilisation et entretien du four Cuisson au gril par convection La cuisson au gril par convection est en fait une opération de rôtissage par convection à haute température Utiliser ce réglage pour la cuisson au gril de morceaux de viande épais Les résultats sont semblables à ceux obtenus lors de l utilisation d une rôtissoire avec tournebroche 1 Positionner les...

Page 87: ...mpérature de cuisson au gril par convection après le début répéter les étapes 4 5 et 6 7 Lorsque l opération de cuisson au gril est terminée éteindre le four APPUYER SUR Exemple AFFICHAGE Exemple AFFICHAGE heure du jour START ENTER MIN START STOP SEC MIN HR CLEAN DELAY CLEAN DEHYD TIMED LOCKED ROTIS START ON CANCEL OFF Rôtissage par convection 1 Préparer le four Positionner la grille au bon emplac...

Page 88: ...SUR 3 Choisir la température facultatif Exécuter cette étape si vous désirez choisir une température autre que 149 C 300 F Exemple APPUYER SUR Voir livre de recettes pour cuisson au four par convection pour les recommandations de température Exemple AFFICHAGE Si on désire changer la température de rôtissage après le début de la cuisson répéter les étapes 2 3 et 4 Exemple AFFICHAGE heure du jour CA...

Page 89: ...s de cuisson au four rôtissage il est possible de corriger la température conformément à la méthode ci dessous Le système de commande se souviendra de la correction de température choisie après une interruption ou une panne d électricité 1 Choisir le réglage BAKE Cuisson au four APPUYER SUR et tenir pendant 4 secondes Lâcher la touche BAKE lorsqu un chiffre apparaît sur l afficheur de température ...

Page 90: ... 3 Connecter la sonde thermométrique au four Ouvrir le couvercle de la sonde thermométrique sur le côté gauche de la paroi du four Insérer la fiche dans le connecteur Veiller à ce que le sommet de la sonde soit aussi loin que possible de la source de chaleur Utilisation et entretien du four Comment déterminer la correction de température nécessaire Le tableau ci contre indique les corrections de t...

Page 91: ...lle affichée Exemple APPUYER SUR Consulter un livre de recettes fiable ou le livre de cuisson au four par convection pour les recommandations de température REMARQUE Ne pas utiliser la sonde thermométrique lors de la cuisson au gril ou de la cuisson au gril par convection 5 Choisir le réglage pour la sonde thermométrique APPUYER SUR TEMP PROBE DELAY CLEAN DEHYD TIMED LOCKED ROTIS START MIN START S...

Page 92: ...rique 11 Retirer l aliment du four Pour éviter une cuisson excessive 12 Nettoyer la sonde Laver la sonde thermométrique avec une éponge savonneuse et essuyer parfaitement Utiliser un tampon à récurer en plastique pour enlever les résidus alimentaires cuits sur la sonde On peut également laver la sonde au lave vaisselle START ENTER DELAY CLEAN DEHYD TIMED LOCKED ROTIS START MIN START STOP TIMER SEC...

Page 93: ...s étapes 1 à 4 de la section Utilisation de la sonde thermométrique 2 Choisir le programme CONVECT FULL MEAL Repas complet par convection APPUYER SUR Appuyer sur la touche numérique désirée Exemple APPUYER SUR Utiliser le tableau de Repas complet par convection comme guide pour choisir le programme correct REMARQUES On peut changer le programme de repas complet par convection à tout moment avant d...

Page 94: ...t l heure du jour apparaîtront sur l afficheur Quatre signaux seront entendus suivis par un signal sonore bref à chaque minute jusqu à ce qu on ouvre la porte enlève la sonde ou appuie sur la touche CANCEL OFF Annulation Arrêt Exemple pour réglage Auto 5 AFFICHAGE Exemple AFFICHAGE START ENTER DELAY CLEAN DEHYD TIMED LOCKED ROTIS START MIN START STOP TIMER SEC MIN HR CLEAN ON DELAY CLEAN DEHYD TIM...

Page 95: ...r seulement Repas n 4 ragoût de boeuf pommes de terre en tranches tarte aux fruits congelée Rôti de boeuf saignant Rôti de boeuf à point Rôti de boeuf bien cuit rôti de porc pain de viande Mets en sauce Pot au feu avec légumes 3 lb Pizza NUMÉRO DU PROGRAMME 1 2 3 4 5 6 7 8 9 0 FONCTION PAR CONVECTION Cuisson conv Cuisson conv Cuisson conv Cuisson conv Rôtissage conv Rôtissage conv Rôtissage conv C...

Page 96: ...R Croûtes légèrement dorées Brunissement égal Croûtes brunes croustillantes Croûtes brunes croustillantes Brunissage faible ou non existant à la base Croûtes dorées légères Brunissage inégal Croûtes croustillantes DIRECTIVES Utiliser la température et la durée recommandées dans la recette Peut réduire la température de cuisson de 14 C 25 F Utiliser la durée de cuisson suggérée Utiliser la températ...

Page 97: ...du four au bon emplacement et placer l aliment dans le four Pour l emplacement correct de la grille voir la section Position des grilles et le Tableau de l emplacement des grilles 2 Choisir le réglage APPUYER SUR BAKE ROAST CONVECTION BAKE CONVECTION OR OR Exemple pour le rôtissage par convection AFFICHAGE DELAY CLEAN DEHYD TIMED LOCKED ROTIS START ON Utilisation et entretien du four 3 Régler la t...

Page 98: ...aque minute jusqu à ce que l utilisateur ouvre la porte ou appuie sur la touche CANCEL OFF Exemple AFFICHAGE heure du jour STOP TIME 4 Régler l heure d arrêt STOP TIME APPUYER SUR Exemple AFFICHAGE heure du jour Pour différer la mise en marche et l arrêt automatiquement 1 Préparer le four Positionner convenablement la ou les grilles du four au bon emplacement et placer l aliment dans le four Pour ...

Page 99: ...AGE START TIME DELAY CLEAN DEHYD TIMED LOCKED ROTIS START MIN START STOP TIME SEC MIN HR CLEAN ON DELAY CLEAN DEHYD TIMED LOCKED ROTIS START MIN START STOP TIME SEC MIN HR CLEAN ON 0 1 0 5 Choisir l heure de fin de cuisson STOP TIME APPUYER SUR Exemple APPUYER SUR DELAY CLEAN DEHYD TIMED LOCKED ROTIS START MIN START STOP TIME SEC MIN HR CLEAN ON Exemple AFFICHAGE heure du jour Exemple AFFICHAGE ST...

Page 100: ...du jour Nombre de grilles 1 grille 2 grilles 3 grilles Utiliser la posi tion de la grille dans le four 3 2 et 4 1 3 et 5 Déshydratation Fours à cuisson Thermal Convection On peut utiliser le four à convection pour déshydrater une variété d aliments 1 Préparer les aliments Préparer les aliments conformément aux recommandations de la recette 2 Répartir les aliments sur les grilles de séchage Les gri...

Page 101: ...entre le châssis du four et la porte du four permettant à la vapeur d eau de s échapper La pièce d espacement pour la déshydratation n de pièce 814166 ou le nécessaire de déshydratation qui comprend les grilles et la pièce d espacement n de pièce 4395974 peuvent être commandés de votre marchand local KitchenAid ou en composant 1 800 422 1230 aux É U ou 1 800 461 5681 au Canada et en suivant les in...

Page 102: ...églage CONVECTION BAKE APPUYER SUR CONVECTION BAKE pendant 2 secondes 3 Régler la température Régler la température à 38 C 100 F Exemple APPUYER SUR 4 Mettre le four en marche Laisser la pâte lever jusqu à ce qu elle ait presque doublé de taille La durée de levée peut être plus rapide et dépendra du type et de la quantité de pâte Vérifier la pâte au bout de 20 à 25 minutes APPUYER SUR DELAY CLEAN ...

Page 103: ... plastique sur laquelle on a vaporisé un liquide de cuisson Placer les moules sur la grille 2 Placer la lèchefrite sur la grille 1 et y verser deux tasses d eau bouillante Fermer la porte du four Suivre les étapes 2 à 4 inclusivement décrites dans la Première levée Une fois que la pâte a levé la retirer du four ainsi que la lèchefrite contenant de l eau Régler de nouveau le four à préchauffage pou...

Page 104: ...F 204 C 400 F 2041 C 400 F 177 C 350 F 30 40 12 15 10 15 20 25 20 25 60 75 25 30 30 40 20 30 35 45 34 45 2 21 2 hrs 25 35 10 15 12 18 10 15 20 30 12 15 50 60 5 6 hrs 35 40 75 45 60 30 40 40 60 60 90 50 60 35 40 30 40 10 12 25 30 40 50 10 15 ALIMENTS Pains levure pain brioches Pains rapides biscuits muffins popovers pain aux noix pain au gingembre Gâteaux gâteau des anges gâteau à étages gâteau épo...

Page 105: ...1 8 kg 3 4 lb 4 5 7 3 kg 10 16 lb 8 2 11 3 kg 18 25 lb 1 4 1 8 kg 3 4 lb 2 3 2 7 kg 5 6 lb TEMPÉRATURE DU THERMOMÈTRE À VIANDE 60 C 140 F 71 C 160 F 77 C 170 F 60 C 140 F 71 C 160 F 77 C 170 F 71 C 160 F 77 C 170 F 60 C 140 F 66 68 C 150 155 F 82 C 180 F 77 C 170 F 77 C 170 F 85 C 185 F 54 C 130 F 54 C 130 F 85 C 185 F 77 82 C 170 180 F 77 82 C 170 180 F 77 C 170 F 77 C 170 F VIANDES Boeuf côtes r...

Page 106: ...es directives seulement et peuvent être ajustées selon les goûts individuels DURÉE APPROXIMATIVE TOTALE MINUTES 16 21 25 23 28 8 12 18 20 10 12 20 22 25 28 8 32 20 20 22 10 12 TEMPÉRATURE 260 C 500 F 260 C 500 F 260 C 500 F 204 C 400 F 260 C 500 F 260 C 500 F 232 C 450 F 260 C 500 F 260 C 500 F 177 C 350 F 177 C 350 F 177 C 350 F POSITION DE LA GRILLE 4 4 5 4 4 4 4 4 3 3 3 4 VIANDES Steak 3 cm 1 p...

Page 107: ...oduit de nettoyage abrasif Ces produits peuvent endommager la finition Ne pas pulvériser le produit de nettoyage directement sur le tableau de commande Appliquer le produit sur un essuie tout en papier REMARQUE S assurer que vous n avez pas allumé le four lors du nettoyage du tableau de commande Dans ce cas appuyer sur la touche Cancel Off Laver rincer avec de l eau propre et bien sécher Utiliser ...

Page 108: ... du programme d autonettoyage Nettoyage des surfaces en acier inoxydable porte devant du tiroir et console à l arrière sur certains modèles Ne pas utiliser des tampons en laine d acier ou des tampons à récurer garnis de savon Frotter dans le sens de la ligne du grain pour éviter de marquer la surface Toujours bien sécher pour éviter les marques d eau Si des produits de nettoyage commerciaux sont u...

Page 109: ...ise de courant Utilisation et entretien du four Remplacement des lampes de four halogènes de chaque côté du four 1 Débrancher la cuisinière ou interrompre le courant électrique 2 Ôter le couvercle en verre sur l ampoule en saisissant le bord avant du couvercle et en le retirant hors de la paroi latérale du four 3 Retirer l ampoule de la douille Remplacer par une ampoule à halogène 12 volts 5 watts...

Page 110: ...gir le sucre avec la porcelaine Ceci peut causer des tâches blanchâtres des marques ou des piqûres Retirer les grilles du four si on veut qu elles demeurent brillantes On peut soumettre les grilles à l opération d autonettoyage mais elles subiront un changement de couleur et leur coulissement deviendra plus difficile Si les grilles sont soumises au traitement d autonettoyage placer les grilles sur...

Page 111: ... fumée que d habitude Ne pas obstruer l évent du four au cours de l opération d autonettoyage Pour l obtention des meilleurs résultats de nettoyage l air doit pouvoir circuler librement Ne pas laisser d ustensiles de plastique sur la table de cuisson Le plastique peut fondre Retirer tout article combustible tel que les serviettes de papier du tiroir de remisage Ceci comprend les ustensiles à poign...

Page 112: ...UE Si on désire changer la durée de nettoyage après le commence ment du nettoyage répéter les étapes 1 à 3 Appuyer sur CLEAN pour voir le temps de nettoyage qui reste Pour différer l heure de com mencement de l autonettoyage 1 Choisir le réglage CLEAN Autonettoyage APPUYER SUR Un programme d autonettoyage de 3 heures sera réglé REMARQUE On ne peut pas ouvrir la porte lorsque le réglage LOCKED Exem...

Page 113: ... opération d autonettoyage Lorsque le four est refroidi aux températures normales de cuisson rôtissage Exemple AFFICHAGE Exemple AFFICHAGE heure du jour Exemple AFFICHAGE heure du jour START ENTER START TIME 0 3 0 Lorsque le programme d autonettoyage commence Utilisation du programme d autonettoyage Choisir une période de 3 à 4 heures pour un four modérément ou très sale Exemple AFFICHAGE heure du...

Page 114: ...e Le four est préréglé pour un programme d autonettoyage de 3 heures Cependant la durée du programme peut être modifiée en fonction de la quantité de souillures dans le four Il est possible de régler la durée de l autonettoyage entre 2 et 4 heures voir la section Réglage des commandes Le graphique ci contre illustre une opération normale d autonettoyage de 3 heures Noter que le chauffage cesse apr...

Page 115: ... On n enfonce pas le bouton avant de le tourner On a programmé une heure de mise en marche differé QUOI FAIRE Brancher l appareil dans un circuit actif avec voltage approprié Voir Instructions d installation Remplacer le fusible ou remettre de nouveau le disjoncteur en fonction Se référer à la section dans ce manuel décrivant la fonction que vous utilisez Attendre que l heure de mise en marche soi...

Page 116: ...s le plat QUOI FAIRE Ajuster la commande de température du four Voir la section réglage de la température du four Accroître la durée de cuisson ou de rôtissage Augmenter la température du four de 14 C 25 C Préchauffer le four à la température choisie avant d introduire les aliments lorsque le préchauffage est recommandé Choisir des ustensiles qui permettront d avoir 5 cm 2 po d air sur tous les cô...

Page 117: ...avec du papier d aluminium L affichage indique 88 88 F suivi par un chiffre qui paraît dans l affichage L afficheur indique CF Une panne d électricité est survenue Le four est au mode Repas complet par convection Régler de nouveau l horloge Voir page 21 Téléphoner pour le service Voir Demande d assistance ou de service à la page 62 63 Se référer à la section Préparation d un repas complet par conv...

Page 118: ...ar l usine dans votre région composer le numéro de téléphone de notre Centre d assistance aux consommateurs ou votre Centre de service autorisé le plus proche Téléphoner au Centre d assistance aux consommateurs KitchenAid sans frais d interurbain 1 800 422 1230 Nos consultants sont prêts à vous aider Lors de l appel Veuillez connaître la date d achat et le numéro de série et le numéro de modèle co...

Page 119: ...pouvez également consulter l annuaire téléphonique Pages jaunes pour identifier une compagnie de service autorisée KitchenAid dans votre région Si vous avez besoin de pièces de rechange Si vous avez besoin de commander des pièces de rechange nous vous recommandons d employer uniquement des pièces autorisées par le fabricant Ces pièces seront facilement installées et fonctionneront bien parce qu el...

Page 120: ...ques locaux D Tous les frais de main d oeuvre durant la période de garantie limitée E Pièces de rechange ou frais de main d oeuvre pour les appareils utilisés hors des États Unis et du Canada F Transport pour aller chercher et livrer l appareil Ce produit est conçu pour être réparé sur place G Réparations de la table de cuisson en vitrocéramique si elle n a pas fait l objet de l entretien recomman...

Reviews: