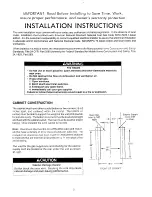
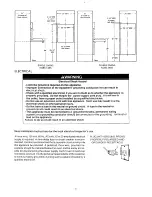
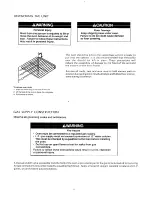
background image

Summary of Contents for KGBS 146S

Page 1: ... connections must be tested for gas leaks OPERATIONAL 7 1 If used on LP gas verify that pressure regulator and orifice hoods have been modified for use with LP gas 0 2 Oven racks installed and slide freely in all posttions 0 3 Knobs secured in place and rotate freely without rubbing on edge of control panel glass holes 0 4 Selector switch functions in all modes 0 5 All lights function properly 0 6...

Page 2: ... smell gas 1 Open windows 2 Don t touch electrical switches 3 Extinguish any open flame 4 Immediately call your gas supplier Failure to follow these instructions could result in a fire or explosion CABINET CONSTRUCTION The cabinet must have either a solid bottom or two runners l9 l 2 inches apart and centered within the cabinet The bottom or runners must be able to support the weight of the unit 2...

Page 3: ...neutral or ground circuit A fuse in the neutral or ground circuit could result in an electrical shock l This appliance must be connected to a grounded metallic permanent wiring system or a grounding conductor should be connected to the grounding terminal or lead on the appliance Failure to do so could result in an electrical shock Save Installation Instructions for the local electrical inspector s...

Page 4: ...instruc tlons during Installation To remove oven racks 1 Slide rack all the way to the back of the oven 2 Lift the back of the rack up above the rack guides 3 Pull forward to remove GAS SUPPLY CONSTRUCTION Observe all governing codes and ordinances Fire Hazard l Oven must be connected to a regulated gas supply l L P gas supply must not exceed a pressure of 12 water column This must be checked by a...

Page 5: ...oven has been placed into cabinet the bottom trim strip is placed on the lower edge of the front frame This is done by loosening the three screws at the bottom of the front frame Place gas valve extension rod through hole in trim strip and slide strip under screw heads until the top edge of trim meets the lower corners of the front frame see Illus Tighten screws to hold trim to front frame Make su...

Page 6: ...lator TO REMOVE CONTROL FRAME t v TYPICAL CONSOLE 1 Remove bezel nut from oven light switch by turning counterclockwrse 2 Remove all other knobs by pullrng straight forward 3 Remove front 3 Phillips screws under control frame and 2 Phillips screws on top portlon of control frame Be sure to hold control frame in place 4 Pull control frame forward To convert the regulator for LP gas remove the regul...

Page 7: ...til a concise blue cone has been obtained If the flames lift from the burner reduce the air opening in the shutter If the flames are yellow increase the air shutter opening DOOR ADJUSTMENT CHECK NEWSPAPER STRIPS TOP OF DOOR NEWSPAPER STRIPS SIDE OF DOOR NEFI K SIDE OF DOOR ADJUST IN OR OUT FOR I PROPER DOOF SEAL NEWSPAPER STRIPS v BOTTOM OF DOOR Place2 x 18 stripsofnewspaperin locarlons indicated ...

Page 8: ...TCH LIGHT ROTISSERIE L O MOTOR LIGHT U O IND LIGHT 12V RELAY BAN Ir BAKE IGNITOR BAKE VALVE BROIL IGNITOR BROIL VALVE FAN BLOWER MOTOR I IND LIGHT x3 LOWER OVEN L 0 IND LIGHT 3 2 BAKE IGNITOR BAKE VALVE 0 x x 0 x x CLOSED 0 OPEN WARNING DISCONNECT FROM ELECTRICAL SUPPLY BEFORE SERVICING UNIT 8 ...

Page 9: ...POWER ON OVEN IN IN WHT LIWT YEI MEAT PROBE JACK RED I YEL LK WHT 1r CAP SERVICE COi 3 S IWGL E OVEN HOOKUP KGBSl46SBLO ...

Page 10: ...N IN WH T WHT LIWT ELECTRONIC II BAKE VALVE W T J GUN 1 I BLU MECT PROBE JACK 16L U O BROIL ICNITOR CLK U G BAKE lGNlTCR EOUB i E OVEN HOCKUF KGbS233SBi0 DiSCCrddECT FROM ELECTRICAL SIJPFLY BEFORE SERVlCIr IG UNIT lO ...

Page 11: ...Part No 3177319 Rev C C 1989 KitchenAid Inc Prepared by KitchenAid St Joseph Michigan 49085 ll Printed in U S A ...

Reviews: